What is JavaScript
JavaScript was developed in 1995 by Netscape
JavaScript implementation
- The core: ECMAScript
- ECMMAScript implements all features described in ECMA-262
- ECMA-262 is ECMAScript edition 7
- The Document Object Model(DOM)
- The DOM is an API for XML that was extended for use in HTML
- The DOM maps out an entire page as a hierarchy of nodes
- Each part of an HTML or XML page is a type of node containing different kinds of data
- DOM Levels
- DOM level 1: DOM core (provides a way to map XML-based document to a hierarchy of nodes), DOM HTML (extends the DOM core)
- DOM level 2: introduces DOM views, DOM events, DOM style, DOM traversal and range
- DOM level 3: introduces DOM Load and Save, DOM Validation
- The Browser Object Model(BOM)
- BOM allows access and manipulation of the browser window
- Primarily, the BOM deals with the browser window and frames, but generally any browser-specific extension to JavaScript is considered to be a part of the BOM
- The core: ECMAScript
JavaScript in HTML
- The
<script>element- Attributes:
charset,crossorigin,src,type=text/javascript, ... - Two ways to use the
<script>element: embed JavaScript code directly into the page or include JavaScript from an external file - In XHTML, you can write like this:
<script src="example.js"/>, but in HTML, you should write likt this:<script src="example.js"> </script> - Tag placement
- Traditionally, all
<script>elements were placed within the<head>element on a page, the main purpose of this formant was to keep external file references, both CSS files and JavaScript files, in the same area. But this format requires all scripts are loaded before the page begins rendering - Modern web applications typically include all JavaScript references
in the
<body>element, after the page content - Deferred scripts: use
deferattribute,<script defer src="example.js"></script - Asynchronous scripts: use
asyncattribute,<script async src="example.js"></script
- Traditionally, all
- Dynamic script loading: use DOM to load scripts dynamically
1
2
3
4
5
let script = document.createElement('script');
script.src = 'example.js';
<!-- Some browser does not support the async attribute -->
script.async = false;
document.head.appendChild(script);
- Attributes:
- Inline code versus external files
- Generally it's a best practice to include as much JavaScript as possible using external files
- Reasons
- Maintainability: easier to have a directory for all JavaScript files
- Caching: browser cache all externally linked JavaScript files to improve performance
- Future proof: the syntax is the same in both HTML and XHTML
- Document modes
- Quirk mode: layout emulates nonstandard behavior in Navigator 4 and Internet Explorer 5, this is to support websites that were built before the widespread adoption of web standards
- Fully standards mode: the behavior is the one described by the HTML and CSS specifications
- Almost standards mode: has a lot of the features of standards mode but isn’t as strict
- The
<nonscript>element- Some early browser does not support JavaScript, the
<nonscript>element was created to provide alternate content to browsers without JavaScript <nonscript>element can contain any HTML elements that can be included in the document<body>, aside from<script>- Any content contained in a
<nonscript>element will be displayed when the browser does not support scripting or the browser's scripting support is turned off
- Some early browser does not support JavaScript, the
Language Basics
- Syntax
- Case-sensitivity: everything is case-sensitive
- Identifiers:
- Name format
- First character must be a letter, an underscore, or a dollar sign
- All other characters may be letters, underscores, dollar signs, or number
- Identifiers use camel case
- Keywords, reserved words, true, false and null cannot be used as identifiers
- Name format
- Comments
//single line comment/**/multi-line comment
- Strict mode
- ECMAScript 5 introduced the strict mode, the strict mode is a restricted variant of JavaScript, but is not just a subset: it intentionally has different semantics from normal code
- Use strict code for an entire script: add
"use strict";at the top of the script - Specify just a function to execute in strict mode:
1
2
3
4
function test() {
;
// function body
} - All modern browsers support strict mode
- Statements
- Statements are terminated by a semicolon
- A semicolon is not required, but you should always include one
- Multiple statements can be combined into a code block using curly braces
- Control statements require code blocks only when executing multiple statements, but it is considered a best practice to always use code blocks with control blocks
- Keywords and reserved words
- Keywords:
typeof,instanceof,yield,debugger, etc. - Reserved words:
- Always reserved:
enum - Reserved in strict mode:
implements,package,public,protected,private,let,static,interface - Reserved in module code:
await
- Always reserved:
- Keywords:
- Variables
- ECMAScript variables are loosely typed, meaning they can hold any type of data
varis available for all ECMAScript versions,constandletwere introduced in ECMAScript 6vardeclaration scope: thevaroperator defines a variable that is local to the function scope in which it is defined1
2
3
4
5
6
7
8
9
10
11
12function test1() {
var x = 1;
console.log(x); // 1
}
console.log(x); // ReferenceError: x is not defined
function test2() {
y = 1;
console.log(y); // 1
}
console.log(y);
// 1, y is seen as a global variable; in strict mode this line throws a ReferenceErrorvardeclaration hoisting: the interpreter pulls all variable declaration to the top of its scope1
2
3
4
5
6
7
8
9
10
11
12
13
14// The following two functions are equivalent
function test1() {
console.log(x); // undefined
// Redundant declaration is allowed for var
var x = 1;
var x = 2;
var x = 3;
}
function test2() {
var x;
console.log(x); // undefined
x = 1;
}letdeclarationletis block scoped rather than function scoped- Redundant declaration is not allowed for
let - There is not declaration hoisting for
let letdoes not create properties of the window object when declared globally
constdeclaration- Similar to
let, but it must be initialized with a value and the value cannot be redefined after declaration - Attempting to modify a
constvariable will result in a runtime error
- Similar to
- Declaration styles and best practice
- Don't use
var - Prefer
cosntoverlet
- Don't use
- Date types
- Six primitive data types in ECMAScript: Undefined, Null, Boolean, Number, String, and Symbol. One complex data type: Object (unordered list of name-value pairs)
- The
typeofoperator returns one of the following things: undefined, boolean, string, number, object, function (technically, functions are considered objects in ECMAScript), or symbol - The Undefined type
- Only one value:
undefined - When a variable is declared but not initialized, its value is
undefined
- Only one value:
- The Null type
- Only one value:
null undefinedis a derivative ofnull, sonull == undefinedis true
- Only one value:
- The Boolean type
- Only two values:
trueandfalse - Convert to boolean:
Boolean(value)
- Only two values:
- The Number type
- Octal lateral:
0ab - Hexadecimal lateral:
0xab - Floating-point values use approximations
- Infinity:
Infinity,-Infinity, useisFinite(value)to check for infinity NaN: not a number- Any mathematical operation involves
NaNresults inNaN NaN == NaNis false- Use
isNaN(value)to check for NaN
- Any mathematical operation involves
- Convert to number:
Number(value),parseInt(value),parseFloat(value)
- Octal lateral:
- The String type
- String can be delineated by double quotes, single quotes, or backticks
- Strings are immutable
- Length of string:
value.length - Convert to string
value.toString()- When the string is a number, you can pass the radix as the parameter
of
toString():value.toString(radix)(value.toString(2),value.toString(8),value.toString(16)) String(value)
- Template literals: template literals defined using
backtickscan span multiple lines - Interpolation: use
${variable}to insert the value of a variable into a template literal - Raw strings: use
String.raw(value)to get raw strings
- The Symbol type
- Symbol instances are unique and immutable
- The purpose of a symbol is to be a guaranteed unique identifier for object properties that does not risk property collision
- Use
Symbol(value)to create a symbol1
2
3
4
5
6
7let x1 = Symbol('x1');
let x2 = Symbol('x1');
console.log(x1 === x2); // false, because symbols are unique
console.log(x1.description); // x1
let num = new Number();
let sym = Symbol(); // You cannot use new keyword to create a symbol - Use the global symbol registry:
Symbol.for(string)to get a symbol if it exists or create a new one if it doesn't, it's an idempotent operation- Global symbols are not the same as local symbols
1
2
3let globalSymbol = Symbol.for('test');
let localSymbol = Symbol('test');
console.log(globalSymbol === localSymbol); // false - Use
Symbol.keyFor(string)to find the global string key for a global symbol1
2
3
4let globalSymbol = Symbol.for('test');
let localSymbol = Symbol('test');
console.log(Symbol.keyFor(globalSymbol)); // test
console.log(Symbol.keyFor(localSymbol)); // undefined - Anywhere you can use a string or number property, you can also use a
symbol
1
2
3
4
5let sym = Symbol('key');
let obj = {
[sym]: 'value'
};
console.log(obj[sym]); // value
- Global symbols are not the same as local symbols
- There are some built-int symbols in ECMAScript 6 that would be used
to expose internal language behavior for direct access, overriding, or
emulating
- Example:
Symbol.asyncIterator,Symbol.hasInstance,Symbol.isConcatSpreadable,Symbol.iterator,Symbol.match,Symbol.replace,Symbol.search,Symbol.species,Symbol.split,Symbol.toPrimitive,Symbol.toStringTag,Symbol.unscopables
- Example:
- The Object type
- If the constructor has no arguments, the parentheses are optional,
but it's recommended to use them:
let obj = new Object, this is correct, but not recommended - Properties and methods
constructor,hasOwnProperty(propertyName),isPrototypeOf(object),propertyIsEnumerable(propertyName),toLocaleString(),toString(),valueOf()
- If the constructor has no arguments, the parentheses are optional,
but it's recommended to use them:
- Operators
- Unary operators:
- Increment/decrement:
++,--, can be used on any values- For string, convert to number/NaN, and then increment/decrement
- For object, use
obj.valueOf()to get number/NaN, and then increment/decrement
- Plus/minus:
+,-- For string, convert to number/NaN, and then plus/minus
- For object, use
obj.valueOf()to get number/NaN, and then plus/minus
- Increment/decrement:
- Bitwise operators:
~,&,|,^,<<,>>(signed right shift),>>>(unsigned right shift) - Boolean operators:
!,&&,|| - Multiplicative operators:
*,/,% - Exponentiation operator:
** - Additive operators:
+,- - Relational operators:
<,<=,>,>=,instanceof,in- If both are numbers, perform numeric comparison
- If both are strings, compare the character codes of each character
- If one is number, convert the other to number, and the perform numeric comparison
- If an object, use
valueOf()to get numeric value, ifvalueOf()is not available, usetoString()to get string value, and then compare - If one is Boolean, convert it to a number and then compare
- Equality operators:
==,!=,===,!==- If one is a boolean, convert it to a number and then compare
- If one is a string, the other is a number, convert to string to number, and then compare
- If one is object, use
valueOf()to get numeric value, ifvalueOf()is not available, usetoString()to get string value, and then compare null == undefinedis trueNaN == xis false
- Conditional operator:
booleanExpression ? valueIfTrue : valueIfFalse - Assignment operators:
=,+=,-=,*=,/=,%=,<<=,>>=,>>>=,&=,^=,|= - Comma operator:
,let x = 1, y = 2;let x = (1, 2);, thenx = 2
- Unary operators:
- Statements
- The
ifstatement - The
do-whilestatement - The
whilestatement - The
forstatement: initialization, control expression, and postloop expression are all optional - The
for-instatement: used to enumerate the non-symbol keyed properties of an object - The
for-ofstatement: used to loop through elements in an iterable object - Labeled statements:
label: statement, can be used together withbreak,continue breakandcontinuestatementswithstatements: sets the scope of the code within a particular object1
2
3
4
5
6
7
8
9
10// The following two formats are equivalent
let eq = location.search.substring(1);
let hostName = location.hostname;
let url = location.href;
with(location) {
let eq = search.substring(1);
let hostName = hostName;
let url = href;
}- The
switchstatement1
2
3
4
5
6
7
8
9
10switch(expression) {
case value1:
statement;
break;
case value2:
statement;
break;
default:
statement;
}
- The
- Functions
- Basic syntax
1
2
3function functionName(arg0, arg1, ..., argN) {
statements;
} - Functions do not need to specify whether they return a value, any
function can return a value at any time by using the
returnstatement - Strict mode places several restrictions on functions
- No function can be named eval or arguments
- No named parameter can be named eval or arguments
- No two named parameters can have the same name
- Basic syntax
Variables, Scope, and Memory
- Primitive and reference values
- ECMAScript variables contain two different types of data: primitive values and reference values
- Primitive values are simple atomic pieces of data
- Reference values are objects that may be made up of multiple values
- JavaScript does not permit direct access of memory locations, so you actually work on a reference to the object that you manipulate
- Primitive values cannot have properties added to them even though attempting to do so won't cause an error
- Copying values
- When a primitive value is assigned from one variable to another, the value stored on the variable object is created and copied into the location for the new variable
- When a reference value is assigned from one variable to another, the value stored on the variable object is also copied into the location for the new variable
- Argument passing: all function arguments are passed by value
- Determining type
- If x is null or an object,
typeof xreturnsobject - Use
x instanceof Typeto check if the variable is an instance of the given reference type, e.g.person instanceof Object
- If x is null or an object,
- Execution context and scope
- The execution context of a variable or function defines what other dat it has access to, as well as how it should behave. Each execution context has an associated variable object upon which all of its defined variables and functions exist
- The global execution context is the outermost one. In web browsers,
the global context is that of the
windowobject - ECMAScript execution flow
- Each function call has its own execution context
- A context stack holds all function contexts
- When code is executed, a scope chain of variable objects is created, the scope provide ordered access to all variables and functions than an execution context has access to
- Each execution context has an associated variable object upon which all of its defined variables and functions exist
- Scope chain augmentation: in a
catchblock of atry-catchstatement, or in awithstatement, a temporary addition to the front of the scope chain appears - Identifier lookup
- Search starts at the front of the scope chain, if target is found in the local context, then done, otherwise continuing along the scope chain
- The process continues until the global context is done
- Garbage collection
- JavaScript is a garbage-collected language, it automatically allocates what is needed and reclaims memory that is no longer being used
- Idea: figure out which variables aren't going to be used and free the memory associated with them, run garbage collection periodically
- Two strategies have traditionally been used in browsers: mark-and-sweep, and reference counting
- Mark-and-sweep
- The most popular JavaScript garbage collection format
- Variables are flagged when they are in context
- GC procedure
- The garbage collector marks all variables stored in memory first
- The garbage collector then removes marks off variables that are in context or referenced by in-context variables
- All variables that are still marked are considered ready for deletion
- The garbage collector then does a memory sweep, destroying each of the marked values and reclaiming the memory associated with them
- Reference counting
- Idea: every value keeps track of how many references are made to it, when the reference count reaches zero, there is no way to reach that value and it is safe to reclaim the associated memory
- A problem with reference counting is that when there are circular references, the reference count will not be zero even when the objects are no longer reachable
- Performance
- GC runs periodically and can slow normal operations down if there are a large number of variable allocations in memory, so the timing of GC is important
- The best strategy is to organize your code in such a way that it allows garbage collection to do its job to the best of its ability whenever it is scheduled to run
- Managing memory
- Due to GC, developers typically don't have to worry about memory management
- Keeping in the amount of used memory to a minimum leads to better page performance
- The best way to optimize memory usage is to ensure that you only keep around data that is necessary for the execution of your code. When data is no longer necessary, it's best to set the value to null
- Use const and let declarations to boost performance
- Memory leaks
- One of the most common and easily fixed memory leak is accidentally declaring global variables
- Interval timers can also cause memory leaks
- JavaScript closures can also cause memory leaks
- Static allocation and object pools: use object pools to reduce GC and boost performance
Basic Reference Types
- Introduction
- A reference value/object is an instance of a specific reference type
- The
Datetype- The
Datetype stores dates as the number of milliseconds that have passed since midnight on January 1, 1970 UTC - Now:
let now = new Date(); - Use
Date.parse(string)to convert a string to milliseconds- String format:
month/date/year,month_name date, year,YYYY-MM-DDTHH:mm:ss:sssZ,day_of_week month_name date year HH:mm:ss time_zone - Example:
let date = new Date(Date.parse("06/02/2022)), this is equivalent tolet date new Date("06/02/2022")
- String format:
- Use
Date.UTC(YYYY, MM, DD, HH, mm, ss)to convert a string to milliseconds- MM is 0 indexed, so January is 0
- Example:
let date = new Date(Date.UTC(2022, 5, 2, 12, 0, 0)), this is equivalent tolet date new Date(2022, 5, 2, 12, 0, 0) - During implicit call,
Date.parse()creates GMT time,Date.UTC()creates local time
- Use
Date.now()to calculate time difference1
2
3
4let t1 = Date.now();
// do something
let t2 = Date.now();
console.log(t2 - t1); - Inherited methods:
toLocaleString()does not contain time zone,toString()contains time zone information,valueOf()returns the milliseconds - Date-formatting methods:
toDateString(),toTimeString(),toLocaleDateString(),toLocaleTimeString(),toUTCString() - Date/time component methods:
getTime()returns milliseconds,setTime(),getFullYear(),getMonth(),getDate(),getDay(),getHours(),getMinutes(),getSeconds(),getMilliseconds(),getTimezoneOffset(), ...
- The
RegExp- ECMAScript supports regular expression through the
RegExptype - Regular expression syntax:
let expr = /pattern/flags- flags:
g: find all matches instead the first one,i: case-insensitive mode,m: multiline mode, pattern ends after EOF,u: Unicode mode is enabled - You can also use
let expr = new RegExp(pattern, flags)to create regular expressions
- flags:
- Instance properties:
globalboolean,ignoreCaseboolean,unicodeboolean,multilineboolean,flagsstring - Instance methods
pattern.exec(target)- Returns an array of information about the first match, or null if no match is found
- The returned array has
indexandinputproperties to indicate the position of the match, and the input string - The first string in the array is the matched string
- If global flag is set, the
exec()method returns information about one match per iteration, when the global flag is not specified, callingexec()on the same string multiple times will always return information about the first match
pattern.test(target)- Returns true if the pattern matches the argument and false if it does not
- ECMAScript supports regular expression through the
- Primitive wrapper types
- Three special reference types are designed to ease interaction with
primitive values:
Boolean,Number, andString - Every time a primitive value is read, an object of the corresponding
primitive wrapper type is created, the wrapper object is destroyed when
it's done
1
2
3
4
5
6
7let s1 = "text";
let s2 = s1.substring(2);
// the above line creates a wrapper object from s1, call substring method on it, and destroys the wrapper object
let s1 = "text";
s1.color = "red";
console.log(s1.color); // undefined - Calling
typeofon an instance of a primitive wrapper type returnsobject, and all primitive wrapper objects convert to the Boolean valuetrue1
2
3
4
5let x = new String('');
console.log(x == false); // true
console.log(x && 1); // 1
console.log(typeof x); // object
console.log(x instanceof String); // true - The
Objectconstructor also acts as a factor method and is capable of returning an instance of a primitive wrapper based on the type of value passed into the constructor1
2let x = new Object('');
console.log(x instanceof String); // true - The
Booleantype- Instances of Boolean override the
valueOf()method and thetoString()method - Boolean objects are seldom used because they can be rather confusing
1
2
3
4let x = new Boolean(false);
console.log(x && true); // true
let y = false;
console.log(y && true); // false
- Instances of Boolean override the
- The
Numbertype- The
toString()method accepts a single argument indicating the radix in which to represent the number1
2
3
4
5let x = new Number(10);
console.log(x.toString(2)); // 1010
console.log(x.toString(8)); // 12
console.log(x.toString(10)); // 10
console.log(x.toString(16)); // a toFixed(n): returns a string representation of a number with a specified number of decimal pointstoExponential(): returns a string with the number of formatted in exponential notationtoPrecision(): returns either the fixed or the exponential representation of a number, depending on which makes the most sense- Some differences
1
2
3
4
5
6let x = new Number(10);
let y = 10;
console.log(typeof x); // object
console.log(typeof y); // number
console.log(x instanceof Number); // true
console.log(y instanceof Number); // false Number.isInteger(value): whether a number is stored as an intergerNumber.isSafeInteger(value): whether a number is stored as an interger and is within the range of a 32-bit signed integer, i.e.,
- The
- The
Stringtypes.length: return the length of a stringcharAt(index): returns the character at the specified indexs1.concat(s2): creates a new string by concatenating two strings, s1 and s2 remain the sames.slice(start, end),s.substring(start, end): returns a substring of a strings.substr(start, length): returns a substring of a strings.indexOf(str[, pos]): returns the index of the first occurrence of a substring in a string, starting from poss.lastIndexOf(str[, pos]): returns the index of the last occurrence of a substring in a string, starting from poss.startsWith(str),s.endsWith(str): returns true if the string starts or ends with the specified substrings.includes(str): returns true if the string contains the specified substrings.trim(),s.trimLeft(),s.trimRight(): returns a string with whitespace removeds.repeat(n): returns a string consisting of n copies of the strings.padStart(),s.padEnd(): returns a string with the specified padding- String destructuring:
1
2
3
4
5
6for (const c of "abc") {
console.log(c);
}
// a
// b
// c s.toLowerCase(),s.toUpperCase(): returns a string with all characters converted to lowercase or uppercases.match(pattern): equivalent topattern.exec(s)s1.localeCompare(s2): compares two strings in a locale-aware manner, returns 1, 0, or -1
- Three special reference types are designed to ease interaction with
primitive values:
- Singleton built-in objects
- The
Globalobject- It's the most unique in ECMAScript because it is not explicitly accessible
- The
Globalobject is the catchall for properties and methods that don't otherwise have an owning object - URL-encoding methods:
encodeURI(uri),encodeURIComponent(uri),decodeURI(uri),decodeURIComponent(uri) - Properties:
undefined,NaN,Infinity,Object, ... - The
windowobject: web browsers implement it in such that thewindowis theGlobalobject's delegate - Use
thisto get theGlobalobject:1
let global = () => {return this;}
- The
Mathobject- Properties:
Math.E,Math.PI,Math.LN10,Math.LN2,Math.LOG2E,Math.LOG10E,Math.SQRT1_2,Math.SQRT2 - Methods
min(x1, ..., xn),max(x1, ..., xn)ceil(),floor(),round(),fround()random(): useMath.floor(Math.random() * max + min)to get an integer range of- Others:
abs(x),exp(x),expm1(x)exp(x) - 1,log(x),log1p(x)log(x) + 1,pow(x, power), ...
- Properties:
- The
Collection Reference Types
- The
Objecttype- Two ways to create an instance of Object
- Use
newoperator1
2
3let obj = new Object();
obj.name = 'Superman';
obj.sex = 'Female'; - Use object lateral notation
1
2
3
4let obj = {
name: 'Superman',
sex: 'Female'
} - Property names can be string or number
- Accessing a property:
obj.property, orobj['property']
- Use
- Two ways to create an instance of Object
- Array
- ECMAScript arrays are ordered lists of data, but they can hold any type of data in each slot
- ECMAScript arrays are dynamically sized, automatically growing to accommodate any data that is added to them
- Creating arrays:
let arr = new Array(3);orlet arr = new Array('a', 'b', 'c');,let arr = ['a', 'b', 'c']; - Use
Array.from(iterable[, map_function])to create an array from an iterable object - Use
Array.of(x1, ..., xn)to create an array - Array holes
1
2
3
4let a1 = [,,,]; // [x0, x1, x2,], so length is 3
let a2 = [1,,,]; // [1, x0, x1,], so length is 3
let a3 = [,,,1]; // [x0, x1, x2, 1], so length is 4
let a4 = [1,,,2]; // [1, x0, x1, 2], so length is 4map()method skip array holes,join()method treats holes as empty strings
- Detect arrays
- Use
value instanceof Arrayto detect - Use
Array.isArray(value)to detect
- Use
- Iterator methods
arr.keys(),arr.values(),arr.entries()- Example
1
2
3
4
5
6
7
8
9
10
11
12
13let arr = ['a', 'b', 'c'];
for (let key of Array.from(arr.keys())) {
console.log(key);
}
// 0\n 1\n 2\n
for (let value of Array.from(arr.values())) {
console.log(value);
}
// a\n b\n c\n
for (let [key, value] of Array.from(arr.entries())) {
console.log(key + ': ' + value);
}
// 0: a\n 1: b\n 2: c\n - Copy and fill methods
arr.fill(value[, start[, end]]): fill the array with the specified value, start and end are optionalarr.copyWithin(target, start[, end]): copy the array to a new location, start and end are optional
- Conversion methods
toString()andvalueOf()methods return the same comma separated string or an array
- Stack methods
arr.push(value): add a new element to the end of the arrayarr.pop(): remove the last element of the array, this method returns the removed item
- Queue methods
arr.push(value): add a new element to the end of the arrayarr.shift(): remove the first element of the array, this method returns the removed itemarr.unshift(value): add a new element to the beginning of the arrayarr.pop(): remove the last element of the array, this method returns the removed item
- Reordering methods
arr.reverse(): reverse an array in place, this method returns the reversed arrayarr.sort(): sort an array in place, this method returns the sorted array- By default , the sort order is ascending, built-upon converting the items into strings and then comparing their sequences of UTF-16 code units values
- You can pass a compare function to
sortto specify the sort order, ifa < bthen a appears before b
- Manipulation methods
a1.concat(a2): return a new concatenated array, a1 and a2 remain the samearr.slice(start[, end]): return a new array arr[start: end], end is optional, both can be negativearr.splice(start, deleteCount[, item1[, item2[, ...]]])- One parameter: delete all items in the array starting from
start - Two parameters:
startanddeleteCount, deletedeleteCountitems starting fromstart - More than two parameters,
deleteCountis 0: insert the items into the array starting fromstart - More than two parameters,
deleteCountis positive: deletedeleteCountitems starting fromstart, then insert the items into the array starting fromstart
- One parameter: delete all items in the array starting from
- Search and location methods
indexOf(item),lastIndexOf(item),includes(item)- Predicate search
- Predicate:
(item, index, array) => boolean_function(item) arr.find(predicate): return the matched itemarr.findIndex(predicate): return the index of the matched item
- Predicate:
- Iterative methods
every(predicate): returns true if all items in the array satisfy the predicate, otherwise falsefilter(predicate): return a new array with all items that satisfy the predicateforEach((item, index, array) => {// do something}): execute a function for each item in the arraymap(predicate): return a new array with the result of the functionsome(predicate): returns true if any item in the array satisfies the predicate, otherwise false
- Reduction methods
arr.reduce((pre, cur, index, array) => {function(pre, cur)}, initialValue): reduce the array to a single value, initialValue is optional (if initialValue is not provided, pre = arr[0], cur = arr[1]), start from left to rightarr.reduceRight((pre, cur, index, array) => {function(pre, cur)}, initialValue): reduce the array to a single value, initialValue is optional (if initialValue is not provided, pre = arr[arr.length - 1], cur = arr[arr.length - 2]), start from right to left
- Typed arrays
- The typed array is a construct designed for efficiently passing binary data to native libraries. There is no actual typed array in JavaScript, the term refers to a collection of specialized arrays that contain numeric types
- Using ArrayBuffers
- ArrayBuffer is a normal JavaScript constructor that can be used to allocate a specific number of bytes in memory
const buf = new ArrayBuffer(n);: allocates n bytes of memory- ArrayBuffer cannot be resized once it is created, you can copy a
part to create a new one:
const buf = new ArrayBuffer(n).slice(start, end); - You can use views to read data from or write data into an ArrayBuffer
- DataViews: designed for file I/O and network I/O
- Typed arrays: another form of an ArrayBuffer view, it offers broader API and better performance
- The
Maptype- Prior to the ECMASCript 6, implementing a key/value store in JavaScript could be accomplished effectively and easily by using an Object. Newly added in the ECMAScript 6, Map is a new collection type that introduces true key/value behavior into the language
- Creating a new map
1
2
3
4const m1 = new Map();
// Pass an iterable of key/value pair arrays to the map constructor
const m2 = new Map([['k1', 'v1'], ['k2', 'v2']]);
console.log(m2.size); // 2 - Accessor and mutator
map.get(key): return the value associated with the keymap.set(key, value): set the value associated with the key, return the modified mapmap.has(key): return true if the map contains the key, otherwise falsemap.delete(key): delete the value associated with the keymap.clear(): delete all values
- Order and iteration
- One major departure from the
Objecttype’s conventions is thatMapinstances maintain the order of key/value insertion and allow you to perform iterative operations following insertion order - Iterator:
map.keys(),map.values(),map.entries()- You can use spread operator to convert a map to an array of
key/value pairs:
[...map]
- You can use spread operator to convert a map to an array of
key/value pairs:
- One major departure from the
- Choosing between object and map
- Memory profile: Results may vary by browser, but given a fixed
amount of memory, a
Mapwill be able to store roughly 50 percent more key/value pairs than anObject - Insertion performance: insertion into a
Mapwill generally be slightly faster across all browser engines - Lookup performance: when the amount of key/value pairs is small,
there isn't much difference between
ObjectandMap, but when the number of key/value pairs is large,Objectis faster - Delete performance: deleting properties from an
Objectis notorious, you should useMapinstead
- Memory profile: Results may vary by browser, but given a fixed
amount of memory, a
- The
WeakMaptype- Newly added in the ECMAScript 6,
WeakMapis a new collection type that introduces augmented key/value behavior into the language. The “weak” designation describes how JavaScript’s garbage collector treats keys in aWeakMap - Basic API
const wm = new WeakMap();: create a new weak map- Keys in a
WeakMapmust be objects, and values can be anything wm.has(key),wm.set(key, value),wm.get(key),wm.delete(key)
- Weak keys
- keys in a
WeakMapare weak, meaning that they are not counted as formal references that would otherwise prevent garbage collection - Values in a
WeakMapare not weak - Example
1
2
3
4
5
6let wm1 = new WeakMap();
wm1.set({}, 'value'); // after the line is done, the key/value pair is garbage collected
let wm2 = new WeakMap();
let container = {key: {}};
wm2.set(container.key, 'value'); // the key is not garbage collected because it is referenced by the container
- keys in a
- Non-iterable keys: because the key/value pairs can be garbage
collected at any time, so you cannot iterate over them (including
destroying the key/value pairs using the
clearmethod) - Utility
- Private variables: private variables will be stored in a
WeakMapwith the object instance as the key and a dictionary of private members as the value - DOM data metadata: because WeakMap instances do not interfere with garbage collection, they are a terrific tool for cleanup-free metadata association
- Private variables: private variables will be stored in a
- Newly added in the ECMAScript 6,
- The
SettypeSettype is added in the ECMAScript 6- Basic API
- Create a set:
const s = new Set(); - Create a set with an iterable:
const s = new Set(iterable); - Accessor and mutator:
set.add(value)this is idempotent,set.has(value),set.size,set.delete(value)returns boolean and is idempotent,set.clear()
- Create a set:
- A
Setcan contain any JavaScript data type as a value - Order and iteration
- Sets maintain the order of value insertion and allow you to perform iterative operations following insertion order
- You can iterate a set using the
set.values()method or theset[Symbol.iterator]()method1
2
3
4
5
6
7
8const arr = [1, 2, 3];
const s = new Set(arr);
for (let value of s.values()) {
console.log(value);
}
for(let value of s[Symbol.iterator]()) {
console.log(value);
} - The
set.entries()method returns an iterator that yields value/value pairs for each value in the set - You can use
set.forEach(callback)to iterate over the set
- The
WeakSettype- Basic API
- Create a
WeakSet:const we = new WeakSet(); - Create a
WeakSetwith an iterable:const we = new WeakSet(iterable); - Accessor and mutator:
set.add(value)this is idempotent,set.has(value),set.delete(value)
- Create a
- Weak keys
- Values in a WeakSet are “weakly held,” meaning they are not counted as formal references, which would otherwise prevent garbage collection
- Example
1
2
3
4
5
6let ws1 = new WeakSet();
ws1.add({});
let ws2 = new WeakSet();
let container = { val: {}};
ws2.add(container.val);
- Non-iterable keys: because the key/value pairs can be garbage
collected at any time, so you cannot iterate over them (including
destroying the key/value pairs using the
clearmethod)
- Basic API
- Iteration and spread operators
- Four native reference types define a default iterator:
Array, allTyped Array,Map,Set - Iterable types support ordered iteration and can be passed to a
for..ofloop - Iterable types are compatible with the spread operator, the spread operator is especially useful as it performs a shallow copy on the iterable object
- Four native reference types define a default iterator:
Iterators and generators
- Introduction to iteration
- Using index to iterate over an array is not the ideal iteration
approach:
- You need to have a specific knowledge of how to use the data structure
- The order of traversal is not inherent to the data structure
- The
Array.prototype.forEach()is not ideal
- Using index to iterate over an array is not the ideal iteration
approach:
- The iteration pattern
- The
iterator patterndescribes a solution in which something can be described as iterable and can implement a formaliterableinterface and be consumed by anIterator - An
iteratoris a separate object created on demand and intended for a single use. Each iterator is associated with an iterable, and the iterator exposes an API to iterate through the associated iterable a single time - The iterable protocol
- Implementing the
Iterableinterface requires both the capability to self-identify as supporting iteration and the capability to create an object that implements theIteratorinterface. In ECMAScript, this requires it must expose a property, the "default iterator", keyed with the specialSymbol.iteratorkey. - Many built-in types implement the
Iterableinterface:String,Array,Map,Set, theargumentsobject, some Dom collection types likeNodeList - You can use
object[Symbol.iterator]to check if an object is iterable - You do not need to explicitly invoke the factory function to produce
an iterator. Anything that implements the
Iterableinterface will automatically invoke the factor function to produce an iterator
- Implementing the
- The
Iteratorprotocol- An iterator is a single-use object that will iterate through whatever iterable it is associated with
- Use an
next()method to advance through the iterable, each time return anIteratorResultobject containing the next value in the iterator, the current position the iterator is at cannot be known without invoking thenext()method - The
next()method return an object with two properties:donetrue if there is no more values to iterate, andvaluewhich contains the next value in the iterable if done is false
- Custom iterator definition
- Any object that implements the
Iteratorinterface can be used as an iterator - Example
1
2
3
4
5
6
7
8
9
10
11
12
13
14
15
16
17class Counter {
constructor(limit) {
this.count = 1;
this.limit = limit;
}
next() {
if (this.count <= this.limit) {
return { value: this.count++, done: false };
} else {
return { value: undefined, done: true };
}
}
[Symbol.iterator]() {
return this;
}
}
- Any object that implements the
- Early termination of iterators: the optional
return()method allows for specifying behavior that will execute only if the iterator is closed prematurely1
2
3
4
5
6
7
8
9
10
11
12
13
14
15
16
17
18
19
20
21
22
23class Counter {
constructor(limit) {
this.limit = limit;
}
[Symbol.iterator]() {
let count = 1;
limit = this.limit;
return {
next() {
if (count <= limit) {
return { value: count++, done: false };
} else {
return { value: undefined, done: true };
}
},
return() {
console.log('Early termination');
return { value: undefined, done: true };
}
}
}
}
- The
- Generators
- Generators are a delightfully flexible construct introduced in the ECMAScript 6 specification that offers the ability to pause and resume code execution inside a single function block
- Basics API
- Syntax:
function* generatorName() { ... } - When invoked, generator functions produce a generator object,
generator objects begin in a state of suspended execution, and implement
the
Iteratorinterface and thus feature anext()method
- Syntax:
- Interrupting execution with
yield- The
yieldkeyword allows generators to stop and start execution, and it is what makes generators truly useful - Upon encountering the
yieldkeyword, execution will be halted and the scope state of the function will be preserved. Execution will only resume when thenext()method is invoked on the generator object1
2
3
4
5
6
7
8
9function* generatorFunction() {
yield 1;
yield 2;
}
let generator = generatorFunction();
console.log(generator.next()); // { value: 1, done: false }
console.log(generator.next()); // { value: 2, done: false }
console.log(generator.next()); // { value: undefined, done: true } - Using a generator object as an iterable
1
2
3
4
5
6
7
8
9
10function* generatorFunction() {
yield 1;
yield 2;
}
for (let x of generatorFunction()) {
console.log(x);
}
// 1
// 2 - Using yield for input and output
1
2
3
4
5
6
7
8
9
10
11
12function* range(start, end) {
while (end > start) {
yield start;
start += 1
}
}
for (let x of range(1, 3)) {
console.log(x);
}
// 1
// 2 - Yielding an iterable with
yield*1
2
3function* generatorFn() {
yield* [1, 2, 3];
} - Recursive algorithms using
yield*1
2
3
4
5
6
7
8
9
10
11
12
13function* nTimes(n) {
if (n > 0) {
yield* nTimes(n - 1);
yield n - 1;
}
}
for (const x of nTimes(3)) {
console.log(x);
}
// 0
// 1
// 2
- The
- Using a generator as the default iterator
- Because generator objects implement the
Iteratorinterface, and because both generator functions and the default iterator are invoked to produce an iterator, generators are exceptionally well suited to be used as default iterators
- Because generator objects implement the
- Early termination of generators
- A generator can use both the
next()method and thethrow()method to be terminated early
- A generator can use both the
Objects, Classes, and Objected-Oriented Programming
- Understanding objects
- Create a new custom object
1
2
3
4
5
6
7
8
9
10
11
12
13
14let obj1 = new Object();
obj1.name = "Obj1";
obj1.age = -1;
obj1.sayHello = function() {
console.log("Hi, I'm " + this.name);
}
let obj2 = {
name: "Obj2",
age: -2,
sayHello: function() {
console.log("Hi, I'm " + this.name);
}
} - Types of properties
- ECMA-262 describes characteristics of properties through the use of internal-only attributes
- Data properties
- Data properties contain a single location for a data value, values are read from and written to this location
Configurableattribute: boolean, whether the property may be redefined or deletedEnumerableattribute: boolean, whether the property will be returned in afor...inloopWritableattribute: boolean, whether the value of the property can be changedValueattribute: boolean, contains the actual data value for the property
- Accessor properties
- Accessor properties do not contain a data value, they contain a combination of a getter function and a setter function
Configurableattribute: boolean, whether the property may be redefined or deletedEnumerableattribute: boolean, whether the property will be returned in afor...inloopGetattribute: function, the function to call when the property is read fromSetattribute: function, the function to call when the property is written to
- Object identity and equality
NaN === NaNis false,isNaN(NaN)is true,Object.is(NaN, NaN)is true
- Enhanced object syntax
- Property value shorthand
1
2
3
4
5
6
7
8let name = "Obj1";
let obj = {
name
/*
When the property name and the value name are the same, you can omit the
value name, this is equivalent to name: name;
*/
}; - Concise method syntax
1
2
3
4
5
6
7
8
9
10
11let person = {
sayName: function(name) {
console.log(`Hi, I'm ${name}`);
}
};
let person = {
sayName(name) {
console.log(`Hi, I'm ${name}`);
}
}
- Property value shorthand
- Object destructuring
1
2
3
4
5
6
7
8
9
10let person = {
name: "John",
age: 30
};
let {name, age} = person;
console.log(name); // John
console.log(age); // 30
let {a, b='b'} = person;
console.log(a); // undefined, no corresponding property in person
console.log(b); // b, default value is provided
- Create a new custom object
- Object creation
- Although the
Objectconstructor or an object literal are convenient ways to create single objects, creating multiple objects with the same interface requires a lot of code duplication - In ECMAScript 6, formal support for classes and inheritance was introduced
- The factory pattern
- It is a well-known design pattern used in software engineering to abstract away the process of creating specific objects
- Example
1
2
3
4
5
6
7
8
9
10
11
12
13function createPerson(name, age, job) {
let obj = new Object();
obj.name = name;
obj.age = age;
obj.job = job;
obj.sayName = function() {
console.log(`Hi, I'm ${this.name}`);
};
return obj;
}
let obj1 = createPerson("John", 30, "Programmer");
let obj2 = createPerson("Jane", 25, "Designer");
- The function constructor pattern
- Constructors are used to create specific types of objects, there are native constructors, but it is also possible to define custom constructors
- Compared with the factory pattern, the function constructor pattern does no explicitly create an object and return it. Defining custom constructors also ensures that instances can be identified as a particular type of object
- Example
1
2
3
4
5
6
7
8
9
10
11function Person(name, age, job) {
this.name = name;
this.age = age;
this.job = job;
this.sayName = function() {
console.log(`Hi, I'm ${this.name}`);
};
}
let obj1 = new Person("John", 30, "Programmer");
let obj2 = new Person("Jane", 25, "Designer"); - Problems with constructors: methods are created once for each instance, which is unnecessary and inefficient
- The prototype pattern
- Each function is created with a prototype property, which is an object containing properties and methods that should be available to instances of a particular reference type
- The benefit of using the prototype is that all of its properties and methods are shared among object instances
- Example
1
2
3
4
5
6
7
8
9
10function Person() {}
Person.prototype.name = "John";
Person.prototype.age = 30;
Person.prototype.job = "Programmer";
let obj1 = new Person();
let obj2 = new Person();
console.log(obj1.name); // John
console.log(obj2.name); // John - Use
isPrototypeOfto check if an object is an instance of a prototype1
2
3
4
5
6
7
8
9
10
11function Person() {}
Person.prototype.name = "John";
let obj1 = new Person();
console.log(Person.prototype.isPrototypeOf(obj1)); // true
console.log(Object.getPrototypeOf(obj1) === Person.prototype); // true
/*
You can manually set the prototype of an object, but this will likely cause
severe slowdowns when used
*/
console.log(Object.setPrototypeOf(obj1, Person.prototype)); - Understanding the prototype hierarchy
- Property searching by name: search the instance first, then the prototype
- The property of an instance will shadow the property of the
prototype with the same name
1
2
3
4
5
6
7
8
9
10
11function Person() {}
Person.prototype.name = "John";
let obj1 = new Person();
console.log(obj1.name); // John
console.log(obj1.hasOwnProperty("name")); // false
console.log("name" in obj1); // true
obj1.name = "Jane";
console.log(obj1.name); // Jane
console.log(obj1.hasOwnProperty("name")); // true
- Property enumeration order
- The
for..inloop andObject.keysdo not have a deterministic order of enumeration, these are determined by the JavaScript engine and may vary by browser Object.getOwnPropertyNames(),Object.getOwnPropertySymbols(),Object.assign()do have a deterministic enumeration order. Number keys will first be enumerated in ascending order, then string and symbol keys enumerated in insertion order
- The
- Object iteration
- The
Object.values()andObject.entries()methods return an array of values or entries, respectively - Alternate prototype syntax
1
2
3
4
5
6function Person() {}
Person.prototype = {
name: "John",
age: 30,
job: "Programmer"
} - Dynamic nature of prototype
- Because the process of looking up values on a prototype is a search, changes made to the prototype at any point are immediately reflected on instances, even the instances that existed before the change was made
- Example
1
2
3
4function Person() {}
let obj1 = new Person();
Person.prototype.name = "John";
console.log(obj1.name); // John
- Problems with prototypes
- Prototype pattern negates the ability to pass initialization arguments into the constructor, meaning all instances get the same property values by default
- All properties on the prototype are shared among instances, but
reference value can cause problems
1
2
3
4
5
6
7
8
9
10function Person() {}
Person.prototype = {
name: "John",
friends: ["Jane", "Bob"]
}
let obj1 = new Person();
let obj2 = new Person();
obj1.friends.push("Mary");
console.log(obj2.friends); // ["Jane", "Bob", "Mary"]
- The
- Although the
- Inheritance
- There are two types of inheritance, interface inheritance, where only the method signatures are inherited, and implementation inheritance, where actual methods are inherited
- Implementation inheritance is the only type of inheritance supported by ECMAScript
- ECMA-262 describes prototype chaining as the primary method for inheritance in ECMAScript. The idea is to use the concept of prototype to inherit properties and methods between two reference types
- Each constructor has a prototype object that points back to the constructor, and instances have an internal pointer to the prototype. If the prototype were actually an instance of another type, the prototype itself would have a pointer to a different prototype that, in turn, would have a pointer to another constructor
- Example
1
2
3
4
5
6
7
8
9
10
11
12
13
14
15
16
17
18
19
20function SuperType() {
this.property = true;
}
SuperType.prototype.getSuperValue = function() {
return this.property;
};
function SubType() {
this.subProperty = false;
}
SubType.prototype = new SuperType();
SubType.prototype.getSubValue = function() {
return this.subProperty;
};
let instance = new SubType();
console.log(instance.getSuperValue()); // true - Constructor stealing
- Constructor stealing (also called object masquerading or classical inheritance) is the technique that calling the supertype constructor from within the subtype constructor
- The
apply()andcall()methods can be used to execute a constructor on the newly created object - Example
1
2
3
4
5
6
7
8
9
10
11
12
13
14
15
16
17function SuperType(name) {
this.colors = ["red", "blue", "green"];
this.name = name;
}
function SubType(name) {
SuperType.call(this, name);
}
let obj1 = new SubType("Tom");
obj1.colors.push("black");
console.log(obj1.colors); // ["red", "blue", "green", "black"]
console.log(obj1.name); // Tom
let obj2 = new SubType("Nicholas");
console.log(obj2.colors); // ["red", "blue", "green"]
console.log(obj2.name); // Nicholas
- Combination inheritance
- Combination inheritance combines prototype chaining and constructor stealing to get the best of each approach
- The idea is to use prototype chaining to inherit properties and methods on the prototype and to use constructor stealing to inherit instance properties
- Other inheritance: prototypal inheritance, parasitic inheritance, parasitic combination inheritance
- Classes
- The ability to formally define classes using the
classkeyword was introduced in ECMAScript 6, although classes still use prototype and constructor concepts under the hood - Class definition basics
- Class declaration:
class Person {} - Class expression:
const Person = class {} - Class composition
- Components: constructor method, instance methods, getters, setters and static class methods
- None of the components are required, an empty class definition is valid syntax
- By default, everything inside a class definition executes in strict mode
- Class declaration:
- The class constructor
- The
constructorkeyword is used inside the class definition block so signal the definition of the class's constructor function - A constructor is not required
- Example
1
2
3
4
5class Person {
constructor(name) {
this.name = name;
}
} - There is no formal class type in the ECMAScript specification, and in may ways ECMAScript classes behave like special functions
- The
- Instance, prototype, and class members
- Each instance is assigned unique member objects, meaning nothing is shared on the prototype
- Everything defined in the class body is defined on the class prototype object
- For static methods, there is one copy in each class
1
2
3
4
5
6
7
8
9
10
11
12
13
14
15class Person {
constructor(name) {
this.name = name;
this.locate = () => console.log("instance");
}
locate = () => console.log("prototype");
static locate = () => console.log("class");
}
let obj1 = new Person("John");
obj1.locate(); // instance
Person.locate(); // class
Person.prototype.locate(); // prototype
- Inheritance
- Inheritance basics
- Inherit from class
1
2
3
4class Person {}
class Engineer extends Person {}
let engineer = new Engineer();
console.log(engineer instanceof Person); // true - Inherit from function constructor
1
2
3
4function Person() {}
class Engineer extends Person {}
let engineer = new Engineer();
console.log(engineer instanceof Person); // true
- Inherit from class
super()superis used inside the constructor to control when to invoke the parent class constructorsupercan also be used inside static methods to invoke static methods defined on the inherited classsupercannot be referenced by itself
- Abstract base classes
- ECMAScript does not explicitly support defining abstract classes
- You need to use
new.targetto prevent instantiating abstract class objects1
2
3
4
5
6
7class Person {
constructor() {
if (new.target === Person) {
throw new Error("Cannot instantiate abstract class");
}
}
}
- Inheritance basics
- The ability to formally define classes using the
Proxies and Reflect
- Proxy foundation
- Introduced in ECMAScript 6, proxies and reflection are new constructs that afford you the ability to intercept and shim additional behavior into fundamental operations within the language
- A proxy behaves as an abstraction for a target object, the target can either be manipulated directly or through the proxy
- Creating a passthrough proxy
- By default, all operations performed on a proxy object will be propagated through to the target object
- A proxy is created using the
Proxyconstructor, you need to provide both a target object and a handler object, without which aTypeErroris thrown
- Example
1
2
3
4
5
6
7
8
9
10let target = {
id: 'target'
};
const handler = {};
const proxy = new Proxy(target, handler);
console.log(proxy.id); // target
console.log(target.id); // target - Defining traps
- The primary purpose of a proxy is to allow you to define traps, which behaves as fundamental operations interceptors inside the handler object
- Each handler is made up to a certain amount ot traps, and each trap corresponds to a fundamental operation that can be directly or indirectly called on the proxy
- Example
1
2
3
4
5
6
7
8
9
10
11
12
13
14const target = {
foo: 'bar'
}
const handler = {
// traps are keyed by method name inside the handler object
get() {
return 'handler override';
}
}
const proxy = new Proxy(target, handler);
console.log(proxy.foo); // handler override
console.log(target.foo); // bar
- Trap parameters and the reflect API
- All traps have access to parameters that will allow you to fully recreate the original behavior of the trapped method
- Example
1
2
3
4
5
6
7
8
9
10
11
12
13
14
15
16
17
18
19const target = {
msg1: "hello",
msg2: "everyone"
};
const handler = {
get(target, property, receiver) {
if (property === "msg1") {
return "hello world";
}
return Reflect.get(...arguments);
}
};
const proxy = new Proxy(target, handler);
console.log(target.msg1); // hello
console.log(proxy.msg1); // hello world
console.log(target.msg2); // everyone
console.log(proxy.msg2); // everyone - Every method that can be trapped inside a handler object has a
corresponding Reflect API method, this method has identical name and
function signature, and performs the exact behavior that the trapped
method is intercepting
1
2
3
4
5
6
7
8
9
10
11
12
13
14const target = {};
// Approach 1
const handler = {
get() {
return Reflect.get(...arguments);
}
};
const proxy = new Proxy(target, handler);
// Approach 2
const handler = {
get: Reflect.get
};
const proxy = new Proxy(target, handler);
- Trap invariants
- Traps are not without restriction, each trapped method is aware of the target object context and trap function signature, and the behavior of the trap handler function must obey the trap invariants
- Trap invariants vary by method, but in general they will prevent the trap definition from exhibiting any grossly unexpected behavior
- Utility of the Reflect API
- Reflect API vs. Object API
- The Reflect API is not limited to trap handler
- Most Reflect API methods have an analogue on the Object type
- Status flags: many Reflect methods return a Boolean, indicating if the operation they intend to perform will be successful or not
- Reflect API vs. Object API
- Proxying a Proxy
- Proxies are capable of intercepting Reflect API operations, and this means that it is entirely possible to create a proxy of a proxy, this allows you to build multiple layers of indirection on top of a singular target object
- Example
1
2
3
4
5
6
7
8
9
10
11
12
13
14
15
16
17
18
19
20
21
22const target = {
foo: 'bar'
};
const firstProxy = new Proxy(target, {
get() {
console.log('first proxy');
return Reflect.get(...arguments);
}
});
const secondProxy = new Proxy(firstProxy, {
get() {
console.log('second proxy');
return Reflect.get(...arguments);
}
});
console.log(secondProxy.foo);
// second proxy
// first proxy
// bar
- Proxy considerations and shortcomings
- One potential source of trouble with proxies is the value of
this - Some built-in types are not compatible with proxies
- One potential source of trouble with proxies is the value of
- Proxy types and Reflect methods
- Proxies are able to trap thirteen fundamental operations, each has its own entry in the Reflect API, parameters, associated ECMAScript operations, and invariants
- Different JavaScript operations may invoke the same trap handler, but for any single operation that is performed on a proxy object, only one trap handler will ever be called, there is no overlap of trap coverage
get()- The
get()trap is called inside operations that retrieve a property value, its corresponding Reflect API method isReflect.get() get(target, property, receiver), return value is unrestricted
- The
set()- The
set()trap is called inside operations that assign a property value, its corresponding Reflect method isReflect.set() set(target, property, value, receiver), return boolean value
- The
has()- The
has()trap is called inside the in operator, its corresponding Reflect API method isReflect.has() has(target, property), return boolean value
- The
defineProperty()- The
defineProperty()trap is called inside theObject.defineProperty()method, its corresponding Reflect API method isReflect.defineProperty() defineProperty(target, property, descriptor), return boolean value
- The
getOwnPropertyDescriptor()- The
getOwnPropertyDescriptor()trap is called inside theObject.getOwnPropertyDescriptor()method, its corresponding Reflect API method isReflect.getOwnPropertyDescriptor() getOwnPropertyDescriptor(target, property), return an object, or undefined if the property does not exist
- The
deleteProperty()- The
deleteProperty()trap is called inside thedeleteoperator, its corresponding Reflect API method isReflect.deleteProperty() deleteProperty(target, property), return a boolean value
- The
ownKeys()- The
ownKeys()trap is called insideObject.keys()and similar methods, its corresponding Reflect API method isReflect.ownKeys() ownKeys(target), return an enumerable object that contains either strings or symbols
- The
getPrototypeOf()- The
getPrototypeOf()trap is called inside theObject.getPrototypeOf()method, its corresponding Reflect API method isReflect.getPrototypeOf() getPrototypeOf(target), return an object or null
- The
setPrototypeOf()- The
setPrototypeOf()trap is called inside theObject.setPrototypeOf()method, its corresponding Reflect API method isReflect.setPrototypeOf() setPrototypeOf(target, prototype), return a boolean value
- The
isExtensible()- The
isExtensible()trap is called inside theObject.isExtensible()method, its corresponding Reflect API method isReflect.isExtensible() isExtensible(target), return a boolean value
- The
preventExtensions()- The
preventExtensions()trap is called inside theObject.preventExtensions()method, its corresponding Reflect API method isReflect.preventExtensions() preventExtensions(target), return a boolean value
- The
apply()- The
apply()trap is called on function calls, its corresponding Reflect API method isReflect.apply() apply(target, thisArg, ...argumentsList), the return value is unrestricted
- The
construct()- The
construct()trap is called on thenewoperator, its corresponding Reflect API method isReflect.construct()
construct(target, argumentsList), the return value is unrestricted
- The
- Proxy patterns
- Tracking property access
- Hidden properties
- Property validation
- Function and constructor parameter validation
- Data binding and observables
Functions
- Introduction
- Each function is an instance of the
Functiontype that has properties and methods just like other reference types - There is no semicolon after the end of the function definition, but there is a semicolon after the end of function declaration
- You can use the function keyword or the arrow function syntax to define a function
- Each function is an instance of the
- Arrow functions
- For the most part, arrow functions instantiate function objects that behave in the same manner as their formal function expression counterparts, anywhere a function expression can be used, an arrow function can also be used
- Arrow functions are useful in inline situations
- Arrow functions do not require the parentheses if you only want to use a single parameter, if you want to have zero parameters, or more than one parameter, parentheses are required
- Arrow functions also do no require curly braces
- Arrow functions do not allow the use of arguments, super, or new.target, and cannot be used as a constructor, functions objects created with the arrow syntax do not have a prototype defined
- Function names
- Function names are simply pointers to functions, so it is possible to have multiple names for a single function
- All function objects in ECMAScript 6 expose a read-only name
property that describes the function. If a function is unnamed, the name
property returns an empty string, if a function is created using the
function constructor, the name property returns anonymous
1
2
3
4
5
6
7
8
9
10
11
12
13function mySum(a, b) {
return a + b;
}
let anotherSum = mySum;
console.log(mySum(1, 2)); // 3
console.log(anotherSum(1, 2)); // 3
let testFunc = () => {};
console.log(mySum.name); // mySum
console.log(testFunc.name); // (empty string here)
console.log((new Function()),name); // anonymous
console.log(anotherSum.name); // mySum
- Understanding arguments
- An ECMAScript function does not care how many arguments are passed in, nor does it care about the data types of those arguments
- Arguments in ECMAScript are represented as an array internally, the function does not care what is in the array
- Named arguments are a convenience, not a necessity
1
2
3
4
5
6
7
8// The following functions are equivalent
function sayHi1(name, msg) {
console.log(`Hello ${name}, ${msg}`);
}
function sayHi2() {
console.log(`Hello ${arguments[0]}, ${arguments[1]}`);
} - The amount of arguments:
arguments.length - Arguments in arrow functions
- When a function is defined using the arrow notation, the arguments
passed to the function cannot be accessed using the
argumentskeyword; they can only be accessed using their named token in the function definition
- When a function is defined using the arrow notation, the arguments
passed to the function cannot be accessed using the
- No overloading
- ECMAScript functions cannot be overloaded in the traditional sense, they don't have signatures
- If two functions are defined to have the same name, it is the last function that becomes the owner of that name
- Default parameters
- You can define default values for arguments
- Temporal dead zone: the default parameter values are initialized in
the order in which they are listed in the list of parameters
1
2
3
4
5
6
7
8
9// This one works
function makeKing(name = 'Henry' numerals = name) {
return `King ${name} ${numerals}`;
}
// This one does not work
function makeKing(numerals = name, name = 'Henry') {
return `King ${name} ${numerals}`;
}
- Spread arguments and rest parameters
- Use the spread operator to expand the elements of an array into a
list of arguments
1
2
3
4
5
6
7
8
9
10function add() {
let sum = 0;
for (let i = 0; i < arguments.length; i++) {
sum += arguments[i];
}
return sum;
}
const arr = [1, 2, 3];
console.log(add(-1, ...arr)); // 5 - Rest parameter
1
2
3
4
5
6function add(...values) {
return values.reduce((a, b) => a + b, 0);
}
const arr = [1, 2, 3];
console.log(add(-1, ...arr)); // 5
- Use the spread operator to expand the elements of an array into a
list of arguments
- Function declarations versus function expressions
- Function declarations are read and available in an execution context
before any code is executed, whereas function expressions aren't
complete until the execution reaches that line of code
1
2
3
4
5
6
7
8
9
10
11// This works
console.log(add1(10, 10)); // 20
function add1(a, b) {
return a + b;
}
// This doesn't work
console.log(add2(10, 10)); // Uncaught ReferenceError: add2 is not defined
let add2 = function(a, b) {
return a + b;
}
- Function declarations are read and available in an execution context
before any code is executed, whereas function expressions aren't
complete until the execution reaches that line of code
- Functions as values
- Because function names are variables, functions can be used anywhere
variables can be used, this means it is possible not only to pass a
function into another function as an argument, but also to return a
function as the result of another function
1
2
3
4
5
6
7
8
9
10
11
12
13function comparePropertyFunc(name) {
return function(obj1, obj2) {
let val1 = obj1[name];
let val2 = obj2[name];
if (val1 < val2) {
return -1;
} else if (val1 > val2) {
return 1;
} else {
return 0;
}
};
}
- Because function names are variables, functions can be used anywhere
variables can be used, this means it is possible not only to pass a
function into another function as an argument, but also to return a
function as the result of another function
- Function internals
arguments: theargumentsobject has a property namedcallee, which is a pointer to the function that owns theargumentsobject1
2
3
4
5
6
7
8function fact(n) {
if (n <= 1) {
return 0;
}
// This recursive call is tightly coupled with the function name
return n * fact(n - 1);
// This is the equivalent one: return n * arguments.callee(n - 1);
}
this:thisbehaves differently when used inside a standard function and an arrow function- Inside a standard function, it is a reference to the context object
that the function is operating on, often called the
this value - Inside an arrow function, it references the context in which the arrow function expression is defined
- Inside a standard function, it is a reference to the context object
that the function is operating on, often called the
caller- The
callerproperty contains a reference to the function that called this function or null if the function was called from the global scope - When function code executes in strict mode,
arguments.calleeandarguments.callerresult in an error - In strict mode, you also cannot assign a value fo the caller property of a function, otherwise an error is called
- The
- Function properties and methods
- Each function has two properties:
lengthandprototype- The
lengthindicates the number of named arguments that the function expects - The
prototypeproperty is the actual location of all instance methods for reference types, meaning methods actual exist on the prototype and are then accessed from the object instances
- The
- Each function has two methods:
callandapply- Both methods call the function with a specific this value, effectively setting the value of this object inside the function body
apply()accepts two arguments: the value of this inside the function and an array of argumentscall(): the first arguments is the this value, but arguments are passed directly into the function1
2
3
4
5
6
7
8
9
10
11
12function add(a, b) {
return a + b;
}
function callSum1 (val1, val2) {
// Alternative way: return add.apply(this, arguments);
return add.apply(this, [val1, val2]);
}
function callSum2(val1, val2) {
return add.call(this, val1, val2);
}
- Each function has two properties:
- Function expressions
- The created function in an function expression is considered to be anonymous function/lambda function
- Function expressions must be assigned before usage
- Recursion
- A recursive function typically is formed when a function calls itself by name
- The ECMAScript 6 introduced a memory management optimization that allows the JavaScript engine to reuse stack frames with tail calls, where the return value of an outer function is the returned value of an inner function
- Requirements for tail call
- The code is executing in strict mode
- The return value of the outer function is the invoked tail call function
- There is no further execution required after the tail call function returns
- The tail call function is not a closure that refers to variables in the outer function's scope
- Closures
- Closures are functions that have access to variables from another function's scope, this is often accomplished by creating a function inside a function
- In general, when a variable is accessed inside a function, the scope chain is searched for a variable with the given name, once the function has completed, the local activation object is destroyed, leaving only the global scope in memory
- In closures, the outer function adds the inner function to its own scope, and the inner function can access the outer function's variables even after the inner function has completed
- There may be memory leaks with closures
- Private variables
- Strictly speaking, JavaScript has no concept of private members, all object properties are public
- Any variable defined inside a function or block is considered private because it is accessible outside that function
- A privileged method is a public method that has access to private
variables and/or private functions
- Privileged methods can be created inside a constructor
- Privileged methods can also be created by using a private scope to define the private variables or functions
Promises and Async Functions
- Asynchronous programming
- Synchronous behavior is analogous to sequential processor instructions in memory, each instruction is executed strictly in the order in which it appears. At each step in this program, it is possible to reason about the state of the program because execution will not proceed until the previous instruction is completed
- Asynchronous behavior is analogous to interrupts, where an entity external to the current process is able to trigger code execution, asynchronous operation is often required because it is infeasible to force the process to wait a long time for an operation to complete
- Legacy asynchronous programming patterns
- In early versions of JavaScript, an asynchronous operation only supported definition of a callback function to indicate that the asynchronous operation had completed
- Serializing asynchronous behavior was a common problem, usually solved by a codebase full of nested callback functions, colloquially referred to as callback hell
- An example
1
2
3
4
5
6
7
8
9
10
11
12
13
14
15
16
17function double(value, success, failure) {
setTimeout(() => {
try {
if (typeof value !== 'number') {
throw 'Must provide number as first argument!';
}
success(value * 2);
} catch (err) {
failure(err);
}
}, 1000);
}
const successCallback = (value) => console.log(`Success: ${value}`);
const failureCallback = (err) => console.log(`Failure: ${err}`);
double(3, successCallback, failureCallback); // Success: 6
double('3', successCallback, failureCallback); // Failure: Must provide number as first argument!
- Promises
- Promises are used to describe a programming tool for synchronizing program execution
- ECMAScript 6 uses the Promises/A+ Promise Specification to define how promises were implemented. ECMAScript 6 introduced a first-class implementation of a Promise/A+-compliant Promise type
- Promise basics
- Create a promise with
newkeyword:let p = new Promise(executor) - The promise state machine
- A promise is a stateful object that can exist in one of three states: pending, fulfilled (resolved), or rejected
- The pending state is the initial state a promise begins in
- The pending state can become settled by irreversibly transitioning to either the fulfilled state or the rejected state
- It is not guaranteed that a promise will leave the pending state
- The state of a promise is private and cannot be directly inspected in JavaScript
- Utilities of promises
- Promise can be used to represent a block of asynchronous execution, the pending state indicates that the execution has not yet begun, the fulfilled state indicates the execution is successful, the rejected state indicates the execution failed
- Promise can be used to generate a value, the fulfilled state contains a private internal value, the rejected state contains the reason for rejection
- Controlling promise state with the executor
- The state of a promise can only be manipulated internally using the executor function
- Two methods are involved:
resolve()andreject() - An example
1
2
3
4
5
6
7
8
9
10let p1 = new Promise((resolve, reject) => {
setTimeout(() => {
resolve('Success!');
}, 1000);
});
let p2 = new Promise((resolve, reject) => {
setTimeout(() => {
reject('Failure!');
}, 1000);
}); - Resolve:
let p = new Promise((resolve, reject) => { resolve('Success!'); }), or equivalently,let p = Promise.resolve('Success!') - Reject:
let p = new Promise((resolve, reject) => { reject('Failure!'); }), or equivalently,let p = Promise.reject('Failure!')
- Create a promise with
- Promise methods
- Implementing the Thenable interface
- Any asynchronous constructs expose a
then()method, which implements theThenableinterface
- Any asynchronous constructs expose a
Promise.prototype.then()- Then
then()method accepts up to two arguments, an optionalonResolvedhandler function, and an optionalOnRejectedhandler function - The
onResolvedhandler function is called when the promise is fulfilled, and theOnRejectedhandler function is called when the promise is rejected - An example
1
2
3
4
5
6
7
8
9
10
11
12
13
14
15
16
17let p1 = new Promise((resolve, reject) => {
setTimeout(() => {
resolve('Success!');
}, 1000);
});
p1.then((value) => {
console.log(value); // Success!
});
let p2 = new Promise((resolve, reject) => {
setTimeout(() => {
reject('Failure!');
}, 1000);
});
p2.then((value) => {
console.log(value); // Failure!
});
- Then
Promise.prototype.catch()- The
catch()method can be used to attach only a reject handler to a promise, it only takes a single argument, theonRejectedhandler function - The
catch(onRejected)is equivalent tothen(null, onRejected)
- The
Promise.prototype.finally()- The
finally()method can be used to attach anonFinallyhandler function, which executes when the promise reaches either a fulfilled or rejected state - Since the
finallydoes not know the state of the promise, it is designed to be used for things like cleanup, logging, and other tasks that need to be performed regardless of the state of the promise
- The
- Each promise instance methods return a new promise, so promises can be chained
Promise.all(): this static method creates an all-or-nothing promise that resolves only once every promise in a collection of promises resolves, a new promise is returnedPromise.race(): this static method creates a promise that will mirror whichever promise inside a collection of promises reaches a resolved or rejected state first, a new promise is returned
- Implementing the Thenable interface
- Async functions
- Async functions, also referred to by the operative keyword pair
async/await, are the application of the ES6 Promise paradigm to ECMAScript functions - Async function basics
- The
asynckeyword- An async function can be declared by prepending the
asynckeyword, this keyword can be used on function declarations, function expressions, arrow functions and methods - Using the
asynckeyword will create a function that exhibits some asynchronous characteristics but overall is still synchronously evaluated - In an async function, whatever value is returned with the return
keyword will be converted into a promise object with
Promise.resolve(). An async function will always return a promise object - The return value of an async function anticipates, but does not require a thenable object
- Throwing an error value instead return a rejected promise
- An async function can be declared by prepending the
- The
awaitkeyword- An async function indicates to code invoking it that there is no exception of timely completion, the logical extension of this behavior is the ability to pause and resume execution
- The
awaitkeyword is used to pause execution while waiting for a promise to resolve - It can be used standalone or inside an expression
- The
awaitkeyword anticipates, but does not actually require, a thenable object - The
awaitkeyword can only be used inside an async function, otherwise a SyntaxError is thrown
- Halting and resuming execution
- Example 1
1
2
3
4
5
6
7
8
9
10async function foo() {
console.log(2);
await null;
console.log(4);
}
console.log(1);
foo();
console.log(3);
// 1 2 3 4 - Example 2
1
2
3
4
5
6
7
8
9
10
11
12
13
14
15
16
17
18async function foo() {
console.log(2);
console.log(await Promise.resolve(8));
console.log(9);
}
async function bar() {
console.log(4);
console.log(await 6);
console.log(7);
}
console.log(1);
foo();
console.log(3);
bar();
console.log(5);
// 1 2 3 4 5 6 7 8 9
- Example 1
- Strategies for async function
- Implementing sleep
1
2
3
4
5async function sleep(delay) {
return new Promise((resolve) => {
setTimeout(resolve, delay);
});
} - Serial promise execution
1
2
3
4
5
6
7
8
9
10
11
12
13
14function addTwo(x) return x + 2;
function addThree(x) return x + 3;
function addFive(x) return x + 5;
async function addTen(x) {
for (const fn of [addTwo, addThree, addFive]) {
x = await fn(x);
}
return x;
}
addTen(1).then((value) => {
console.log(value); // 11
});
- Implementing sleep
- The
- Async functions, also referred to by the operative keyword pair
The Browser Object Model
- The
windowobject- Although ECMAScript describes it as the cores of JavaScript, the BOM is really the core of using JavaScript on the web. The BOM provides objects the expose browser functionality independent of any web page content
- At the core of the BOM is the window object, which represents an instance of the browser
- Two purposes of window object in browsers:
- Act as the JavaScript interface to the browser window
- Act as the ECMAScript global object
- The global scope
- All variables and functions declared globally with var become
properties and methods of the window object, if they are defined using
let or const, they are not global
1
2
3
4
5
6
7var age = 20;
let name = 'Susan';
const sayAge = () => alert(this.age);
alert(window.age); // 20
alert(window.name); // undefined
alert(window.sayAge); // TypeError: window.sayAge is not a function
- All variables and functions declared globally with var become
properties and methods of the window object, if they are defined using
let or const, they are not global
- Window relationships
- Introduction
- The
topobject always points to the very top window, which is the browser window itself - The
parentobject always points to the current window's immediate parent window. For the topmost window, parent is equal to top, and both equal to window - The topmost window will never have a value set for name unless the
window was opened using
window.open()
- The
- Window position and pixel ratio
- Modern browsers all provide
screenLeftandscreenTopproperties that indicate the window's location in relation to the left and top of the screen, respectively, in CSS pixels - It's also possible to move the window using the
window.moveTo(x, y)andwindow.moveBy(dx, dy)methods - Pixel ratio
- A CSS pixel is the denomination of the pixel used universally in web
development, it is defined as an angular measurement: 0.0213
- A CSS pixel (px) is not the same as a physical resolution of a device (device pixel, pt)
- Device pixel ratio = device resolution / CSS pixel. If the device has a physical resolution of 1920x1080, and we want to convert it to 640x360, then the device pixel ratio is 3
- A CSS pixel is the denomination of the pixel used universally in web
development, it is defined as an angular measurement: 0.0213
- Modern browsers all provide
- Window size
- All modern browsers provide four properties to determine the window
size:
innerWidth,innerHeight,outerWidth, andouterHeight. TheouterWidthandouterHeightreturn the dimensions of the browser window itself, theinnerWidthandinnerHeightindicate the size of the page viewport inside the browser window (minus borders and toolbars) - The
document.documentElement.clientWidthanddocument.documentElement.clientHeightproperties return the size of the page viewport, for mobile browsers, usedocument.body.clientWidthanddocument.body.clientHeight - The browser window can be resides using the
window.resizeTo(width, height)andresizeBy(dw, dh)methods
- All modern browsers provide four properties to determine the window
size:
- Window viewport position
- Because the browser window is usually not large enough to display the entire rendered document at once, the user is give the ability to scroll around the document with a limited viewport
- The X and Y offsets are each accessible bia two properties, which
return identical values:
window.pageXoffset/window.scrollX, andwindow.pageYoffset/window.scrollY - You can also use the
window.scroll(x, y),window.scrollTo(x, y), andwindow.scrollBy(dx, dy)methods to move the viewport
- Navigating and opening windows
window.open(stringUR, stringName, stringFeatures, booleanReplace)- stringURL: the URL to load
- stringName: the name of the new window
- stringFeatures: comma-separated list of features to enable
- booleanReplace: if true, the current window is replaced, otherwise a new window is opened
window.open()return a window object, this object can be used to manipulate the newly opened window in the same way as any other windowwindow.close(): close the current window, return a boolean indicating whether the window was closed- Security restrictions: pop-up windows went through a period of
overuse by online ads, so browsers nowadays put limits on teh
configuration of pop-up windows. Browsers will allow the creation of
pop-up windows only after a user action, a call to
window.open()while a page is still being loaded will not be executed and may cause an error to be displayed to the user - Pop-up blocks: all modern browsers have pop-up blocking software
built in
- If a pop-up window is blocked by the built-in blocker, then
window.open()returns null - When a browser add-on or other program blocks a pop-up,
window.open()typically throws an error - Detection
1
2
3
4
5
6
7
8
9
10
11
12
13let blocked = false;
try {
let win = window.open(url, name, features, replace);
if (win == null) {
blocked = true;
}
} catch (ex) {
blocked = true;
}
if (blocked) {
alert('Pop-ups are blocked');
}
- If a pop-up window is blocked by the built-in blocker, then
- Intervals and timeouts
- JavaScript execution in a browser is single-threaded, but does allow for the scheduling of code to run at specific points in time through the use of timeouts and intervals
- Timeouts execute some code after a specified amount of time, whereas intervals execute code repeatedly, waiting a specific amount of time in between each execution
window.setTimeout(callback, milliseconds)window.clearTimeout(timeoutId): cancel a pending timeout operation, the timeoutId is an unique number returned from the setTimeout methodwindow.setInterval(callback, milliseconds)window.clearInterval(intervalId): cancel a pending interval operation, the intervalId is an unique number returned from the setInterval method1
2
3
4
5
6
7
8
9
10
11
12let num = 0;
let intervalId = null;
let max = 10;
const callback = () => {
console.log(num);
num++;
if (num >= max) {
clearInterval(intervalId);
}
};
intervalId = setInterval(callback, 1000);
- System dialogs
- The browser is capable of invoking system dialogs to display to the
user through the
alert(),confirm(), andprompt()methods - The system dialogs are not related to the web page being displayed in the browser and do not contain HTML, the appearance is determined by operating system and/or browser settings rather than CSS, and each of the dialogs is synchronous
- The
alert()method- Accept a string to display to the user, if the argument of alert is not a string, it will be converted to a string first
- It contains a single OK button
- Alert dialogs are typically used when users must be made aware of something that they have no control over, such as an error, the user's only choice is to dismiss the dialog after reading the message
- The
confirm()method- It looks similar to an alert dialog in that it displays a message to the user, the main difference is that the confirm dialog contains a Cancel button along with the OK button, which allows the user to indicate if a given action should be taken
- The
confirm()method returns a boolean value: true if OK was clicked, or false if Cancel was clicked1
2
3
4
5if (confirm('Are you sure?')) {
alert("I'm so glad you're sure!");
} else {
alert("I'm sorry to hear you're not sure!");
}
- The
prompt()method- The prompt dialog prompts the user for input: along with the Cancel and OK button, it has a text box where the user may enter some data
window.prompt(stringMessage, stringDefault)- If the OK button is clicked,
prompt()returns the value in teh text box, if Cancel is clicked or the dialog is otherwise closed without clicking OK,prompt()returns null
- The system dialogs can be helpful for displaying information to the user and asking for confirmation of decisions, because they require not HTML or CSS, they are fast and easy ways to enhance a web application
- The browser is capable of invoking system dialogs to display to the
user through the
- Introduction
- The
locationobject- One of the most useful BOM object is location, which provides information about the document that is currently loaded in the window, as well as general navigation functionality
- Both
window.locationanddocument.locationpoint to the same object - Some properties of the location object:
location.host(name of server + port number if present),location.hostname(name of server),location.port(port number),location.protocol(the protocol used by the page, typically http or https),location.username(the username specified before the domain name),location.password(the password specified before the domain name),location.origin(the origin of the URL, read only),location.search(the query string of the URL, returns a striong beginning with a question mark) - Convert query string to an object
1
2
3
4
5
6
7
8
9
10
11
12
13let getParams = () => {
let queryString = location.search.length > 0 ? location.search.substring(1) : '';
let params = {};
for (let item of queryString.split("&").map((x) => x.split("="))) {
// query-string arguments are supposed to be encoded
let key = decodeURIComponent(item[0]);
let value = decodeURIComponent(item[1]);
if (key.length) {
params[key] = value;
}
}
return params;
} - Manipulating the location
location.assign(URL): navigate to the new URL and makes an entry in the browser's history stack. Iflocation.href=URLorwindow.location=URLis used, thelocation.assign()method is called automatically- Changing various properties on the location object can also modify the currently loaded page
- Generally, when the URL is changed, an entry is made in the
browser's history stack so the user may click the Back button to
navigate to the previous page. It is possible to disallow this behavior
by using the
replace()method
- The
navigatorobject- The navigator object is the standard browser identification on the client, each browser supports its own set of properties
- Properties:
navigator.appCodeName(return Mozilla),navigator.appName(return browser full name),navigator.appVersion,navigator.deviceMemory(the amount of device memory in GB),navigator.hardwareConcurrency(device's number of processor cores),navigator.language(browser primary language),navigator.languages(all browser's preferred languages),navigator.platform(system platform) - Detecting plug-ins
1
2
3
4
5
6
7
8
9
10
11let hasPlugin = (name) => {
name = name.toLowerCase();
for (let item of navigator.plugins) {
if (item.name.toLowerCase().indexOf(name) > -1) {
return true;
}
}
return false;
}
alert(hasPlugin("Flash")); - Registering handlers
1
navigator.registerProtocolHandler("URL", name);
- The
screenobject- The screen object (also a property of window) is one of the few object JavaScript objects that have little to no programming use, it is used purely as an indication of client capabilities
- Property:
screen.height,screen.width,screen.left(the pixel distance of the current screen's left side),screen.top(the pixel distance of the current screen's top),screen.orientation,screen.colorDepth(the number of bits used to represent colors)
- The
historyobject- The history object represents the user's navigation history since the given window was first used
- Because history is a property of window, each browser object has its own history object relating specifically to that instance
- The
history.go(n)navigates through the user's history iun either direction, backward or forward, if n < 0, then navigates backward, you can also usehistory.back(n),history.forward(n) - You can also use
history.go(URL)to go the nearest URL page history.lengthreturns the amount of items in the history stack
Client Detection
- Introduction
- Although browser vendors have made a concerted effort to implement common interfaces, the face remains that each browser presents its own capabilities and flaws
- Developers need to either design for the lowest common denominator or, more commonly, use various methods of client detection to work with or around limitations
- Client detection should be the very last step in solving a problem, whenever a more common solution is available, that solution should be used
- Capability detection
- Capability detection (feature detection) uses a suite of simple checks in the browser's JavaScript runtime to test for support of various features
- You should verify not just the feature is present but also that the feature is likely to behave an appropriate manner
- User-agent detection
- User-agent detection uses the browser's user-agent string to determine information about the browser being used
- The user-agent string is sent as a response header for every HTTP
request and is made accessible in JavaScript through
navigator.userAgent - Mozilla is an abbreviation for Mosaic Killer
- Spoofing a user-agent
- User-agent is an imperfect browser identification solution, because it is easy to spoof a user-agent string
- Browsers that implement the
window.navigatoroffer the user-agent string as a read-only property, so you cannot modify it directly - If browsers offer the pesudo-private
__defineGetter__method, then spoofing a user-agent is easy1
2window.navigator.__defineGetter("userAgent", () => "random");
console.log(window.navigator.userAgent); // random
- You can infer many of the following information from the user-agent: browser, browser version, browser rendering engine, device class(desktop/mobile), device manufacture, device model, operating system, operating system version
- Software and hardware detection
- Browser and operating system identification
navigator.oscpu: this is deprecated, Edge and Chrome does not have this propertynavigator.vendor: return a string of the browser vendornavigator.platform: return a string indicating the operating system inside which the browser is executingscreen.colorDepth/screen.pixelDepth: return the number of color bits that can be represented in the displayscreen.orientation: return aScreenOrientationobject, which contains information about the browser's screen according to the Screen Orientation API
- Browser Metadata
navigator.geolocationproperty provides access to the GeoLocation API, wich allows browser scripts to learn about the current device's location1
2
3
4
5
6
7
8let p;
// The following line requires user permission
navigator.geolocation.getCurrentPosition((pos) => p = pos);
console.log(p.timestamp);
console.log(typeof p.coords); // object
console.log(p.coords.latitude, p.coords.longitude); // get the latitude and the longitude
console.log(p.coords.altitude); // the altitude of the device, this can be null
console.log(p.coords.speed); // the speed of the device, this can be null- The
navigator.geolocation.getCurrentPosition(callback1, callback2)can be rejected, so the first argument is the handler for position object, the second argument is the handler for PositionError object, usee.code/e.messageto get information about the PositionError - The browser tracks the network connection state and exposes this
information in two ways: connection events, and the
navigator.onLineboolean property - The
navigator.connectionproperty exposes teh NetworkInformation API - Battery status API: the
navigator.getBattery()returns a promises that resolves to aBatteryManagerobject1
2
3
4
5
6
7
8navigator.getBattery().then(
(bat) => {
console.log(bat.charing); // boolean
console.log(chargingTime); // number
console.log(dischargingTime); // number
console.log(level); // number
}
)
- Hardware
- Processor cores:
navigator.hardwareConcurrency - Device memory:
navigator.deviceMemory - Maximum touch points:
navigator.maxTouchPoints
- Processor cores:
- Browser and operating system identification
The Document Object Model
- Introduction
- The Document Object Model (DOM) is an application programming interface for HTML and XML documents
- The DOM represents a document as a hierarchical tree of nodes, allowing for adding, removing and modifying individual parts of the page
- Hierarchy of nodes
- A document node represents every document as the root
- In HTML, the only child of the document node is the
<html>element, which is called the document element. There can be only one document element per document. In HTML, the document element is always the element, in XML, any element may be the document element - The node type
- DOM Level 1 describes an interface called Node that is to be implemented by all node types in the DOM, the Node interface is implemented in JavaScript as the Node type
- There are 12 node types in total:
Node.ELEMENT_NODE(1),Node.ATTRIBUTE_NODE(2),Node.TEXT_NODE(3),Node.CDATA_SECTION_NODE(4),Node.ENTITY_REFERENCE_NODE(5),Node.ENTITY_NODE(6),Node.PROCESSING_INSTRUCTION_NODE(7),Node.COMMENT_NODE(8),Node.DOCUMENT_NODE(9),Node.DOCUMENT_TYPE_NODE(10),Node.DOCUMENT_FRAGMENT_NODE(11),Node.NOTATION_NODE(12) - Get the type of a node:
node.nodeType, this returns the node type as a number - The
node.nodeNameand thenode.nodeValueproperties return the node name and value respectively - Node relationships:
node.childNodesreturn the child nodes of the node, each node has this propertynode.childNodes.item(1)is equivalent tonode.childNodes[1]node.firstChildis equivalent tonode.childNodes[0]node.lastChildis equivalent tonode.childNodes[node.childNodes.length - 1]
- Manipulating nodes
node.appendNode(newNode): append a node to the end of the child nodes of the nodenode.insertBefore(newNode, referenceNode): insert a node before the reference node,node.insertBefore(newNode, null)is equivalent tonode.appendChild(newNode),node.insertBefore(newNode, node.firstChild)inserts the node before the first child of the nodenode.replaceChild(newNode, oldNode): replace the old node with the new nodenode.removeChild(oldNode): remove the old nodenode.cloneNode(booleanFlag): clone the node, if flag is true, it is deep copy, otherwise it is shallow copy
- The
Documenttype- The document object is an instance of HTMLDocument (which inherits from Document)
node.nodeType = 9,node.nodeName = #document,node.value = null- The child of a Document node can be a
DocumentType,Element,ProcessingInstruction,Comment - HTML example
let html = document.documentElement;let head = document.head;let body = document.body;let doctype = document.doctype;let title = document.title;,document.title = "new title";let domain = document.domain;let referrer = document.referrer;
- Locating elements
let item = document.getElementById("itemId");let items = document.getElementsByTagName("tagName");: return a HTMLCollection object that acts like a list of elementslet items = document.getElementByTagName("tagName"); let item = item.namedItem("itemName"): get an element from a HTMLCollection by its name propertylet allItems = document.getElementByTagName("*");: get all elementslet radios = document.getElementsByName("tagName");: get all elements with the same name, often used with radio buttons
- Document writing
document.write(string): write a string tag to the documentdocument.writeln(string): write a string tag to the document and add a new line
- The
Elementtypenode.nodeType = 1,node.nodeName = #element,node.value = nullnode.nodeName === node.tagName: the tag name of the element, return tag name in uppercase in HTML, the same as it is in XML1
2
3
4// this is the general check for the tag name
if (element.tagName.toLowerCase() === "xxx") {
// do something
}- HTML elements
- Properties:
id,className(the class property, because class is a keyword in ECMAScript, you cannot use class directly),title(additional information about the element),lang(code language),dir(direction of the language, "ltf" : left-to-right, "rtl": right-to-left, rarely used)1
<div id="item" class="item" title="item title" lang="en" dir="ltr"><>
1
2
3
4
5
6let item = document.getElementById("item");
console.log(item.id); // item
console.log(item.className); // item
console.log(item.title); // item title
console.log(item.lang); // en
console.log(item.dir); // ltr
- Properties:
- Getting attributes
- Each element may have zero or more attributes, which are typically
used to give extra information about the particular element or its
contents, three primary DOM methods for working with attributes are
getAttribute(attrName),setAttribute(attrName, value),removeAttribute(attrName) item.setAttribute("attrName", "value")is equivalent toitem.attrName = "value"
- Each element may have zero or more attributes, which are typically
used to give extra information about the particular element or its
contents, three primary DOM methods for working with attributes are
- The attributes property
- The Element type is the only DOM node type that uses the
attributesproperty, the attributes property is a NamedNodeMap object, which is a list of attributes, each attribute is an Attr node - use
item.attributes.getNamedItem(attrName)to get the value of an attributes, useitem.attributes.removeNamedItem(attrName)to remove an attributes
- The Element type is the only DOM node type that uses the
- Create elements: use
document.createElement(tagName)to create an element
- The
Texttypenode.nodeType = 3,node.nodeName = #text,node.value = textContent, child nodes are not supported- The text contained in a Text node may be accessed via either the
nodeValueproperty or thedataproperty, both of which contain the same value - Creating text nodes: use
document.createTextNode(text)to create a text node1
2
3
4let textNode = document.createTextNode("text");
let node = document.createElement("div");
node.appendChild(textNode);
document.body.appendChild(node); - Normalizing text nodes
- Typically, elements have only one text node as a child, sibling text nodes can be confusing
- Use
node.normalize()to merge adjacent text nodes, the caller node should be the parent node of the text nodes that are to be merged
- Splitting text nodes
- The
textNode.splitText(offset)method splits one text node into two at the given offset
- The
- The
Commenttypenode.nodeType = 8,node.nodeName = #comment,node.value = textContent, child nodes are not supported- The Comment type inherits from the same base as the Text type, so it
has all of the same string manipulation methods except
splitText(), the actual content of the comment may be retrieved using eithernodeValueor thedataproperty
- The
CDATASectiontypenode.nodeType = 4,node.nodeName = #cdata-section,node.value = textContent, child nodes are not supported- CDATA sections are specific to XML-based documents and are represented by the CDATASection type
- The CDATA section type inherits from the same base as the Text type,
so it has all of the same string manipulation methods except
splitText(), the actual content of the CDATA section may be retrieved using eithernodeValueor thedataproperty
- The
DocumentTypetypenode.nodeType = 10,node.nodeName = #document-type,node.value = null- A DocumentType object contains about the document's doctype
- DocumentType objects cannot be created dynamically in DOM level 1,they are created only as teh document's code is being parsed
- The
DocumentFragmenttypenode.nodeType = 11,node.nodeName = #document-fragment,node.value = null- Of all the node types, the DocumentFragment type is the only one that has no representation in markup. DOM defines a document fragment as a lightweight document, capable of containing and manipulating nodes without all of the additional overhead of a complete document
- A document fragment cannot be added to a document directly. Document
fragments are created using the
document.createDocumentFragment()method - Default fragments inherit all methods from Node and are typically used to perform DOM manipulations that are to be applied to a document
- The
Attrtypenode.nodeType = 11,node.nodeName = attribute name,node.value = attribute value- Element attributes are represented by the Attr type in the DOM, the Attr type constructor and prototype are accessible in all browsers
- Even though they are nodes, attributes are not considered part of the DOM document tree
- There are three properties on an Attr object:
namethe attribute name ,valuethe attribute value,specifieda boolean value indicating if the attribute was specified in code or if it is a default value - Creating new attributes:
document.createAttribute(attrName)
- Working with the DOM
- Dynamic scripts
- The
<script>element is used to insert JavaScript code into the page, either by using thesrcattribute to include an external file or by including text inside the element itself - Dynamic scripts are those that don't exist when teh page is loaded but are included later by using the DOM
- Dynamic loading an external file example
1
<script src="script.js"></script>
1
2
3let script = document.createElement("script");
script.src = "script.js";
document.body.appendChild(script); //' This is when the script.js is downloaded
- The
- Dynamic styles
- CSS styles are included in HTML pages using one of two elements: the
<link>element is used to include CSS from an external file, the<style>element is used to specify inline styles - Dynamic styles don't exist on the page when it is loaded initially, they are added after the page has been loaded
- Dynamic loading an external CSS file example
1
<link rel="stylesheet" type="text/css" href="style.css">
1
2
3
4
5
6let link = document.createElement("link");
link.rel = "stylesheet";
link.type = "text/css";
link.href = "style.css";
let head = document.getElementsByTagName("head")[0];
head.appendChild(link);
- CSS styles are included in HTML pages using one of two elements: the
- Manipulating tables
- Using the core DOM methods to create and change tables can require a large amount of code
- Example
1
2
3
4
5
6
7
8
9
10
11
12<table border="1" width="100%">
<thead>
<tr>
<th>Title</th>
</tr>
</thead>
<tbody>
<tr>
<td>content</td>
</tr>
</tbody>
</table>1
2
3
4
5
6
7
8
9
10
11
12
13
14
15
16
17
18let table = document.createElement("table");
table.border = "1";
table.width = "100%";
let thead = document.createElement("thead");
table.appendChild(thead);
let thr = document.createElement("tr");
thead.appendChild(thr);
let th = document.createElement("th");
thr.appendChild(th);
th.appendChild(document.createTextNode("Title"));
let tbody = document.createElement("tbody");
table.appendChild(tbody);
let tbr = document.createElement("tr");
tbody.appendChild(tbr);
let td = document.createElement("td");
tbr.appendChild(td);
td.appendChild(document.createTextNode("content"));
document.body.appendChild(table);
- Dynamic scripts
DOM Extensions
- Selectors API
- Background
- The DOM API is frequently augmented, in 2008 the W3C adopted some of the DOM extensions into formal specifications
- The two primary standards specifying DOM extensions are the Selectors API and HTML5
- Introduction
- One of the most popular capabilities of JavaScript libraries is the ability to retrieve a number of DOM elements matching a pattern specified using CSS selectors
- The selectors API was started by the W3C to specify native support for CSS queries in browsers
- At the core of Selectors API level 1 are two methods:
querySelector()andquerySelectorAll(), these methods are available on the Document type and on the Element type - The Selectors API level 2 specifications introduces more methods:
matches(),find(),findAll()on the Element type
- The
querySelector()method- This method accepts a CSS query and returns the first descendant element that matches the pattern or null if there is no matching element
- Example query strings:
tag,#id,.class, etc - When the method is used on the Document type, it starts trying to match the pattern from the document element; when used on an Element type, the query attempts to make a match from the descendants of the element only
- The
querySelectorAll()method- This method accepts a CSS query and returns a NodeList object regardless of the number of matching elements, if there are not matches, the NodeList is empty
- Can work on Document, DocumentFragment and Element
- The
matches()method- This method accepts a single argument, a CSS selector, and returns true if the given element matches the selector or false if not
- All major browsers support some form of matches()
- Background
- HTML5
- All HTML specifications before HTML5 were short of any JavaScript interfaces, all JavaScripts were binding to the DOM specification. The HTML5 specification contains a large amount of JavaScript APIs designed for use with the markup additions, part of these APIs overlap with the DOM and define DOM extensions that browsers should provide
- Class-related additions
- The
getElementByClassName()method- This method can be called on the Document object and on all HTML elements
- Accepts a single string containing one or more class names, returns a NodeList containing all elements that have all of the the specified classes applied, if multiple class names are specified, the order is unimportant
- The
classListproperty- This property is used to add, remove, and replace class names
- The classList property is an instance of a collection named
DOMTokenList, it has the following methods:add(value),contains(value)returns boolean,remove(value),toggle(value)remove if present, add if not present1
<div id="myDiv" class="bd user disabled">content</div>
1
2let div = document.getElementById("myDiv");
div.classList.
- The
- Focus management
document.activeElementcontains a pointer to the DOM element that currently has focus, an element can receive focus automatically as the page is loading, via user input, or programmatically using thefocus()method- When the document is first loaded,
document.activeElementis set todocument.body - When the document is being loaded,
document.activeElementis null
- When the document is first loaded,
document.hasFocus()returns true if the document has focus or false if not
- Changes to HTMLDocument
- The
readyStateproperty- Used to indicate whether the document has been loaded
- The property has two values:
loading,complete
- The
compatModeproperty- Used on the document object to indicate which rendering mode the browser is in
- When a browser is in standards mode,
document.compatMode = CSS1Compat, when a browser is in quirks mode,document.compatMode = BackCompat
- The
headproperty:document.headpoints to the<head>element of a document
- The
- Character set properties
- The
document.characterSetproperty indicates the actual character being used by the document and can also be used to specify a new character set and can also be used to specify a new character set - The default value is
UTF-16
- The
- Custom data attributes
- HTML allows elements to be specified with nonstandard attributes
prefixed with
data-in order to provide information that isn't necessary to the rendering or semantic value of the element - Example:
<div id="myDiv" data-infoId="myDivInfo" data-nyName="divExp">Content</div> - The customized data attributes can be accessed via the
datasetproperty of the element, example:div.dataset.infoId
- HTML allows elements to be specified with nonstandard attributes
prefixed with
- Markup insertion
- The
innerHTMLproperty- When used in read mode, innerHTML returns the HTML representing all of the child nodes, including elements, comment,s and text nodes. When used in write mode, innerHTML completely replaces all of the childe node in the element with a new DOM subtree based on the given HTML string input
- In modern browsers,
<script>elements cannot be executed in innerHTML, the<style>elements causes similar problems with innerHTML - The
outerHTMLproperty- When outerHTML is called in read mode, it returns the HTML of the element on which it is called, as well as its child nodes. When called in write mode, outerHTML replaces the node on which it is called with the DOM subtree created from parsing the given HTML string
insertAdjacentHTML(pos, text)andinsertAdjacentText(pos, text), the position can be one of the following:beforebegin: insert just before the element as a previous siblingafterbegin: insert inside the element as a new child or series of children before the first childbeforeend: insert inside the element as a new child or series of children after the last childafterend: insert just after the element as a next sibling
- The
scrollIntoView()method- The method exists on all HTML elements and scrolls the browser window or container element so the element is visible in the viewport
- Variations:
element.scrollIntoView(),element.scrollIntoView(alignToTop),element.scrollIntoView(scrollIntoViewOptions)- boolean alignToTop: if true, the element is scrolled to the top of the viewport, otherwise the bottom
- object options: with property
behavior,block,inline
- The
- Proprietary extension
- The
childrenproperty: returns an HTMLCollection that contains only an element's child nodes that are also elements - The
containsmethod: check if two nodes have parental relationship - Markup insertion
- The
innerTextproperty- When used to read the value, innerText concatenates the values of all text nodes in the subtree in DFS order
- When used to write the value, removes all children of the element and inserts a text node containing the given value
- The
outerTextproperty- For reading text values, outerText and innerText essentially behave in the same way, in writing mode, outerText replaces the entire element, including child nodes
- The
- Scrolling
- Scrolling specification didn't exist prior to HTML5
- Apart from
scrollIntoView(), you can usescrollIntoViewIfNeeded()
- The
DOM Levels 2 and 3
- Introduction
- DOM levels 2 and 3 consist of several modules
- DOM Core: builds on level 1 core, adding methods and properties to nodes
- DOM Views: defined different views for a document based on stylistic information
- DOM Events: defines how to tie interactivity to DOM documents using events
- DOM Style: defines how to programmatically access and changes CSS styling information
- DOM Traversal and Range: introduces new interfaces for traversing a DOM document and selecting specific parts of it
- DOM HTML: builds on the level 1 HTML, adding properties, methods and interfaces
- DOM Mutation Observers: allows for definition of callbacks upon changes to the DOM
- DOM levels 2 and 3 consist of several modules
- DOM changes
- Backgrounds
- The DOM levels 2 and 3 Core is to expand the DOM API, for the most part, this means supporting the concept of XML namespaces
- The DOM Views and DOM HTML augment DOM interfaces, they are fairly small
- XML namespaces
- XML namespaces allow elements from different XML-based language to be mixed together in a single, well-formed document without fear of element name clashes. XML namespaces are not supported by HTML but supported in XHTML
- Namespaces are specified using the
xmlnsattribute and should be included on the<html>element of any well-formed XHTML page - Changes to Node: add
localName,namespaceURL,prefixproperties - Changes to Document: add
createElementNS(namespaceURL, tagName),createAttributeNS(nameSpaceURL, attributeName),getElementsByTagNameNS(namespaceURL, tagName)methods - Changes to Element: add
getAttributeNS(namespaceURL, attributeName),setAttributeNS(namespaceURL, attributeName, value),removeAttributeNS(namespaceURL, attributeName)methods
- Backgrounds
- Styles
- Styles are defined in HTML in three ways, including an external
style sheet via the
<link>element, defining inline styles using the<style>element, and defining element specific styles using thestyleattribute. DOM levels 2 Styles provide an API around all three of these styling mechanisms - Accessing element styles
- Any HTML elements that supports the style attribute also has a style
property exposed in JavaScript, which is an instance of
CSSStyleDeclarationand contains all stylistic information specified by the HTML style attribute but no information about styles that have cascaded from either included or inline style sheets - CSS property names use dash case, the names must be converted to
camel case to be used in the JavaScript API, for example,
background-colorbecomesbackgroundColor - Example
1
<div id="myDiv" style="background-color: red;">Content</div>
1
2
3
4let div = document.getElementById('myDiv');
div.style.backgroundColor; // 'red'
div.style.height = "100px";
div.style.width = "100px";
- Any HTML elements that supports the style attribute also has a style
property exposed in JavaScript, which is an instance of
- Working with style sheets
- The
CSSStyleSheettype represents a CSS style sheet as included using a<link>element or defined in a<style>element - The CSSStyleSheet type inherits from StyleSheet, which can be used to define non-CSS style sheets
- Example
1
2
3
4
5
6let styles = document.styleSheets[0];
let rules = styles.cssRules;
let r0 = rules[0];
console.log(r0.selectorText); // the selector text for the first rule
console.log(r0.cssText); // the CSS text for the first rule
console.log(r0.style.backgroundColor); // the background color for the first rule
- The
- Element dimensions
- Offset dimensions
- The offset dimensions incorporate all of the visual space that an
element takes up on the screen

- Properties:
offsetHeight,offsetWidth,offsetTop,offsetLeft,offsetParent. The offsetLeft and offsetTop properties are in relation to the containing element, which is stored in theoffsetParentproperty. The offsetParent may not necessarily be the same as the parentNode
- The offset dimensions incorporate all of the visual space that an
element takes up on the screen
- Client dimensions
- The client dimensions of an element comprise the space occupied by the element's content and its padding
- Properties:
clientWidth, andclientHeight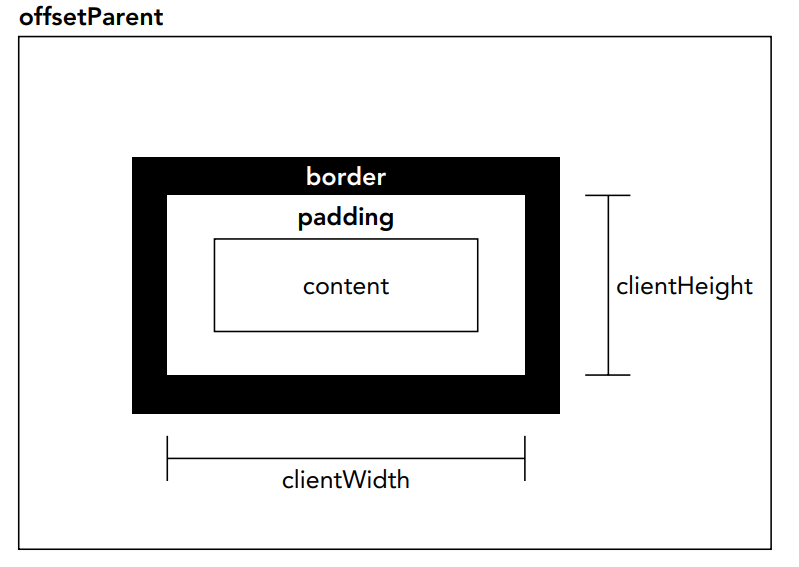
- Scroll dimensions
- The scroll dimension provide information about an element whose content is scrolling
- Properties:
scrollHeight,scrollLeft,scrollTop,scrollWidth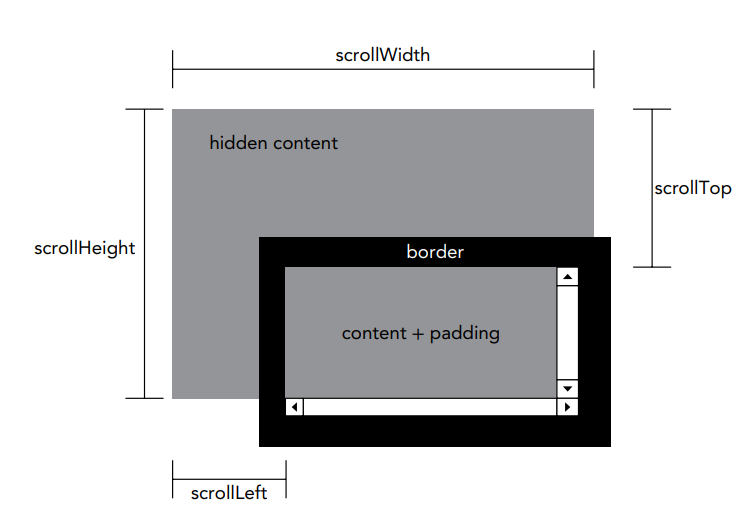
- Offset dimensions
- Styles are defined in HTML in three ways, including an external
style sheet via the
- Traversals
- The DOM level 2 Traversal and Range module defined two types that
aid in sequential traversal of a DOM structure. The types,
NodeIteratorandTreeWalker, perform depth-first traversals of a DOM structure given a certain starting point NodeIterator- The NodeIterator type can be instantiated using the
document.createNodeIterator(root, whatToShow, filter, entityReferenceExpansion)methodrootis the node in the tree that you want to start searching fromwhatToShowis a numerical code indicating which nodes should be visited, it can beNodeFilter.SHOW_ALL,NodeFilter.SHOW_ELEMENT,NodeFilter.SHOW_ATTRIBUTE,NodeFilter.SHOW_TEXT,NodeFilter.SHOW_CDATA_SECTION,NodeFilter.SHOW_ENTITY_REFERENCE,NodeFilter.SHOW_ENTITY,NodeFilter.SHOW_PROCESSING_INSTRUCTION,NodeFilter.SHOW_COMMENT,NodeFilter.SHOW_DOCUMENT,NodeFilter.SHOW_DOCUMENT_TYPE,NodeFilter.SHOW_DOCUMENT_FRAGMENT,NodeFilter.SHOW_NOTATIONfilteris a NodeFilter object or a function indicating whether a particular node should be accepted or rejectedentityReferenceExpansionis a boolean indicating whether entity reference nodes should be expanded or not
- Example usage
1
2
3
4
5
6
7
8
9
10let div = document.getElementById('myDiv');
let iterator = document.createNodeIterator(div, NodeFilter.SHOW_ELEMENT, null, false);
let prev = null;
let node = iterator.nextNode();
while (node != null) {
console.log(node.nodeName);
node = iterator.nextNode();
prev = node.previousNode();
}
- The NodeIterator type can be instantiated using the
TreeWalker- TreeWalker is a more advanced version of NodeIterator
- Methods:
nextNode(),previousNode(),parentNode(),firstChild(),lastChild(),nextSibling(),previousSibling() - A TreeWalker object is created using the
document.createTreeWalker(root, whatToShow, filter, entityReferenceExpansion)method
- The DOM level 2 Traversal and Range module defined two types that
aid in sequential traversal of a DOM structure. The types,
- Ranges
- The DOM level 2 Traversal and Range module defined an interface called a range to allow for greater control over a page. A range can be used to select a section of a document regardless of node boundaries
- Create a range object:
let range = document.createRange() - Some properties:
startContainer,startOffset,endContainer,endOffset,commonAncestorContainer - Simple selection in DOM ranges
1
2
3
4
5
6
<html>
<body>
<p id="p1"><b>Hello</b> world!</p>
</body>
</html>1
2
3
4
5let range1 = document.createRange();
let range2 = document.createRange();
let p1 = document.getElementById('p1');
range1.selectNode(p1); // range1 contains p1 and its contents
range2.selectNodeContents(p1); // range2 contains only contents of p1: <b>Hello</b> world! - Complex selection in DOM ranges
- Creating complex ranges requires the use of
setStart(node, offset)andsetEnd(node, offset)methods1
2
3
4
5
6
<html>
<body>
<p id="p1"><b>Hello</b> world!</p>
</body>
</html>1
2
3
4
5
6
7
8
9
10
11
12
13
14
15
16
17let range1 = document.createRange();
let range2 = document.createRange();
let p1 = document.getElementById('p1');
let p1Index = -1;
let len = p1.parentNode.childNodes.length;
for (let i = 0; i < len; i++) {
if (p1.parentNode.childNodes[i] === p1) {
p1Index = i;
break;
}
}
// range1 contains p1 and its contents
range1.setStart(p1.parentNode, p1Index);
range1.setEnd(p1.parentNode, p1Index + 1);
// range2 contains only contents of p1: <b>Hello</b> world!
range2.setStart(p1, 0);
range2.setEnd(p1, p1.childNodes.length);
- Creating complex ranges requires the use of
Events
- Introduction
- JavaScript's interaction with HTML is handled through events, which indicate when particular moments on interest occur in the document or browser window
- Events can be subscribed using listeners(aka handlers) that execute only when an event occurs. This model, called the observer pattern in traditional software engineering, allows a loose coupling between the behavior of a page and the appearance of the page
- DOM level 2 was the first attempt to standardize the DOM events API in a logical way, all modern browsers have implemented the core parts of DOM level 2 events
- Event flow
- Event flow describes the order in which events are received on the page(say, you click a button inside a div, will the button or the div receive the click event first?). The IE and Netscape developer teams came up with an almost opposite concept of event flow: IE supports the event bubbling flow, whereas Netscape Communicator supports the event capturing flow
- Event bubbling
- The IE event flow is called event bubbling because an event starts at the most specific element and then flow upward toward the least specific node
- All modern browsers support event bubbling, although implementation details vary, modern browsers continue event bubbling up to the window object
- Event capturing
- The Netscape communicator came up with the event capturing flow, in which the least specific node should receive the event first and the most specific node should receive the event last
- Event capturing was designed to intercept the event before it reached the intended target
- All modern browsers support event capturing, all of them begin event capturing at the window-level event despite the fact that the DOM level 2 event specification indicates that the events should begin at document
- DOM event flow
- The event flow specified by DOM level 2 events has three phases: the event capturing phase (providing the opportunity to intercept events if necessary), at the target, and the event bubbling phase (allowing a final response to the event)
- Event handlers
- Events are certain actions performed either by the user or by the browser itself. A function that is called in response to an event is called an event handler (event listener). Event handlers have names beginning with "on" (onclick)
- HTML event handlers
- Each event supported by a particular element can be assigned using
an HTML attribute with the name of the event handler, and the value of
the attribute should be some JavaScript code to execute
1
2
3
4
5
6
7
8
9
10// Approach 1
<input type="button" value="Click me!" onclick="console.log('Clicked!')" />
// Approach 2: code executing as an event handler has access to everything in the global scope
<script>
function showMessage() {
console.log("Clicked");
}
</script>
<input type="button" value="Click me!" onclick="showMessage()" /> - When the event handler is assigned as a property, you can access the
eventlocal variable (say,console.log(event.type)), meanwhile,thisis also equivalent to the event's target element (say,console.log(this.value))
- Each event supported by a particular element can be assigned using
an HTML attribute with the name of the event handler, and the value of
the attribute should be some JavaScript code to execute
- DOM level 0 event handlers
- The traditional way of assigning event handlers in JavaScript is to
assign a function to an event handler property
1
2
3
4
5
6let btn = document.getElementById("myBtn");
btn.onclick = () => {
console.log("Clicked!");
alert("Clicked");
console.log(this.id); // myBtn, this refers to the element itself
} - Since the event handler is considered to be a method of the element
using the DOM level 0 method, the value of
thisis the element itself
- The traditional way of assigning event handlers in JavaScript is to
assign a function to an event handler property
- DOM level 2 event handlers
- DOM level 2 events define two methods to deal with the assignment
and removal of event handlers:
addEventListener()andremoveEventListener(). These methods exist on all DOM nodes and accept three arguments: the event name to handle, the event handler function, and a boolean value indicating whether to call the event handler during the capture phase (true) or during the bubble phase(false), the third argument is optional and defaults to false1
2
3
4
5// add an onclick event handler in the bubble phase
let btn = document.getElementById("myBtn");
btn.addEventListener("click", () => {
console.log("Clicked!");
}, false);
- DOM level 2 events define two methods to deal with the assignment
and removal of event handlers:
- Internet Explorer event handlers
- IE implements methods similar to the DOM called
attachEvent()anddetachEvent(), both accepts two arguments: the event handler name and the event handler function - IE 8 and earlier support only event bubbling, event handlers added
using
attachEvent()are attached on the bubbling phase - A major difference between using
attachEvent()and using the DOM level 0 approach in IE is the scope of the event handler. When using DOM level 0, the event handler runs with a this value equal to the element on which it is attached; when usingattachEvent(), the event handler runs in global context, so this is equivalent to window1
2
3
4let btn = document.getElementById("myBtn");
btn.attachEvent("onclick", () => {
console.log("Clicked!");
});
- IE implements methods similar to the DOM called
- Cross-browser event handler
- To make sure that the event-handling code works in the most compatible way possible, you will need it to work only on the bubbling phase
- The event object
- Introduction
- When an event related to the DOM is fired, all of the relevant information is gathered and stored on an object called event
- The event object contains basic information such as the element that caused the event, the type of event that occurred, and any other data that may be relevant to the particular event
- All browsers support the event object, though not in the same way
- The DOM event object
- In DOM-compliant browsers, the event object is passed in as the sole argument to an event handler
- Some properties:
event.bubbles: boolean, indicate if the event bubblesevent.currentTarget: element, the element whose event handler is currently handling the event, equal to thisevent.target: element, the target of the eventevent.type: string, the type of event that was fired
- The IE event object
- The legacy IE event object is accessible in different ways, based on the way in which the event handler was assigned
- If the handler is assigned using the DOM level 0 approach, the event
object exists only as a property of the window object
1
2
3
4
5let btn = document.getElementById("myBtn");
btn.onclick = () => {
let event = window.event;
console.log(event.typ);
} - If the handlers is assigned using attachEvent(), the event object is
passed in as the sole argument to the function
1
2
3
4let btn = document.getElementById("myBtn");
btn.attachEvent("onclick", (event) => {
console.log(event.type);
}); - Some properties:
event.type,event.returnValue,event.srcElement
- The Cross-browser event object
- All of the information and capabilities of the IE event object are present in the DOM object, just in a different form. These parallels enable easy mapping form one event model to the other
- Introduction
- Event types
- DOM level 3 events specify the following event groups:
- User interface (UI) events: general browser events that may have some interaction with the BOM
- Focus events: fired when an elements gains or loses focus
- Mouse events: fired when the mouse is used to perform an action on a page
- Wheel events: fired when a mouse wheel or similar device is used
- Text events: fired when text is input into the document
- Keyboard events: fired when the keyboard is used to perform an action on the page
- Composition events: fired when inputting characters for an Input Method Editor (IME)
- UI events
- UI events are not necessarily related to user actions
- The
loadevent- Fired on a window object when the entire page has been loaded, including all external resources such as images, JS files, and CSS files
onloadhandler- The first approach: define an event handler for the
loadevent using JavaScript1
2
3
4
5
6
7
8
9
10// Style 1
window.onload = () => {
console.log("Page loaded");
}
// Style 2
window.addEventListener("load", () => {
console.log("Page loaded");
});
}) - The second approach: add an onload attribute to the
<body>element1
2
3
4
5
6
7
8
9<script>
function loadHandler() {
console.log("Page loaded");
}
</script>
<body onload="loadHandler()">
<!-- -->
</body>
- The first approach: define an event handler for the
- The
unloadevent- Fired on the window object when a document has completely unloaded, typically fired when navigating from one page to another and is most often used to clean up references to avoid memory leaks
- Can be assigned using JavaScript or the
unloadattribute on the<body>element
- The
resizeevent- Fired on the window object when the browser windows is resized to a new height or width
- Can be assigned using JavaScript or the
resizeattribute on the<body>element, prefer to use the JavaScript approach - You should make the resize event handler as simple as possible
- IE, Safari, Chrome, and Opera fire the resize event as soon as the browser isw resized by one pixel and then repeatedly as the user resizes the browser window
- Firefox fires the resize event only once when the user stops resizing the browser window
- The
scrollevent- Even though the scroll event occurs on the window, it actually refers to changes in the appropriate page-level element
- In quirk mode, the changes are observed using the
scrollLeftandscrollTopof the<body>element, in standards mode, the changes occur on the<html>element in all browsers except Safari - Similar to the resize event, the scroll event is repeatedly executed, so it should be computationally efficient
- Focus events
- Focus events work in concert with the
document.hasFocus()anddocument.activeElementproperties to give insight as to how the user is navigating the page - The six focus events
blur: fired when an element has lost focus, does not bubble and is supported in all browsersDOMFocusIn: fired when an element has received focus, this is a bubbling version of the focus HTML event, only Opera supports this event, DOM level 3 events deprecate DOMFocusIn in favor of focusinDOMFocusOut: fired when an element has lost focus, this is a bubbling version of the blur HTML event, only Opera supports this event, DOM level 3 events deprecate DOMFocusOut in favor of focusoutfocus: fired when an element has received focus, does not bubble and is supported in all browsersfocusin: fired when an element has received focus, this is a bubbling version of the focus HTML eventfocusout: fired when an element has lost focus, this is a bubbling version of the blur HTML event
- Focus events work in concert with the
- Mouse and Wheel events
- Mouse events are the most commonly used group of events on the Web, because mouse is the primary navigation device used
- There are 9 mouse events defined in DOM level 3 events:
click: fired when the user clicks the primary mouse button or when the user presses the Enter key,onclickcan be executed using the keyboard and the mousedblclick: fired when the user double-clicks the primary mouse buttonmousedown: fired when the user pushes any mouse button down, cannot be fired via the keyboardmouseenter: fired when the mouse cursor is outside of an element and then the user first moves it inside of the boundaries of the element, this event does not bubble and is not fired when the cursor moves over descendant elementsmouseleave: fired when the mouse cursor is inside of an element and then the user moves it outside of the boundaries of the element, this event does not bubble and is not fired when the cursor moves over descendant elementsmousemove: fired repeatedly as the cursor is being moved aro7und an element, cannot be fired via the keyboardmouseout: fired when the mouse cursor is over an element and then the user moves it over another element, the element moved to may be outside of the bounds of the original element or a child of the original element, this event cannot be fired via the keyboardmouseover: fired when the mouse cursor is outside of an element and then the user first moves it inside of the boundaries of the element, this event cannot be fired via the keyboardmoustup: fired when the user releases a mouse button, this event cannot be fired via the keyboard
- All elements on a page support mouse, all mouse events bubble except mouseenter and mouseleave, and they can be canceled, which affects the default behavior of the browser
- There is also a subgroup of mouse events called wheel events: wheel
events are really just a single event,
moustwheel, which monitors interactions of a mouse wheel or a similar device such as the Mac trackpad
- Keyboard and text events
- There are 3 keyboard events:
keydown: fired when the user presses a key on the keyboard and fired repeatedly while the key is being held downkeypress: fired when the user presses a key on the keyboard that results in a character and fired repeatedly while the key is being held down, deprecated in DOM level 3 events in favor of the textInput eventkeyup: fired when the user releases a key on the keyboard
- All elements support the 3 keyboard events, when the uses press a character key, the keydown is fired first, then the keypress, and finally the keyup event
- 1 text event:
textInput, an augmentation of the keypress event, fired just before text is inserted into a text box - Key codes: for keydown and keyup events, the
event.keyCodeproperty contains an integer code that maps to a specific key on the keyboard - Character codes: for keypress events, the
event.charCodeproperty contains an integer code that maps to a specific character on the keyboard - TextInput properties
event.data: contains the input textevent.inputMethod: contains an integer code that maps to the input method used to insert the text
- There are 3 keyboard events:
- Composition events
- Composition events were first introduced in DOM level 3 to handle complex inpu8t sequences
- There are 3 composition events
compositionstart: fired when the text composition system of the IME is opened, indicating that input is about to commencecompositionupdate: fired when a new character has been inserted into the input fieldcompositionend: fired when the text composition system is closed, indicating a return to normal keyboard input
- HTML5 events
- The DOM specification doesn't covert all events that are supported by all browsers, HTML5 has an exhaustive list of all events that should be supported by browsers
- The
contextmenuevent- Context menu: right click on Windows, Ctrl+click on Mac
- The contextmenu event is used to indicate when a context menu is about to be displayed
- The contextmenu event bubbles
- The
beforeunloadevent- The beforeunload event is fired on the window and is intended to give developers a way to prevent the page from being unloaded
- This event cannot be canceled
- The
DOMContentLoadedevent- The load event may take a long time because it needs to wait the entire page to be loaded, while the DOMContentLoaded event is fired when the DOM tree is completely formed and without regard to other resources
- The
readystatechangeevent- This event is first defined by IE to provide information about the loading state of the document or of an element
- Each object that supports the readystatechange event has a
object.readyStateproperty that can have five possible string values:uninitialized,loading,loaded,interactive,complete
- The
pageshowandpagehideevents- Firefox and Opera introduced a feature called the back-forward cache (bfcache), designed to speed up page transitions when using the browsers's Back and Forward buttons, the cache effectively keeps the entire page in memory
- The pageshow event is fired whenever a page is displayed, whether from the bfcache or not. On a newly loaded page, pageshow is fired after the load event, on a page in the bfcache, pageshow is fired as soon as the pages's state has been completely restored
- The pagehide event is fired whenever a page is unloaded from the browser, immediately before the unload event
- The
hashchangeevent- This event is used as a way to notify developers when the URL hash has changed
- The
onhashchnagemust be attached to the window object, and it is called whenever the URL hash changes - The
event.oldURLandevent.newURLproperties are used during the process
- Other events
- Device events
- Touch and gesture events
- DOM level 3 events specify the following event groups:
- Memory and performance
- Introduction
- In JavaScript, the number of event handlers on a page directly
relates to the overall performance of the page, there are several
reasons:
- Each function is an object and takes up memory
- The amount of DOM access needed to assign all of the event handlers up front delays the interactivity of the entire page
- In JavaScript, the number of event handlers on a page directly
relates to the overall performance of the page, there are several
reasons:
- Event delegation
- The solution to the too many event handlers issue is called the
event delegation, each delegation takes advantage of event bubbling to
assign a single event handler to manage all events of a particular type
1
2
3
4
5<div id="myLinks">
<li id="goSomewhere">Go somewhere</li>
<li id="doSomething">Do something</li>
<li id="sayHi">Say Hi</li>
</div>1
2
3
4
5
6
7
8
9
10
11
12
13
14
15
16// Multiple event handler approach
let item1 = document.getElementById('goSomewhere');
let item1 = document.getElementById('doSomething');
let item1 = document.getElementById('sayHi');
item1.addEventListener('click', (event) => {
location.href = "https://www.google.com";
});
item2.addEventListener('click', (event) => {
document.title = "New Title!";
});
item3.addEventListener('click', (event) => {
alert("Hi!");
});1
2
3
4
5
6
7
8
9
10
11
12
13// Single event handler approach
let links = document.getElementById('myLinks');
links.addEventListener('click', (event) => {
let target = event.target;
if (target.id === 'goSomewhere') {
location.href = "https://www.google.com";
} else if (target.id === 'doSomething') {
document.title = "New Title!";
} else if (target.id === 'sayHi') {
alert("Hi!");
}
});
- The solution to the too many event handlers issue is called the
event delegation, each delegation takes advantage of event bubbling to
assign a single event handler to manage all events of a particular type
- Removing event handlers
- Another way to solve the too many event handlers issue is to remove event handlers when they are no longer needed
- Introduction
- Simulating events
- JavaScript can be used to fire specific events at any time, and those events are treated the same as events that are created by the browser. This capability can be extremely useful in testing web applications
- DOM event simulation
- An event object can be created at any time by using the
document.createEvent(stringEventType)method - The method argument can be
UIEvents,MouseEvents, orHTMLEvents - Procedure
- Create an event of a specific type
- Initialize the event with appropriate properties
- Fire the event with
node.dispatchEvent(event)method
- An event object can be created at any time by using the
- IE event simulation
- The logic are the same: create an event object, assign the appropriate information, and then fire the event using the object
- Use
document.createEventObject()to create an event object - You need to manually assign the properties of the event
- Use
node.fireEvent(stringEventType, eventObject)to fire the event
Animation and Graphics with Canvas
- Introduction
- The
<canvas>tag introduced in HTML5 designates an are of page where graphics can be created using JavaScript - All major browsers support
<canvas>to some degree <canvas>is made up of a few API sets, and not all browsers support all API sets, there is a 2D context with basic drawing capabilities and a 3D context called WebGL. The latest versions of the supporting browsers now support both the 2D context and WebGL
- The
- Using
requestAnimationFrame- For a long time, timers and intervals have been the state of the art
for JavaScript-based animations, while the
requestAnimationFrameAPI gained widespread adoption and is now available across all major browsers - Early animation loops
- The typical way to create animation in JavaScript is to use
setInterval()to manage all animations - The delay should be short enough to handle a variety of different types smoothly but long enough so as to produce changes the browsers can actually render. Since most monitors have a refresh rate of 60Hz, so the best intervals should be 1000ms/60, or about 17ms
- The problems is that the intervals are not precise, and the code may be delayed
- The typical way to create animation in JavaScript is to use
requestAnimationFrame(callback)- This method indicates to the browsers that some JavaScript code is performing an animation, so the browser can optimize appropriately after running some code
- This method accepts a single argument, which is a function to call prior to repainting the screen, you make appropriate changes to DOM styles that will be reflected with the next repaint in the function
cancelAnimationFrame(id): this method accepts a request ID which can be used to cancel the request of repainting
- For a long time, timers and intervals have been the state of the art
for JavaScript-based animations, while the
- Basic canvas usage
- The canvas element requires at least its
widthandheightattributes to be set in order to indicate the size of the drawing to be created. Any content between the opening tag and the closing tag is the backup data that is displayed only if the canvas element is not supported1
<canvas id="myDrawing" width="100px" height="200ox">A drawing of nonsense! </canvas>
- You need to retrieve a drawing context to begin drawing, you should
pass "2d" as the argument to retrieve 2D context
1
2let drawing = document.getElementById('myDrawing');
let context = drawing.getContext('2d'); - Image created by canvas can be exported using the
toDataURL()method, the exported image is PNG by default, you can usedrawing.toDataURL("image/jpeg")to export a JPEG for example1
2
3
4
5let drawing = document.getElementById('myDrawing');
let context = drawing.getContext('2d');
if (context) {
let image = drawing.toDataURL();
}
- The canvas element requires at least its
- The 2D context
- Introduction
- The 2D drawing context provides methods for drawing simple 2D shapes
- The coordinates in a 2D context begin at the upper-left corner of the canvas element, which is considered to be (0, 0), with x increasing to the right and y increasing toward to the bottom
- The width and height indicate how many pixels are available in each direction
- Fills and strokes
- Fills and strokes are the two basic drawing operations
- Fills automatically fills in the shape with specific color, strokes colors only the edges
- Fills and strokes are displayed based on the
context.fillStyleandcontext.strokeStyleproperties, both of which can be set using a string, a gradient object or a pattern object
- Drawing rectangles:
context.fillRect(x, y, width, height),strokeRect(x, y, width, height),clearRect(x, y, width, height) - Drawing paths:
arc(x, y, radius, startAngle, endAngle, counterclockwise),arcTo(x1, y1, x2, y2, radius),bezierCurveTo(cp1x, cp1y, cp2x, cp2y, x, y),ellipse(x, y, radiusX, radiusY, rotation, startAngle, endAngle, anticlockwise),lineTo(x, y),moveTo(x, y),quadraticCurveTo(cpx, cpy, x, y),rect(x, y, width, height) - Drawing text:
fillText(text, x, y),strokeText(text, x, y),measureText(text) - Transformations:
rotate(angle),scale(x, y),translate(x, y) - Drawing images:
drawImage(image, x, y) - Shadows:
context.shadowColor,context.shadOffsetX,context.shadowOffsetY,context.shadowBlur
- Introduction
- The WebGL
- WebGL is a 3D context for canvas, it's a web version of OpenGL ES 2.0
- The context
1
2
3let drawing = document.getElementById('myDrawing');
// option is an object containing some properties, such as `alpha`, `depth`, `stencil`, `antialias`
let gl = drawing.getContext('webgl', options);
Scripting Forms
- Form basics
- Web forms are represented by the
<form>element in HTML and by theHTMLFormElementtype (this type inherits theHTMLElementtype) in JavaScript - Some properties and methods
acceptCharset: the character sets that the server can process, HTMLaccept-charsetattributeaction: the URL to send the request to, HTMLactionattributeelements: an HTMLCollection of all controls in the formenctype: the encoding type of the request, HTMLenctypeattributelength: the number of controls in the formmethod: the type of HTTP request to send, HTMLmethodattributename: the name of the form, HTMLnameattributereset(): resets all form fields to their default valuessubmit(): submits the formtarget: the name of the window to use for sending the request and receiving the response, HTMLtargetattribute
- Get a specific form
- Using form id:
document.getElementById('myForm') - Using form index:
document.forms[index] - Using form name:
document.forms[name]
- Using form id:
- Submitting forms
- Forms are submitted when the user clicks the submit button
- Submit methods:
- Via input:
<input type="submit" value="Submit"> - Via button:
<button type="submit"> Submit </button> - Via image:
<input type="image" src="submit.gif" alt="Submit">
- Via input:
- When a form is submitted, the submit event is fired before the
request is sent to the server, this gives you the opportunity to
validate the form data and decide whether to allow the form submission
to occur
1
2
3
4
5
6
7
8
9let form = document.getElementById('myForm');
form.addEventListener('submit', function(event) {
// 1. Prevent the form from being submitted first
event.preventDefault();
// 2. Validate form inputs
// some code here
// 3. Submit the form
form.submit();
});
- Resetting forms
- Forms are rest when the user clicks the reset button
- Reset methods
- Via input:
<input type="reset" value="Reset"> - Via button:
<button type="reset"> Reset </button>
- Via input:
- When a form is reset, the reset event is fired, which gives you the
opportunity to cancel the reset if necessary
1
2
3
4
5
6
7
8
9let form = document.getElementById('myForm');
form.addEventListener('reset', function(event) {
// 1. Prevent the form from being reset first
event.preventDefault();
// 2. Validate form inputs
// some code here
// 3. Reset the form
form.reset();
});
- Form fields
- All form fields are parts of an
elementscollection that is a property of each form, the elements collection is an ordered list - Retrieve form fields
1
2
3
4
5
6
7let form = document.getElementById('myForm');
// get the first form field
let input0 = form.elements[0];
// get the form field whose name is `myField`
let input1 = form.elements.myField;
// get the amount of form fields
let inputCount = form.elements.length;1
2
3
4
5
6
7<form method="post" id="myForm">
<ul>
<li><input type="radio" name="color" value="red"></li>
<li><input type="radio" name="color" value="green"></li>
<li><input type="radio" name="color" value="blue"></li>
</ul>
</form>1
2
3
4
5
6
7
8let form = document.getElementById('myForm');
// since multiple fields have the same name, this return an HTMLCollection
let colors = form.elements["color"];
// this return the first field
let firstFormField = form.elements[0];
let colorFields = colors[0];
let firstColorField = colors[0];
console.log(firstColorField == firstFormField); // true - Common form-field properties:
disabledboolean,formread-only,name,readOnlyboolean,tabIndex,type,value - The type property
- For input elements, the type is equal to the HTML type attribute
- For other elements, the type is one of these:
select-one,select-multiple,submit,button,reset,submit
- Common form-field methods:
focus(),blur() - Common form-field events:
blur,change,focus
- All form fields are parts of an
- Web forms are represented by the
- Scripting text boxes
- Two ways to represent text boxes in HTML: a single-line version
using
<input>and a multiline version using<textarea> - The
<input>text boxes- Default type is
text - The
sizeattribute specifies the width of the text box - The
valueattribute specifies the initial value of the text box - The
maxlengthattribute specifies the maximum number of characters allowed in the text box
- Default type is
- The
<textarea>text boxes- The
rowsandcolsattribute specifies the size of the text boxes in number of characters' - The initial value is between
<textarea>and</textarea> - You cannot specify a
maxlengthattribute for<textarea>
- The
- Text selection
- Both text boxes support the
select()method, which selects all of the text in a text box, this method only selects the text, it does not return the selected text - There is also a
selectevent, which is fired when the text is selected in a text box - There are two integer properties that can be used to determine the
selection range:
selectionStartandselectionEnd
- Both text boxes support the
- HTML5 constraint validation API
- HTML5 introduces the ability for browsers to validate data in forms before submitting to the server, this capability enables basic validation even when JavaScript is unavailable or fails to load
- Required fields
- Use the
requiredattribute - Check if the browser supports the required attribute:
"required" in document.createElement("tagName"); - Different browsers behave differently when a form field is required
- Chrome, Firefox, IE, and Opera prevent the form from submitting and opo up a help box beneath the field
- Safari does nothing and doesn't prevent the form from submitting
- Use the
- Alternate input types
- HTML5 introduces the ability to use different input types, for
example
email,password,url - These type attributes not only provide additional information about the type of data expected but also provide some default validation
- Check if certain type is supported
1
2
3
4let input = document.createElement("input");
input.type = "typeName";
// if the type is not supported, the type property will be `text`
console.log(input.type == "typeName");
- HTML5 introduces the ability to use different input types, for
example
- Numeric ranges
- Type values:
number,range,datetime,datetime-local,date,month,week,time - For these numeric types, you can specify the range and step using
the
min,maxandstepattributes - Some browsers do not support the above types, you should check carefully before you use them
- Type values:
- Input patterns: use the
patternattribute to specify a regular expression that the input must match - Checking validity
- Use the
checkValidity()method to check if any given field on the form is valid - This method is provided on all elements and returns a boolean value
- Use the
- Disabling validation: use the
novalidateattribute on the form to disable validation
- Two ways to represent text boxes in HTML: a single-line version
using
- Scripting select boxes
- Select boxes are created using the
<select>and<option>elements - The HTMLSelectElement type provides the following properties and
methods in addition to those that are available for all form fields
add(newOption, relOption): add a new option before the related optionmultiple: a boolean value indicating if multiple selections are allowed, equal to the HTMLmultipleattributeoptions: an HTMLCollection of option elements in the controlremove(index): removes the option in the given positionselectedIndex: 0-based index of the selected option or -1 if no options are selectedsize: the number of rows visible in the select box, equal to the HTMLsizeattribute
- The type of a select box is either
select-oneorselect-multiple - The value of the select box is determined using the following rules
- If no option is selected, the value of the select box is an empty string
- If one option is selected and has a value attribute, then the value of the select box is the value of the selected option
- If one option is selected but does not have a value attribute, then the value of the select box is the text of the selected option
- If multiple options are selected, the value of the select box is the value taken from the first option according to the rules above
- The
<option>element- Each option element is represented in the DOM by an HTMLOptionElement object
- Properties:
index,value,text,label,selected
- Getting the selected option
1
2
3let select = document.getElementById("mySelect");
let selectedOption = select.options[select.selectedIndex];
console.log(selectedOption.text); - Adding options
1
2
3
4
5let select = document.getElementById("mySelect");
let newOption = document.createElement("option");
newOption.text = "New option";
newOption.value = "new-value";
select.appendChild(newOption); - Removing options
1
2
3let select = document.getElementById("mySelect");
let optionToRemove = select.options[removeIndex];
select.removeChild(optionToRemove);
- Select boxes are created using the
JavaScript API
AtomicsandSharedArrayBuffer- A SharedArrayBuffer features an identical API to an ArrayBuffer, the primary difference is that a reference to an ArrayBuffer must be handed off between execution contexts, a reference to a SharedArrayBuffer can be used simultaneously by any number of execution contexts
- Sharing memory between multiple execution contexts means that concurrent thread operations are possible, thus race condition is a problem
- The Atomics API was introduced to allow for thread-safe JavaScript operations on a SharedArrayBuffer
- Atomics basics
- The Atomics object exists on all global contexts, and it exposes a suite of static methods for performing thread-safe operations
- The Atomics API offers a simple suite of methods for performing an in-place modification called AtomicReadModifyWrite operations: read from a location in the SharedArrayBuffer, modify the value at that location, and write the new value back to the same location in the SharedArrayBuffer
- Methods:
Atomics.add,Atomics.sub,Atomics.or,Atomics.and,Atomics.xor, ... - Atomic exchange:
Atomics.exchange,Atomics.compareExchange
- Cross-context messaging
- Cross-document messaging (XDM), is the capability to pass information between different execution contexts
- The core method of XDM is the
postMessage(msg, recipient[, options])methodmsgis a string messagerecipientis a string indicating the intended recipient originoption: an optional array of transferable objects
- The
messageevent- The event is fired asynchronously on the window object when an XDM message is received
- Encoding API
- The encoding API allows for converting between strings and typed arrays
- Related classes for conversions:
TextEncoder,TextEncoderStream,TextDecoder,TextDecoderStream - Encoding text
- Two ways to convert a string into its typed array binary equivalent:
a
bulkencoding, and astreamencoding - The encoder always uses UTF-8
- Bulk encoding: the JavaScript engine synchronously encodes the entire string
- Bulk encoding is accomplished using an instance of a TextEncoder
1
2
3
4
5
6
7
8const textEncoder = new TextEncoder();
const decodedText = "foo";
// this method returns an Unit8Array
const encodedText = textEncoder.encode(decodedText);
// returns an object with two properties
// res.read: the amount of characters encoded from decodedText
// res.written: the amount of characters encoded into encodedText
const res = textEncoder.encodeInto(decodedText, encodedText); - Stream encoding: it accepts a decoded text stream into the TextEncoderStream (it's simply a TextEncoder in the form of TransformStream) and yields a stream of encoded text chunks
- Two ways to convert a string into its typed array binary equivalent:
a
- Decoding text
- Two ways to convert a typed array into its string equivalent: a
bulkdecoding, and astreamdecoding - Unlike the encoder classes, when going from typed array to string, the decoder supports a large number of string encoding
- Bulk decoding: the JavaScript engine synchronously decode the entire string
- Bulk decoding is accomplished using an instance of a DecoderEncoder
1
2
3
4
5
6
7
8
9const textDecoder = new TextDecoder();
// f encoded in utf-8 is 0x66 (102), o encoded in utf-8 is 0x6f (111)
const encodedText = Unit8Array.of(102, 111, 111);
// this method returns a string
const decodedText = textDecoder.decode(encodedText);
// returns an object with two properties
// res.read: the amount of characters decoded from encodedText
// res.written: the amount of characters decoded into decodedText
const res = textDecoder.decodeInto(encodedText, decodedText); - Stream decoding: it accepts an encoded text stream into the TextDecoderStream (it's simply a TextDecoder in the form of TransformStream) and yields a stream of decoded text chunks
- Two ways to convert a typed array into its string equivalent: a
- Blob and File APIs
- History of interaction with file
- The legacy way to interact with file in a form is to use the
<input type="file">element - The Blob and File API were designed to allow web developers access to files on the client computer in a secure manner that allows for better interaction with those files
- The legacy way to interact with file in a form is to use the
- The
Filetype- The File API is still based on the file input filed of a form but adds the ability to access the file information directly
- The
filescollection in HTML5 contains a sequence ofFileobject, each object has several read-only attributes:name,size,type,lastModifiedDate1
2
3
4
5
6
7
8let fileList = document.getElementById("myFile");
fileList.addEventListener("change", (event) => {
let files = event.target.files;
let n = files.length;
for (let file of files) {
console.log(`{file.name} {file.size} {file.type} {file.lastModifiedDate}`);
}
});
- The
FileReadertype- The FileReader type represents an asynchronously file-reading mechanism
- Related methods:
readAsText(file, encoding),readAsDataURL(file),readAsBinaryString(file),readAsArrayBuffer(file) - Because the read happens asynchronously, there are events published
by each FileReader:
progress,error,load- The progress event is fired roughly every 50 ms and has the
following properties:
lengthComputable,loaded,totalandresult - The
errorevents is fired if the file cannot be read for some reason - The
loadevent is fired when the file has been successfully loaded and will not be fired if the error event has already been fired
- The progress event is fired roughly every 50 ms and has the
following properties:
- You can use the
abort()method to stop a read progress
- The
FileReaderSynctype: the FileReaderSync is the synchronous version (blocking read) of the FileReader type - Blobs and Partial reads
- Use the
file.slice(startByte, byteAmount)to create a Blob object to read part of the file - A blob (binary large object) object, is a JavaScript wrapper for immutable binary data, it is the super type of File
- Blobs can be created from an array containing strings, ArrayBuffers,
ArrayBufferViews, or even other blobs
1
2console.log(new Blob(["test", "abc"])); // Blob {size: 7, type: ""}
console.log(new Blob(["test"], {type: "testType"})); // Blob {size: 4, type: "testType"} - Useful blob properties and methods:
size,type,slice()
- Use the
- History of interaction with file
- Media elements
- HTML5 introduces two media-related elements to enable cross-browser
audio and video embedding into a browser baseline without any plug-ins:
<audio>and<video> - Each of the elements requires a
srcattribute to specify the source of the media - You may optionally specify multiple different media sources because
not all browsers support all media formats: omit the src attribute from
the element and instead include on or more
<source>elements - Properties:
autoplayboolean,bufferedtime range,durationfloat amount of seconds,loopboolean,mutedboolean,pausedboolean,playedtime range,volumefloat between 0.0 and 1.0, ... - Events:
abortdownloading has been aborted,canplayplayback can begin,error,ended,play,pause, ... - Custom media players: you can manually control the playback of a
media file, using the
play()andpause()methods
- HTML5 introduces two media-related elements to enable cross-browser
audio and video embedding into a browser baseline without any plug-ins:
- Notifications API
- The Notifications API provides greater degree of customizability than the alert() dialogue boxes
- Notification permissions
- Two security features are enforced to prevent potential abuse
- Notifications can be triggered only by code executing in a secure context
- Notifications must be explicitly allowed by the user on a per-origin basis
- The user grants notification permission to an origin insider a browser dialogue box
- Unless the user does explicit allow or deny permission, the browser will remember the decision and will not ask again for the same origin
- Two security features are enforced to prevent potential abuse
- Showing and hiding notification
- Use the constructor to create and show notifications:
new Notification(title[, options]), the title argument is the title of the notification dialogue box, the options is an object containing specification information - Use the
notification.close()method to close an notification1
2
3
4
5
6
7
8let notification = new Notification("Notification title", {
lang: "en-US",
body: "Notification body",
tag: "notification-tag",
});
setTimeout(() => {
notification.close();
}, 5000);
- Use the constructor to create and show notifications:
- Notification lifecycle callbacks
- Notification aren't always just for displaying text strings, they are also designed to be interactive
- Callbacks
onshow: triggered when the notification is displayedonclick: triggered when the notification is clickedonclose: triggered when the notification is dismissed or closed via close();onerror: triggered when an error occurs that prevents the notification from being displayed
- Page visibility API
- When a page is minimized or hidden behind another tab, it may not take sense to continue functionality of the page, the Page Visibility API
- Three parts of the Page Visibility API
document.visibilityState: a string value, can be one ofhidden,visible,prerendervisibilitychangeevent: fired when a document changes from visible to hidden, or vice versadocument.hidden: a boolean value indicating if the page is hidden from view
- Streams API
- The streams API solves the problem of web applications consuming information in sequential chunks rather than in bulk
- Application situations
- High-level concepts:
- A block of data may not be available all at once
- A block of data can be processed in small portions
- Concrete examples:
- Handle network request
- Read/write to disk
- High-level concepts:
- Introduction to streams
- Three types of streams
- Readable streams: streams from which chunks can be read via a public interface, data enters the stream internally from an underlying source and is processed by a consumer
- Writable streams: streams to which chunks can be written via a public interface, a producer writes data into the stream, and the data is passed internally in an underlying sink
- Transform streams: made up of two streams: a writable stream to accept input data, and a readable stream to emit output data
- The fundamental unit in streams is the chunk, a chunk can be of any data type, but frequently it will take the form of a typed array. The size and arrival time of different chunks can also be different
- The ideal stream has approximately the same size and arrive at approximately regular intervals, the entrance and exit of an ideal stream are also in equilibrium
- Three types of streams
- Readable streams
1
2
3
4
5
6
7
8
9
10
11
12
13
14
15
16
17
18
19
20
21
22
23
24
25
26
27
28
29
30
31async function* ints() {
for (let i = 0; i < 5; i++) {
yield await new Promise((resolve) => setTimeout(resolve, 1000, i));
}
}
// Create a readable stream using the ReadableStream constructor
const readableStream = new ReadableStream(
// the first argument is the underlyingSource, the start function inside has
// a controller object as its sole argument, the controller object is an instance
// of the ReadableStreamDefaultController class
{
async start(controller) {
for await (let chunk of ints()) {
// add the chunk to the stream
controller.enqueue(chunk);
}
// signal the end of the stream
controller.close();
}
});
// read the stream using the readableStreamReader instance
const readableStreamReader = readableStream.getReader();
while (true) {
const { done, value } = await readableStreamReader.read();
if (done) {
break;
}
console.log(value);
}
readableStreamReader.releaseLock(); - Writable streams
1
2
3
4
5
6
7
8
9
10
11
12
13
14
15
16
17
18async function* ints() {
for (let i = 0; i < 5; i++) {
yield await new Promise((resolve) => setTimeout(resolve, 1000, i));
}
}
const writableStream = new WritableStream(
{
async write(value) {
console.log(value);
}
});
// producer
const writableStreamWriter = writableStream.getWriter();
for await (let chunk of ints()) {
await writableStreamWriter.write(chunk);
}
writableStreamWriter.close(); - Transform streams
1
2
3
4
5
6
7
8
9
10
11
12
13
14
15
16
17
18
19
20
21
22
23
24
25
26
27
28
29
30
31async function* ints() {
for (let i = 0; i < 5; i++) {
yield await new Promise((resolve) => setTimeout(resolve, 1000, i));
}
}
const {writable, readable} = new TransformStream(
{
async transform(chunk, controller) {
controller.enqueue(chunk * 2);
}
});
const transformStreamReader = transformStream.readable.getReader();
const transformStreamWriter = transformStream.writable.getWriter();
// consumer
while (true) {
const { done, value } = await transformStreamReader.read();
if (done) {
break;
} else {
console.log(value);
}
}
// producer
for await (let chunk of ints()) {
await transformStreamWriter.ready;
transformStreamWriter.write(chunk);
}
transformStreamWriter.close(); - Piping streams
- The ReadableStream can be piped into a TransformStream using the
pipeThrough()method - The ReadableStream can also be piped into a WritableStream using the
pipeTo()method
- The ReadableStream can be piped into a TransformStream using the
- Timing APIs
- Page performance is an area of concern for web developers, the
interface on the
window.performanceobject provides a way to measure the performance of a web page - Several timing APIs involved:
High Resolution Time API,Performance Timeline API,Navigation Timing API,User Timing API,Resource Timing API,Paint Timing API - High Resolution Time API
- Issues with
Date.now()1
2
3
4
5
6
7
8const to = Date.now();
// some function here;
const t1 = Date.now();
const diff = t1 - t0;
// diff can be 0 (when the difference is less than 1ms), negative (when
// the system clock is set backwards), or very large (when the system clock
// is set forwards)
console.log(diff);
- Issues with
- Use of the
window.performance.now()- It returns a floating point number with up to microseconds precision
- It's also a relative time, the 0 value is when its execution context is spawned, so it's not possible to compare values in different execution contexts
- Performance Timeline API
- This performance information is stored in different PerformanceEntry
objects, all entry records can be get using the
window.performance.getEntries()method - Entry properties:
name,entryType,startTime,duration, ...
- This performance information is stored in different PerformanceEntry
objects, all entry records can be get using the
- Page performance is an area of concern for web developers, the
interface on the
- Web Cryptography API
- Random number generation
Math.random()uses the PosudoRandom Number Generation algorithm (PRNG), it's not fully random, the web browser simply applies a fixed algorithm on an internal state to emulate randomness- The Cryptographically secure PRNG (PSRNG) incorporates a source of entropy as its input, so it's slower than the normal PRNG, but it's emited values are more difficult to predict
- The Cryptography API provides a CSPRNG that can be accessed on the
global Crypto object via
crypto.getRandomValues(typedArray)
- Random number generation
Error handling and Debugging
- Browser error reporting
- Desktop consoles: all modern desktop web browsers expose errors through their web console
- Mobile consoles:
- Mobile phonse will not offer a console interface directly on the device
- Chrome and Safari come bundled with utilities that allow you to connect the device to a host operating system running that same browser, and ytou can then view the errors through the paired desktop browsers
- It's also possible to use a third-party utility to debug directly on the mobile device
- Error handling
- Introduction
- Greate care is usually taken by the server-side team to defined an error-logging mechanism that categories erros by type, frequency, and any other metric that may be important
- Error handling on the browser side of web applications has slowly been adopted
- The try-catch statement
- Syntax
1
2
3
4
5try {
// code that may throw an error
} catch (error) {
// code to handle the error
} - The finally clause
1
2
3
4
5
6
7try {
// code that may throw an error
} catch (error) {
// code to handle the error
} finally {
// code to run regardless of whether an error occurred or not
} - Error types:
Error,InternalError,EvalError,RangeError,ReferenceError,SyntaxError,TypeError,URIError
- Syntax
- Throwing errors
- The
throwoperator can be used to throw custom erros at any point in time - The throw operator must be used with a value but places no limitation on the type of value that can be thrown
- The
- The error event
- Any error that is not handled by a try-catch causes the error event to be fired on the window object
- Arguments of the error handler function: the error message, the URL
on which the error occured, the line number
1
2
3
4
5
6window.onerror = (msg, url, line) => {
console.log(msg, url, line);
// By returning false, this function actually becomes a try-catch
// statement for the entire document
return false;
}
- Error handling strategies
- Identify where errors might occur: type coerciosn erros, data type erros, communication errors
- Distinguishing between fatal and nonfatal errors
- Log errors to the server
- Introduction
- Debuggin techniques
- Logging messages to a console
- Methods:
console.error(msg),console.warn(msg),console.info(msg),console.log(msg),console.debug(msg)
- Methods:
- Understanding the console runtime: a REPL
- Using the JavaScript debugger:
debuggerkeyword - Loggin message to the page
- Logging messages to a console
XML in JavaScript
- XML DOM support in browsers
- DOM level 2 core
1
2// create a blank XML document
let xmldom = docuemnt.implementation.createDocument(namespaceUri, root, doctype); - tHE DOMParser type
1
2let parser = new DOMParser();
let xmlDoc = parser.parseFromString(xmlString, "text/xml"); - The XMLS erializer type
1
2let serializer = new XMLSerializer();
let xmlString = serializer.serializeToString(xmlDoc);
- DOM level 2 core
- XPath support in browsers
- XPath was created as a way to locate specific nodes within a DOM document
- DOM level 3 XPath
- Determine if a browser supports DOM level 3 XPath
1
2
3if (document.implementation.hasFeature("XPath", "3.0")) {
// do something
} - Use the
XPathEvaluatorto evaluate Xpath expressions with a specific context - Use the
XPathResulttp get the result of the evaluation
- Determine if a browser supports DOM level 3 XPath
- XSLT support in browsers
- XSLT is a companion technology to XML that makes use of XPath to transform one document representation into another
- The XSLTProcessor type
- The XSLTProcessor type allows developers to transform XML documents by using XSLT in a manner similar to XSL processor in IE
JSON
- Introduction
- XML was the de facto standard for transmitting structured data over the internet
- JSON is a strict subset of JavaScript, making use of several patterns found in JavaScript to represent structured data
- The most important thing is that JSON is that it is a data format, not a programming language
- Syntax
- Three types of values represented by JSON
- Simple values: strings, numbers, booleans, null; undefined is not supported by JSON
- Objects
- Arrays
- Variables, functions, or object instances are not supported in JSON
- Simple values: JSON strings must be enclosed in double quotes
- Objects: JSON properties are named with double quotes
- Arrays: arrays are represented in JSON using array literal
- Three types of values represented by JSON
- Parsing and serialization
- JSON can be parsed into a usable object in JavaScript, but XML must be parsed into a DOM document first
- The JSON object
- Use the
JSON.stringify(obj)method to convert a JavaScript object into a JSON string - Use the
JSON.parse(jsonString)method to convert a JSON string into a JavaScript object - The JSON string is inside a pair of single quotes
- Use the
- Serialization options
- The
JSON.stringify(obj, replacer, space)method can be used to specify a replacer and/or a space argument - The replacer is an array of strings that specify the names of the properties to be included in the serialization
- The space is a string or number: if the space is a number, it indicates the amount of white space characters used for indention, if the space is a string, the string is used as white space
- The
toJSON()method: this method can be added to JavaScript objects to introduce customized serialization, and is called when JSON.stringify() is called on an object
- The
- Parsing options
- The
JSON.parse(jsonString, reviver)method can be used to specify a reviver function - The reviver function has two arguments: the key and the related value, it also needs to return a value
- A very common use of the reviver function is to turn date strings into Date objects
- The
Network Requests and Remove Resources
- Introduction
- AJAX (asynchronous JavaScript + XML) allows making server requests for additional data without reloading the web page
- AJAX uses XMLHttpRequest (XHR) to makes request to the server
- An XHR object could be used to retrieve the data and then the data could be inerted into the page using the DOM
- The XMLHttpRequest object
- IE 5 was the first browser to introduce the XHR object
- All modern browsers support a native XHR object that can be created
using the XMLHttpRequest constructor:
let xhr = new XMLHttpRequest(); - XHR usage
- The
open(type, URL, async)method is used to open a connection to the servertype: can be eitherget,post, ...URL: the URL of the server to connect toasync: a boolean value indicating whether the request should be sent asynchronously or not
- To send a specific request, use the
send(body)method- The
bodycan be a document, an XMLHttpRequestBodyInit object, or null
- The
- XHR response related properties
xhr.responseText: the text taht was returned as the body of the responsexhr.responseXML: contains an XML DOM document with response data if the response has a context type of "text/xml" or "application/xml"xhr.status: the HTTP status of the responsexhr.statusText: the description of the HTTP status1
2
3
4
5if (xhr.status >= 200 && xhr.status < 300 || xhr.status == 304) {
// do something with successful response
} else {
// do something with error response
}
- XHR
readyStateproperty- Integer value indicating the phase of the request/response cycle
- 0 : Uninitialized, the
open()method has not been called yet - 1: Open,the
open()method has been called, but thesend()method has not been called yet - 2: Sent, the
send()method has been called, but no response ahs been received - 3: Receiving: some response data has been retrieved
- 4: Complete, all of the response data has been retrieved and is available
- The
- HTTP Headers
- The XHR objects expose both the HTTP request headers and the HTTP response headers
- Related headers sent in an XHR request is sent:
Accept,Accept-Charset,Accept-Encoding,Accept-Language,Connection,Cookie,Host,Referer,User-Agent - Use the
xhr.setRequestHeader(header, value)method after thexhr.open()and before thexhr.send()method to set the value of a request header - Use the
xhr.getResponseHeader(header)method to get the value of a response header
- GET requests
- The query string must be present and encoded correctly on the URL that is passed to the open() method
- Each query-string name and value msut be encoded using the
encodeURIComponent()before being attached to the URL, and all of the name-value pairs must be separated by an ampersand1
2
3
4
5
6
7
8function addURLParam(url, name, value) {
// for the first name-value pair, add the ? first, for other pairs, and
// an & first
url += (url.indexOf("?") == -1 ? "?" : "&");
// encode the name and value, and append the pair to the URL
url += encodeURIComponent(name) + "=" + encodeURIComponent(value);
return url;
}
- POST requests
- The body of the post request can contain large amount of data of any format
- You can pass XML DOM document or a string as the argument in the send() method
- Mimic form submission using post request
1
2
3
4
5
6
7let xhr = new XMLHttpRequest();
xhr.open("POST", "URL", ture);
// add this header to tell the server to submit a form
xhr.setRequestHeader("Content-Type", "application/x-www-form-urlencoded");
let form = document.getElementById("form");
// the form should be serialized
xhr.send(serializeForm(form));
- XMLHttpRequest level 2
- Not all browsers implemented all parts of the level 2 specification, but all browsers have implemented some of the functionality
- The
FormDatatype1
2
3
4
5
6
7let data = new FormData();
// append a namme-value pair to the form
data.append("name", "value");
// pass the form data to the xhr send method
let form = document.getElementById("form");
xhr.send(new FormData(form)); - Timeouts
- All browsers support the
timeoutevent and theontimeoutevent handler1
2
3
4xhr.timeout = 1000; // 1 second
xhr.ontimeout = function() {
// do something
}
- All browsers support the
- Progress events
- The Progress Events specification is a W3C Wroking Draft defining events for client-server communication
- The events were first targeted at XHR explicitly but have now also made their way into other similar APIs
- The 6 progress events
laodstart: fired when the first byte of the response has been receivedprogress: fired repeatedlty as a response is being receivederror: fired when there was an eror attempting the requestabort: fired when the connection was terminated by calling abort() methodload: fired when the response has been fully receivedloaded: fired when the communication is complete and after firing, abort, or loade
- Cross-origin resource sharing
- One of the major limitations of Ajax communication via XHR is the cross-origin security policy: by default, XHR objects can access resources only on the domain from which the containing web page originates
- CORS (cross-origin-resource-sharing) defines how the browser and server must communicate when accessing sources across origins
- The basic idea behind CORS is to use custom HTTP headers to allow both the browser and the server to know enough about each other to determine if the request or response should succeed or fail
- Modern browsers support CORS natively throught the XMLHttpRequest
object
- The open method specifies the URL of the reources to be accessed
- CORS allows access to the status, statusText properties, and synchronous requests
- There are also some limitations on CORS XHR object for security
reason:
- Custom headers cannot be set using setRequestHeader() method
- Cookies are neither sent nor received
- The getResponseHeaders() method always returns an empty string
- Preflighted requests
- CORS allows the use of custom headers, methods other than GET or POST, and different body content types through a transparent mechanism of server verification called preflighted requests
- When the browser tries to make a request with one of the advanced options, a preflight request is made to the server
- The server can determine whether or not it will allow requests of this type by sending a response with appropriate headers
- Credentialed requests
- By default, CORS requests do no provide credentials, you can specify
that a request should send credentials by setting the
with-Credentialsproperty to true - If the server allows credentialed requests, then it responds with
the following HTTP header:
Allow-Control-Allow-Credentials - If a credentialed request is sent and this header is not sent as part of the response, then the browser doesn't pass the response to JavaScript
- By default, CORS requests do no provide credentials, you can specify
that a request should send credentials by setting the
- Alternate cross-domain techniques
- Image pings
- Images can be loaded cross-domain by any page without restrictions, this is the main way that online advertisements track views
- You can dynamically create images and use their onload and onerror event handlers to tell you when the response has been received
- Image pings are simple, cross-domain, one-way communication with the server. The data is sent via query-string arguments and the response can be anything
- The browser cannot get any specification data back from an image ping but it can tell whether the response has been received by listening for the load and error events
- Image pings are frequently used for tracking user clicks on a page or dynamic ad impressions
- JSONP
- JSONP is short for JSON with padding and is a special variant of JSON that has become popular for web services
- JSONP looks like JSON except that the data is wrapped within what looks like a function call
- JSONP format is made up of two parts: the callback and the data
- The callback is the function that should be called on the page when the response has been received
- The data is simply the JSON data to pass to the function
- Example
1
function({"k1": "v1", "k2", "v2"});
- JSONP is sued through dynamic
<script>elements assigning the src to a cross-domain URL1
2
3// this is in the server domain, the file is called jsonp.js
// this is the jsonp callback function
callbackFun({"k1": "v1", "k2", "v2"});1
2
3
4
5
6
7
8// this is in the browser domain, which is different from the server domain
<script>
function callbackFun (data) {
console.log(data);
}
</script>
<script src="jsonp.js"> </script> - Limitations of JSONP
- Some executable code is pulled into the page from another domain, and this may cause security issues
- There is no easy way to determine that a JSONP request has failed
- Image pings
- The
fetchAPI- The Fetch API can perform all tasks as an XMLHttpRequest, but is much easier to use, has a more modern interface, and is able to be used by modern web tools
- The XMLHttpRequest is optionally asynchronous, but the Fetch API are strictly asynchronous
- Basic API utilization
- Dispatching a request:
let r = fetch(URL); - Reading a response
1
2
3fetch(URL)
.then((response) => response.text())
.then((data) => console.log(data)); - Handling status codes and request failuers
1
2
3
4
5
6
7
8
9
10fetch(URL)
.then((response) => {
if (response.ok) {
return response.text();
} else {
throw new Error(response.statusText);
}
})
.then((data) => console.log(data))
.catch((error) => console.log(error));
- Dispatching a request:
- Common fetch patterns
- Sending JSON data
1
2
3
4
5
6
7fetch(URL, {
method: "POST",
body: JSON.stringify(data),
headers: {
"Content-Type": "application/json"
}
}) - Sending parameters in a request body
1
2
3
4
5
6
7
8
9let info = "foo=bar&baz=qux";
let paramHeaders = new Headers({
"Content-Type": "application/x-www-form-urlencoded"
});
fetch(URL, {
method: "POST",
body: info,
headers: paramHeaders
}); - Sending a file
1
2
3
4
5
6
7let formData = new FormData();
formData.append("file", file);
fetch(URL, {
method: "POST",
body: formData
}); - Sending a cross-origin request
1
2
3
4fetch(URL, {
method: "no-cors""
})
.then((response) => response.text())
- Sending JSON data
- The Headers object
- The Headers object is used as a container for all outgoing request and incoming response headers
- Basic usage
1
2
3
4let h = new Headers();
h.set("key": "value");
console.log(h.has("key")); // true
console.log(h.get("key")); // value - Header guards
- In some cases, no all HTTP headers are mutable by the client, and the headers object uses guards to enfore how set(), append(), and delete() behave
- Violating the guard restriction will throw a TypeError
- The Request object
- Creating request object
1
let request = new Request("URL", options);
- Cloning request object
- The request constructor does not always create the exact copy of a
request
1
2let r1 = new Request("URL"m {method: "GET"});
let r2 = new Request(r1, {method: "POST"}); - The
clone()method1
2let r1 = new Request("URL"m {method: "GET"});
let r2 = r1.clone();
- The request constructor does not always create the exact copy of a
request
- Using request objects with fetch
- You can pass a request object to the fetch() method, and the options
in fetch() method will override the options in the request object
1
2
3
4
5
6// request object with method set to GET
let req = new Request("URL", {method: "GET"});
// the method is overridden to POST
fetch(req, {method: "POST"})
.then((response) => response.text())
.then((data) => console.log(data));
- You can pass a request object to the fetch() method, and the options
in fetch() method will override the options in the request object
- Creating request object
- The Response object
- Creating response object
- Use the response constructor
1
let response = new Response();
- The most common way is to use the fetch() method, which returns a
promise that resolves to a response object that does represent an actual
HTTP response
1
2fetch("URL")
.then((response) => console.log(response)); - The
Response.redirect("url", statusCode)generates a redirected response object - The
Response.error()method produces a response that you would except from a network error, which would cause a fetch promise to reject
- Use the response constructor
- Cloning response object
- Use the
clone()method to create an exact copy with no opportunity to override any values1
2let r1 = new Response("data");
let r2 = r1.clone(); - Use the response constructor can also do pseudo-cloning
1
2let r1 = new Response("data");
let r2 = new Response(r1);
- Use the
- Creating response object
- The Beacon API
- To maximize the amount of information transmitted about a page, many analytical tools send data to a server as late in the page's lifecycle as possible. As a result, the optimal pattern its to send a network request on the brwoser's unload event
- During the unload event, the browsers is being discarded, so any pending network requests like asynchronous requests created by XMLHttpRequest or fetch() are cancelled. But the analytics tools still need to cease collecting information and ship off what they have to the server
- Solution 1: analytics use synchronous XMLHttpRequest to force delivery of the request, but doing so causes the browser to pause waiting for the request
- Solution 2: use the Beacon API
- The
navigator.sendBeacon(url, payload)sends a POST request to the server with a data payload. Returns a boolean value indicating whether the request was successfully sent - The sendBeacon() method can be called at anytime during the browsers' lifecycle
- Once the method is called, the browsers adds the requests to an internal request queue, and eagerly attempt to send requests in the queue
- The browsers guarantees it will attempt to send the request
- The
- Web sockets
- The goal of Web Socket is to provide full-duplex, bidirectional communication with teh server over a single, long-lasting connection
- Create a Web Socket in JavaScript
- An HTTP request is sent to the server to initiate a connection
- When the server responds, the connection uses the HTTP Upgrade header to switch from HTTTP to Web Socket protocol
- This means the Web Sockets cannot be implemented with a standard HTTP server and must use a specialized server supporting the protocol to work properly
- The url scheme for web socket does not begin with
hppt://orhttps://, but instead begins withws://orwss:// - The API
- Creating a web socket
- The url in the constructor must be an absolute url
- THe same-origin policy does not apply to web socket
1
let ws = new WebSocket("ws://**********");
- The
readyStateproperty for a web socket instanceWebSocket.OPENING(0): the connection is being establishedWebSocket.OPEN(1): the connection has been establishedWebSocket.Closing(2): the connection is beginning to closeWebSocket.CLOSE(3): the connection is closed- There is no readystatechange event
- Close a websocket:
we.close()
- Sending/receiving data
1
2
3
4
5
6
7let ws = new WebSocket("ws://**********");
let stringData = "Hello World";
let arrayBufferData = Uint8Array.from(["f", "o", "o"]);
let blobData = new Blob(["f", "o", "o"]);
ws.send(stringData);
ws.send(arrayBufferData);
ws.send(blobData); - Other events
open: fired when teh connection has been successfully madeerror: fired when an error occurs, the connection is unable to persistclose: fired when the connection is closed
- Creating a web socket
Client-Side Storage
- Cookies
- HTTP cookies were originally intended to store session information on the clicent
- A server sends a
Set-CookieHTTP header containing session information as part of any response to an HTTP request. Browsers store such session information and send it back to the server via theCookieHTTP header for every request after that point to uniquely identify the client from which the request was sent - Restrictions
- Cookies are tied to a specific domain, when a cookie is set, it is sent along with requests to the same domain from which it was created
- Other restrictions
- 300 cookies in total
- 4096 bytes per cookie
- 20 cookies per domain
- 81920 bytes per domain
- Cookie parts
- Name: unique name to identify the cookie, case-insensitive, the name must be URL-encoded
- Value: stirng value, must be URL-encoded
- Domain: domain for which the cookie is valid, all requests sent from a resource at this domain will include the cookie information
- Path: path within the specified domain for which the cookie should be sent to the server
- Expiration: timee stamp indicating when the cookie should be deleted, by default, all cookies are deleted when the browsers session ends, but it is possible to set another time for the deletion. The value is in GMT format (DD-Mon-YYYY HH:MM:SS GMT)
- Secure flag: when specified, the cookie information is sent to the server only if an SSL connection is used
- Cookies in JavaScript
document.cookie: returns a string containing a series of name-value pairs separated by semicolons, each name and each value is separated by an equal sign- The name and value should be URL-encoded
1
document.cookie = encodeURIComponent("name") + "=" + encodeURIComponent("value");
- Subcookies
- Subcookies are smaller pieces of data stored within a single cookie
- The idea is to use the cookie's value to store multiple name-value pairs within a single cookie
- Web Storage
- The Web storage is intent to overcome some of the limitations imposed by cookies when data is needed strictly on the client, with no need to continuously send data back to the server
- The are two primary goals of the Web Storage specification
- To provide a way to store session data oustide of cookies
- To provide a mechanism for storing large amounts of data that persists across sessions
- All major browsers support the following two storage objects as
properties of the window object:
localStorage: the permanent storage mechanismsessionStorage: the session-scoped storage mechanism
- The
Storagetype- The Storage type is designed to hold name-value pairs up to a maximum size
- Related methods
clear(): removes all values, not implemented in FirefoxgetItem(name): retrieves the value for the given namekey(index): retrieves the name fo the value in the given numeric positionremoveItem(name): removes the name-value pair identified by namesetItem(name, value): sets the value for the given name, you can also dosotrage.name = value
- The
sessionStorageobject- This object stores data only for a session, meaning that the data is stored until the browser is closed
- Data stored on sessionStorage is accessible only from the page that initially placed the data onto the object, making it of limited use for multipage applications
- All modern browsers implement storage writing as a blocking
synchronous action, so data added to storage can immediately be read.
Older IE implementations write data asynchronously so there may be a
lag, you can use
sessionStorage.begin()andsessionStorage.commit()to ensure that all assignments have been made1
2
3
4for (let key in sessionStorage) {
let value = sessionStorage.getItem(key);
console.log(`${key} = ${value}`);
}
- The
localStorageobject- In the revised HTML5 specification, the localStorage object superceded globalStorage as a way to store persistent client-side data
- In order to access the same localStorage object, pages must be served from the same domain, using the same protocol, and on the same ports
- The localStorage object can use all methods from the storage objects
- The storage event
- Whenever a change is made to a Storage object, the storage event is fired on the document
- The event object has the following four properties
domain: the domain for which the storage changedkey: the key that was set or removednewValue: the value that the key was set to, or null if the key was removedoldValue: the value prior to the key being changed
- IndexedDB
- The Indexed Database API (IndexedDB), is a structured data store in the browser, the idea is to create an API that easily allowed the storing and retrieval of JavaScript objects while still allowing querying and searching
- IndexedDB is designed to be almost completely asynchronous
- Databases
- The IndexedDB is an example of the NoSQL databases
- Connecting to a database
1
2
3
4
5
6
7
8let db = null;
let request = window.indexedDB.open("dbName", version);
request.onerror = (event) => {
alert(`Failed to open database: ${event.target.errorCode}`);
}
request.onsuccess = (event) => {
db = event.target.result;
}
- Object stores
1
2
3
4
5
6
7
8
9
10
11
12
13
14
15
16let user = {
username: "007",
firstName: "James",
lastName: "Bond",
password: "secret"
};
request.onupgradeneeded = (event) => {
const db = event.target.result;
if (db.objectStoreNames.contains("users")) {
db.deleteObjectStore("users");
}
db.createObjectStore("users", {
keyPath: "username"
});
}; - Transactions
- Create transactions:
let transcation = db.transaction(); - Create transactions with different objects:
let transcation = db.transaction(["users"]); - Use the
objectStore(storeName)method to access a particular object store, useadd(),put(),get(), anddelete()on the store object to conduct CRUD operations
- Create transactions:
- Insertion
- Use
add(obj)andput(pbj)to insert data into the database - The difference occurs only when an object with the same key already exists in the object store, add() will cause an error while put() will simply overwrite the object
- Use
- Querying with cursors
- Transactions can be used directly to retrieve a single item with a known key, when you want to retrieve multiple items, you need to create a cursor with the transaction
- A cursor is a pointer to a result set
- IDBCursor instance properties and methods
direction: the direction of the cursor, can benext,nextunique,prev,prevuniquekey: the key of the objectvalue: the value of the objectprimaryKey: the key being used by the cursor, could be the object key or an index keycontinue([key]): moves to the next item in the result set, if the optional argument key is specified, moves to the specified keyadvance(count): moves the cursor ahead by count number of items1
2
3
4
5
6
7
8
9
10
11
12
13const transaction = db.transaction("users");
store = transaction.objectStore("users");
const request = store.openCursor();
request.onsuccess = (event) => {
const cursor = event.target.result;
if (cursor) {
console.log(cursor.value);
cursor.continue();
}
};
request.onerror = (event) => {
console.log(`Failed to open cursor: ${event.target.errorCode}`);
};
- Key ranges
- Key ranges are used to make working with cursors a little more
efficient, a key range is represented by an instance of
IDBKeyRange - Use the only method and retrives values with the specified key:
const onlyRange = IDBKeyRange.only("keyName") - Use the lower bound method to defines a lower bound for the result
set (where the cursor should start):
- Starts at a specific
key:
const lowerRange = IDBKeyRange.lowerBound("keyName") - Starts after a specific key:
const lowerRange = IDBKeyRange.lowerBound("keyName", true)
- Starts at a specific
key:
- Use the upper bound method to defines an upper bound for the result
set (where the cursor should end):
- Ends at a specific key:
const upperRange = IDBKeyRange.upperBound("keyName") - Ends before a specific key:
const upperRange = IDBKeyRange.upperBound("keyName", true)
- Ends at a specific key:
- Use the bound method to specifies both lower bound and upper bound
- Starts at key1, ends at key2:
const boundRange = IDBKeyRange.bound("key1", "key2") - Starts after key1, ends at key2:
const boundRange = IDBKeyRange.bound("key1", "key2", true) - Starts after key1, ends before key2:
const boundRange = IDBKeyRange.bound("key1", "key2", true, true) - Starts at key1, ends before key2:
const boundRange = IDBKeyRange.bound("key1", "key2", false, true)
- Starts at key1, ends at key2:
- Use key range in the cursor
1
2
3
4
5
6
7
8
9
10const store = db.transaction("users").objectStore("users");
let range = IDBKeyRange.only("007");
const request = store.openCursor(range);
request.onsuccess = (event) => {
const cursor = event.target.result;
if (cursor) {
console.log(cursor.value);
cursor.continue();
}
};
- Key ranges are used to make working with cursors a little more
efficient, a key range is represented by an instance of
- Concurrency issues
- Although IndexedDB is an asynchronous API inside of a web page, there still can be concurrency issues: if the same web page is open in two different browser tabs at the same time, it's possible that one may attempt to upgrade the database before the other is ready
- You should assign an
oversionchangeevent handler to tackle the concurrency issues, the best response to this event is to immediately close the databse so that the version upgrade can be completed1
2
3
4
5
6
7
8
9let request, database;
request = indexedDB.open("dbName", 1);
request.onsuccess = (event) => {
database = event.target.result;
database.onversionchange = () => {
database.close();
};
};
Modules
- Understanding the module pattern
- Module pattern ideas
- Break logic into pieces that are totally encapsulated from the rest of the code
- Allow each piece to explicitly define what parts of itself are exposed to external pieces
- Allow each piece to explicitly define what external pieces it needes to execute
- Module identifiers
- Module systems are essentially key-value entities, where each module has anidentifier that can be used to reference it
- The module identifier can be a string, or an actual path to a module file
- Native browser module identifiers must provide a path to an actual
JavaScript file. In addition, NodeJS will perform a search for module
matches in side the
node_modulesdirectory, and can also match an identifier to a directory containingindex.js
- Module dependencies
- The local module declares to the module system a list of external dependencies
- The module system inspects the dependencies and in turn guarantees that these modules will be loaded and initialized by the time the local module executes
- Module loading
- When an external module is specified as a dependency, the local moduel excepts that when it is executed, the dependencies will be ready and initialized
- In the context of browsers, all dependencies should be sent to the browsers and loaded before the local module executes
- Entry points
- A network of modules that depend upon each other must specify a single module as the entry point, where the path of execution will begin
- Dependencies between modules in an application can be represented as a directed graph
- Asynchronous dependencies: it is useful to laod modules on demand by allowing JavaScript code to instruct the module system to load a new module, and provide the module to a callback once it is ready
- Programmatic dependencies
- Some module systems requier you to specify all dependenciesa at the beginning of a module, but some module system will allow you to dynamically add dependencies inside the program structure
- Programmatic dependencies allow for more complex dependency utilization, but make static module analysis more difficult
- Static analysis
- The JavaScript you build into modules and deliver to the browsers is often subject to static analysis, where tools will inspect the structure of your code and reason about how it will behave without performing program execution
- More complicated module behaviro, such as programmatic dependencies, will make static analysis more difficult
- Module pattern ideas
- Pre-ES6b module loaders
- Prior to ES6, JavaScript codebases using modules essentially wanted to use a language feature that was not available by default. Therefore, codebases would be written in a module syntax that conformed to a certain specification, and separate module tooling would server to bridge the gap between the module syntax and the JavaScript runtime
- CommonJS
- The CommonJS specification outlines a convertion for module definition that uses synchronous declarative dependencies
- The specification is primiarily intended for module organization on the server, but it will also be used on the client side
- CommonJS module syntax will not work natively in the browser
- Example
1
2
3
4
5
6
7var moduleB = require("./moduleB");
module.export = {
stuff: moduleB.doStuff();s
}
// equivalent to :
// module.exports.stuff = moduleB.doStuff(); - Modules are always singletons, irrespective of how many times a module is referenced inside require()
- Modules are cached after the first time they are loaded, subsequent attempts to load a module will retrieve the cached module
- Module loading in CommonJs is synchronous, so require() can be
programmatically invoked inlin in a module
1
2
3if (condition) {
require("./moduleA");
} - NodeJs can use absolute or relative paths to modules, the path to the module definition might reference a directory, or it might be a single JavaScript file
- Asynchronous Module Definition (AMD)
- CommonJs is targeted at a server execution model, all loading of modules is synchronous, the AMD system is targeted at browser execution model, where there are penalties from increased network latency
- The strategy for AMD is for modules to declare their dependencies, and the module system runninng in the browsers will fetch the dependencies on demand and execute the module that depends on them once they have all loaded
- The core of the AMD module implementation is a function wrapper around the module definition, which prevents global variable declaration and allows for the loader library to control when to load modules
- AMD allows you to speficy the string identifier for your module
1
2
3
4
5
6
7
8// definition for a module with id moduleA, moduleA depends on moduleB,
// which will be loaded asynchronously
define("moduleA", ["moduleB"], function(moduleB) {
return {
stuff: moduleB.doStuff();
}
};
}); - AMD also supports the require and exports objects, which allow for construction of CommonJs style modules inside an AMD moduel factory function
- Universal Module Definition (UMD)
- The UMD module system was introduced to create module that could be used by both the CommonJS and the AMD module systems
- The UMD pattern defines module in a way that detects which module system is being used upon startup, configures it as appropriate, and wraps the whole thing in an immediately invoked function expression
- Module loader deprecation
- The above module systems will become increasingly obsolete as support broadens for the ECMAScript 6 module specification
- The intense conflict between CommonJS and AMD cultivated the ECMAScript 6 module specification that we now enjoy
- Working with ES6 modules
- ES6 module specification is simpler than its predecessor module loaders, and native browser support means that loader libraries and other preprocessing is not necessary
- Module taggin and definition
- Modules in ES6 exist as a monolithic chunk of JavaScript, a script
tage with type="module" will signal to the browser that the associate
code should be executed as a module, as apposed to execution as
traditional script
1
2
3
4
5
6// inline module
<script type="module">
// module code goes here
</script>
// external module file
<script type="module" src="./myModule.js"> </script> - Downloading a module file begins immediately after the module script tag is parsed, but execution is delayed until the document is completely parsed
- The order in which module script tag appears on the page is the
order in which it will be executed
1
2
3
4
5
6
7
8// executes 3rd
<script type="module" src="./myModule1.js"></script>
// executes 4th
<script type="module" src="./myModule2.js"></script>
// executes 1st
<script type="text/javascript" src="./jsFile1.js"></script>
// executes 2nd
<script type="text/javascript" src="./jsFile2.js"></script> - ES 6 modules associated with a
<script type="module">tag are considered to be the entry module for a module graph. There are no restrictions as how many entry modules there can be on a page, and there is no limit to overlap of modules. No matter how many times a module is loaded in a page, irrespective of how that load occurs, it will only ever load a single time
- Modules in ES6 exist as a monolithic chunk of JavaScript, a script
tage with type="module" will signal to the browser that the associate
code should be executed as a module, as apposed to execution as
traditional script
- Module loading
- ES 6 modules are unique in theri ability to be loaded both natively by the browser as well as in conjunction with third-party loaders and build tools
- A browser that supports ES6 modules will load the entire dependency graph from a top-level module, and it will do so asynchronously
- Module behavior
- Best features from CommonJS and AMD:
- Module code is only executed when it is loaded
- A moddule will only ever be loaded a single time
- Modules are singletons
- Module can define a public interface with which other modules can observe and interact
- Modules can request that other modules be loaded
- Circular dependencies are supported
- New features introduced in ES6
- Modules by default execute in strict mode
- Modules do not share a global namespace
- The value of
thisat top-level of a module is undefined, as opposed to thewindowobject in normal scripts vardeclarations will not be added to thewindowobject- Modules are loaded and executed asynchronously
- Best features from CommonJS and AMD:
- Module exports
- Modules can use exports from other modules using the
importkeyword, import must appear in the top level of a module - A module identifier can be either the relative path to that module file from the current module or the absolute path to that module file form the base path
- Imports are treated as read-only views to the module, effectively
the same as const-declared variables
1
2
3
4
5
6
7
8
9
10
11
12
13
14
15
16// moduleA.js
const foo = "foo";
const bar = "bar";
const baz = "baz";
export {foo, bar, baz};
// moduleB.js
import * as Foo from "./moduleA";
console.log(Foo.foo); // "foo"
console.log(Foo.bar); // "bar"
console.log(Foo.baz); // "baz"
// moduleC.js
import { foo, bar, baz as myBaz} from "./moduleA";
console.log(foo); // "foo"
console.log(bar); // "bar"
console.log(myBaz); // "baz" - Module passthrough exports
- Imported values can be piped directly through to an export
1
2
3
4
5
6
7
8
9
10// moduleA.js
export const foo = "foo";
// moduleB.js
export * from "./moduleA";
export const foo = "baz";
// moduleC.js
import * as Foo from "./moduleB";
console.log(Foo.foo); // "baz"
- Imported values can be piped directly through to an export
- Worker modules: ES 6 modules are fully compatible with Worker instances
- Modules can use exports from other modules using the
Workers
- Introduction to workers
- A single JavaScript environment is essentially a virtualized environment running inside the host operating system, each open page in a browsers is allocated its own environment. Each page has its own memory, event loop, DOM, and so on. The environments of differeng pageas are in parallel
- Using workers, browsers are able to allocate a second child environment that is totally separated from the original page environment. The child environment is prevented from interacting with single-thread-dependent constructs such as the DOM, but is otherwise free to execute code in parallel with the parent environment
- Workers and threads
- Similarities
- Workers are implemented as actual threads
- Workers execute in parallel
- Workers can share some memory: workers are able to use a SharedArrayBuffer to share memory between multiple environments
- Difference
- Workers do not share all memory
- Worker threads are not essentially part of the same process
- Worker threads are more expensive to create
- Similarities
- Types of workers
- Dedicated web worker: aka dedicated worker, web worker, or just worker, can only be accessed by the page that spawned it
- Shared web worker: similar to a dedicated web worker, but can be accessed across multiple contexts
- Service worker: different from a dedicated web worker or a shared web worker, the primary purpose of a service worker is to act as a network request arbiter capable of intercepting, redirecting, and modifying requests dispatched by the page
- The
WorkerGlobalScope- On a web page, the window object exposes a suite of global
variables. Inside a worker, its global object is an instance of
WorkerGlobalScope, which can be accessed using the
selfkeyword - Properties and methods
navigator: returns theWorkerNavigatorobjectself: returns theWorkerGlobalScopeobjectlocation: returns theWorkerLocationobjectperformance: returns aPerformanceobjectconsole: returns theConsoleobjectcaches: returns theCacheStorageobjectindexDb: returns anIDBFactoryobjectisSecureContext: returns a boolean indicating whether the context of the window is secureorigin: returns the origin of theWorkerGlobalScopeobject- Methods with the same name and function on window:
atob(),btoa(),clearInterval(),clearTimeout,createImageBitmap(),fetch(),setInterval(),setTimeout()
- Subclasses
- A dedicated worker uses a
DedicatedWorkerGlobalScope - A shared worker uses a
SharedWorkerGlobalScope - A service worker uses a
ServiceWorkerGlobalScope
- A dedicated worker uses a
- On a web page, the window object exposes a suite of global
variables. Inside a worker, its global object is an instance of
WorkerGlobalScope, which can be accessed using the
- Dedicated worker basics
- Dedicated workers can be described as background scripts
- Creating a dedicated worker (the worker itself exists in a separate
JavaScript environment)
1
2
3// pass a javascript file to the worker constructor to
// let it load the script file in the background
const worker = new Worker("./emptyWorker.js"); - Worker security restrictions: worker script files can only be loaded from the same origin as the parent page, otherwise an error is thrown when attempting to construct the worker
- Using the worker object
- The
Workerobject returned from the constructor is used as the single point of communication with the newly created dedicated worker, it can be used to transmit information between the worker and the parent context - Worker object event handlers
onerrorcalled when an error is thrown inside the workeronmessage: called when the worker script sends a message back to the parent contextonmessageerror: called when a message is received that cannot be deserialized
- Worker object methods
postMessage(): used to send information to the worker via asynchronous message eventsterminate(): used to immediately terminate the worker, no opportunity for cleanup
- The
- The DedicatedWorkerGlobalScope
- The global scope inside a dedicated worker is the DedicatedWorkerGlobalScope, this inherits from WorkerGlobalScope
- A worker is able to access this global scope using the
selfkeyword - Methods and properties for the DedicatedWorkerGlobalScope instance
name: optional string identifierpostMessage(): counterpart to theWorkerobject'spostMessage()methodclose(): counterpart to theWorkerobject'sterminate()methodimportScripts(): used to import an arbitrary number of scripts into the worker
- The dedicated worker lifecycle
- The
Worker()constructor is the beginning of life for a dedicated worker - Once created, a dedicated worker will last the lifetime of the page
unless explicitly terminated either via self-termination
(
self.close()) or external termination(worker.terminate())
- The
- Worker data transfer
- In languages that wupport traditional models of multithreading, you can use locks, mutexes, and volatile variables to transfer data between threads. In JavaScript, you have three ways: the structured clone algorithm, transferable objects, and shared array buffers
- Structured clone algorithm
- This algorithm can be used to share a piece of data between two separate execution contexts
- This algorithm is implemented by the brwoser behind the scenes, but it cannot be invoked explicitly
- Common JavaScript data types are supported by this algorithm
- Once copied, changes to data in the original context will not affect the copied data
- Attemptying to clone an Error object, a Function object, or a DOM node will throw an error
- Object property descriptors, getters, setters, prototype chains are not cloned
- Transferable objects
- It is possible to transfer ownership from one context to another using transferable objects
- This is useful when it is impratical to copy large amounts of data between contexts
- Transferable data types:
ArrayBuffer,MessagePort,ImageBitmap,OffscreenCanvas
- SharedArrayBuffer
- When passing a SharedArrayBuffer inside postMessage(), the browser only passes a reference to the same block of memory, each context is free to modify the buffer as it would with a normal ArrayBuffer
- Sharing memory blocks between parallel threads introduces a risk of race condition
- Worker pools: because starting a worker is quite expensive, there are situations where it is more efficient to keep a fixed number of workers alive and dispatch work to them as necessary
- Shared workers
- Two different pages on the same origin can share a single worker to reduce computational overheads
- Shared worker basics
- Creating a shared worker
1
2
3// pass a javascript file to the worker constructor to
// let it load the script file in the background
const worker = new SharedWorker("./emptyWorker.js"); - Shared worker identity and single occupancy
- The Worker() constructor always creates a new worker instance, the SharedWorker() constructor will only create a new worker instance if one with the same identity does not already exist
- Shared worker identity is derived from the resolved script URL, the worker name, and the document origin
- Using the SharedWorker object
- The
SharedWorkerobject returned from the constructor is used as the single point of communication with the newly created shared worker, it can be used to transmit information between the worker and the parent context via a MessagePort, as well as catch error events emitted from the worker - Related properties
onerror: called when an error is thrown inside the workerposrt: the MessagePort for communication with the worker
- The
- The
SharedWorkerGlobalScope- The global scope inside a shared worker is the
SharedWorkerGlobalScope, which can be accessed using the
selfkeyword - Properties and methods:
name,importScripts(),close(),onconnect
- The global scope inside a shared worker is the
SharedWorkerGlobalScope, which can be accessed using the
- The shared worker lifecycle
- A shared worker's lifecycle has the same stages and features of a dedicated woker
- A dedicated woker is inextricably bound to a single page, a shared worker will persist as long as a context remains connected to it
- Creating a shared worker
- Service workers
- A service worker is a type of web worker that behaves like a proxy server inside the browser, it allows you to intercept outgoing requests and cache the response
- The service worker allows a web page to work without network connectivity, as some or all of the page can potentially be served from the service worker cache
- Multiple pages on a single domain will all interact with a single service worker instance
- Two primary tasks for a service worker
- Act as a chahing layer for network requests
- Enable push notifications
- Service worker basics
- The
ServiceWorkerContainer- Service workers have no global constructor, they are managed through
the
navigator.serviceWorkerobject, which is aServiceWorkerContainerobject
- Service workers have no global constructor, they are managed through
the
- Creating a service worker:
navigator.serviceWorker.register(filePath), this returns aPromiseobject that resolves to aServiceWorkerRegistrationobject - Using the
ServiceWorkerContainerobject- Event handlers:
oncontrollerchange: called when a new activated ServiceWorkerRegistration is requiredonerror: called when an error is thrown inside any associated service workeronmessage: called when the service worker script sends a message event back to the parent context
- Properties:
ready: returns aPromiseobject that resolves to aServiceWorkerRegistrationobject when the service worker is ready to receive messages, this promise will never rejectcontroller: returns the activatedServiceWorkerobject associated with the current page, or null if there is no active service worker
- Methods
register(url, options): creates or updates aServiceWorkerRegistrationusing the provided url and options objectgetRegistration(): returns a promise, which will resolve with aServiceWorkerRegistrationobject that matches the provided scope, or resolve with undefined if there is no matching service workergetRegistrations(): returns a promise, which will resolve with an array of allServiceWorkerRegistrationobjects that are associated with theServiceWorkerContainer, or an empty array if there are not associated service workersstartMessage(): starts the transmission of message dispatches via Client
- Event handlers:
- Using the
ServiceWorkerRegistrationobject- Event handlers
onupdatefound: called when a new version of this service worker begins installation
- Properties
scope: returns the full URL path of the service worker's scopenavigatyionPreload: returns theNavigationPreloadManagerinstance associated with this registration objectpushManager: returns the PushManager instance associated with this registration objectinstalling: returns the service worker with a state of installing if there is currently one, else nullwaiting: returns the service worker with a state of waiting if there is currently oneactive: returns the service worker with a state of activating or active if there is currently one, else null
- Methods
getNotifications(): returns a promise, which resolves with an array of Notification objectsshowNotifications(): displays a notification configurable with a title and options argumentsupdate(): re-requests the service worker script directly from the service and initiates fresh installation if the new script differsunregister(): attempts to un-register a service worker registration, this allows service worker execution to complete before performing the unregistration
- Event handlers
- Using the
ServiceWorkerobject- Event handlers
onstatechange: called when the service worker changes state
- Properties
state: returns the current state of the service worker, one ofinstalling,installed,activating,activated,redundantscriptURL: returns the URL of the service worker script
- Event handlers
- The
- The service worker cache
- Before service workers, web pages lacked a roubust meahcnism for progrmatically caching network requests
- Some features of service workers
- The service worker cache does not chache any request automatically
- The service worker cache has no concept of time-based expiration
- Service worker cache entries must by manually updated and deleted
- Caches nust by manually versioned
- The only browser-enfored eviction policy is based on storage available for the service worker cache to use
- The
CacheStorageobject- The CacheStorage object is a key-value store of string keys mapping to Cache objects, the CacheStorage object features an API that assembles an asynchronous Map
- Get the CacheStorage object: use the global object
caches - Get the cache for a given key:
caches.open(key), non-string keys are converted to a string - Check if a cache exists in the cache storage:
caches.has(key) - Delete a cache:
caches.delete(key)
- The
Cacheobject- The Cache also resembles an asynchronous Map, Cache key can either be a URL string or a Request object, these keys will map to Response object values
- The service worker cache is intended to only cache GET http requests, because the response will not change over time
- Methods
put(request, response): add the key-value pair to the cache, the key can be a URL string or a Request object, the value should be a Response objectadd(request): used when you only have the key, this method will dispatch a fetch() to the network and cache the response. Returns a promise, which resolves when the cache entry is successfully addedaddAll(requests): used when you wish to perform an all-or-nothing bulk addtion to the cachematchAll(request, options): returns a promise, which resolves to an array of matching cache Response objectsmatch(request, options): returns a promise, which resolves to a matching cache Response object, or undefined if there are no cache hitscache.keys(),cache.delete(key), etc.
- Maximum cache storage
- There is no uniform specification for maximum cache storage
- The
navigator.storage.estimate()returns the approximate space available and how much is currently used in bytes
- Service worker clients
- A service worker tracks an association with a window, worker, or
service worker with a
Clientobject, sertice workers can access the Client objects via theClientsinterface using theself.clientsproperty - Client object properties and methods
id,type(window, worker, sharedWorker),url,postMessage(msg)(send a targeted messaging to a single client)openWindow(url): allows you to open a new window at the specified URL, effectively adding a new Client to the service workerclaim(): forcibly set the service worker to control all clients in its scope
- A service worker tracks an association with a window, worker, or
service worker with a
- Service workers and consistency
- In order to enable web pages to emulate native application behavior, service workers should support versioning
- Two primary form of consistency
- Code consistency: since web pages commonly undergo incremental upgrades, service workers should provide an encorcement mechanism to ensuer that all concurrently running pages on the same origin are always built from the assets from the same version
- Data consistency: since web I/O format may change between different versions, service workers consistency mechanism should also ensure that web I/O behaves identically for all concurrently running pages on the same origin
- Service worker lifecycle
- There are six states a service worker might exist in:
parsed,installing,installed,activating,activated,redundant. A full lifecycle for a service worker will always visit these states in this order - A service worker that encounters an error during installation or activation will skip to the redundant state
- The
parsedstate- A newly created service worker is in the parsed state
- This state has no event or
ServiceWorker.statevalue
- The
installingstate- This state is where all service worker setup tasks should be performed
- If a service worker reaches this state, the
ServiceWorkerRegistrationobject will fire theupdatefoundevent - This state is frequently used to populate the service worker's cache
- If there is no error thrown or promise rejected, the service worker proceeds to the installed state
- The
installed(waiting) state: this state means the service worker has no additional setup tasks to perform and is prepared to assume control of clients once it is allowed to do so - The
activatingstate- This state indicates that the service worker has been selected by the browsers to become the service worker that should control the page
- While in the activating state, no functional events such as
fetchorpushwill be fired until the service worker reaches theactivatedstate
- The
activatedstate- This state indicates that the service worker is in control of one or many clients
- In this state, the service state will capture fetch() events inside its scope as well as notification and push events
- The
redundantstate: this is the graveyard for a service worker, no events will be passed to it, and the browser is free to destroy it and free up its resources
- There are six states a service worker might exist in:
- Intercepting a fetch event
- The interception ability of service workers is not limited to the fetch event, but can also intercept requests for JavaScript, CSS, images,and HTML
- Service workers use the
event.respondWith()method to decide how to handle a fetch event - Return a response from network: a passthrough for a fetch event.
This strategy is suitable for requests that need to reach the server
1
2
3
4
5self.onfetch = (fetchEvent) => {
fetchEvent.respondWith(
fetch(fetchEvent.request)
);
}; - Return from cache: a cache check. This strategy is suitable for
requests that are guaranteed to be in the cache
1
2
3
4
5self.onfetch = (fetchEvent) => {
fetchEvent.respondWith(
caches.match(fetchEvent.request)
);
}; - Return from network with cache fallback: gives prefernence to
up-to-date responses from the network but will return values in the
cache if they exist. This stragety is suitable for finding the most
up-to-date information ASAP
1
2
3
4
5
6
7self.onfetch = (fetchEvent) => {
fetchEvent.respondWith(
fetch(fetchEvent.request).catch(() => {
return caches.match(fetchEvent.request);
})
);
}; - Generic fallback: this strategy accounts for scenarios where both
the cache and network fail to produce a resource
1
2
3
4
5
6
7self.onfetch = (fetchEvent) => {
fetchEvent.respondWith(
caches.match(fetchEvent.request).then((response) => {
return response || fetch(fetchEvent.request);
})
);
};
- Push notifications
- A wqeb application should be able to support push notifications, which means it should be able to receive a push event from a server and display a notification on the device
- In order for push notifications to work, the service workers should be able to display notification, handler interactions with those notifications, subscribe to server-event push notifications, handle push messages even when the application is not in the foreground or open
- Displaying notifications
- Service workers have access to the Notification API via their registration object
- Use
ServiceWorkerRegistration.showNotification(title, options)to display a notification
- Handling notification events: handle the
self.onnotificationclickevent andself.onnotificationcloseevent - Subscribing to push events
- The subsctiption must happen via the service worker's PushManager object
- Use the
ServiceWorkerRegistration.pushManager.subscribe(options)method to subscribe to push events
- Handling push events
- Once subscribed, the service worker will receive push events each time the service pushes a message
Best Practices
- Maintainability
- What is maintainable code
- Understandable: someone else can pick up the code without a walk-through by the original developer
- Intuitive: no matter how complex the operation is, things in the code seem to make sense
- Adaptable: the code is written in such a way that variation in data does not require a complete rewrite
- Extendable: the code allows for extension of the core functionality in the future
- Debuggable: the code gives you enough information to identify the issue when something goes wrong
- Code conventions
- Readibility
- Indentation is usually done by using foure spaces instead of by using the tab key
- Make comments for functions and methods, large sections of code, complex algorithms and hacks
- Variable and function naming
- Variable names should be nouns, function names should begin with a verb
- Use logical names for variables and functions, without worrying about the length
- Variables, functions, and methods should begin with a lowercase letter and camelCase
- Be descriptive and sensible with names
- Variable type transparency
- Variables are loosely typed in JavaScript, it is easy to lose track of the type of data that a variable should contain
- The first solution is through initialization: initialize a variable with a value of the correct type after declaring it
- The second solution is to use Hungarian notation: prepend one or more characters to the beginning of a variable to indicate the data type. o for objects, s for strings, i for integers, b for booleans, f for floats, etc.
- Readibility
- Loose coupling
- Whenever parts of an application depend too closely on one another, the code becomes too tightly coupled and hard to maintain, this usually happens when objects refer directly to one another in such a way that a change to one always requires a change to other
- Decouple HTML/JavaScript
- JavaScript that appears inline in HTML, either using a script tag with inline code or using HTML attributes, is too tightly coupled
- HTML and JavaScript are also closely coupled when HTML is contained in JavaScript, this usually happends using innerHTML to insert HTML into the page
- When HTML and JavaScript are too tightly coupled, interpreting an JavaScript error means first determining whether the error occured in the HTML portion or in the JavaScript portion, which reduces the readbility of the code
- Decouple CSS/JavaScript
- The most common example of tight coupling is using JavaScript to change individual styles
- Modern web applications use JavaScreipt to change styles frequently, so it is not possible to completely decouple CSS and JavaScript, the coupling can be made looser by changeing element class attributes instead of individual styles
- Decouple application logic/event handlers
- Rules for loose coupling of application and business logic
- Do not pass event object into other methods, pass only the data from the event object
- Every action that is possible in the application should be possible without executing an event handler
- Event handlers should process the event and then hand off processing to application logic
- An example
1
2
3
4
5
6
7
8
9
10
11
12
13
14
15
16
17
18
19
20
21
22
23// The application logic and event handler are highly coupled
function handleKeyPress(event) {
if (event.keyCode === 13) {
let target = event.target;
let value = 5 * parseInt(target.value);
if (value > 10) {
document.getElementById("error-msg").style.display = "black";
}
}
}
// Code after decoupling
function validateValue(value) {
value = 5 * parseInt(value);
if (value > 10) {
document.getElementById("error-msg").style.display = "black";
}
}
function handleKeyPress(event) {
let target = event.target;
validateValue(target.value);
}
- Rules for loose coupling of application and business logic
- Programming practices
- Respect object ownership
- If you are not responsible for the creation or maintenance of an object, its constructor, or its methods, you shouldn't be making changes to it
- You can create a new object with the functionality you need, and interact with the object of interest
- You can create a custom type that inherits from the type you want to modify, you can modify the custom type with additional functionality
- Avoid globals
- Avoid global variables and functions whenever possible
- Avoid null comparisons
- JavaScript does not do any automatic type checking, it's the developer's responsibility
- Checking a value against null is overused, and frequently leads to
erros due to insufficient type checking, use
typeofandinstanceoffor type checking
- Use constants
- The goal of relying on constants is to isolate data from application logic in such a way that it can be changed without risking the introduction of errors
- Repeated values, user interface strings, URLs, and any value that may change should be stored in a constant
- Respect object ownership
- What is maintainable code
- Performance
- Be scope-aware
- As the number of scopes in the scope chain increases, so does the amount of time it takes to access variables outside of the current scope
- It is alwasys slow to access a global variable than it is to access a local variable
- Avoid global lookups, avoid with statements (a with statement creates its own scope)
- Choose the right approach
- Avoid uncessary property lookup
- Optimize loops: simplify the terminal condition, simplify the loop body, use postest loops
- Minimize statement count
- A single statement can ocmplete multiple operations faster than multiple statements each performing a single operation
- Multiple variable declaration should be in one statement
- Insert iterative values
1
2
3
4
5// Before
let name = values[i];
i++;
// After
let name = values[i++]; - Use array and object literals
- Optimize DOM interactions
- Minimize live updates
- User innerHTML: for large amounts of updates, using innerHTML is
faster than using the standard DOM methods (like the
createElementById()method) - Beware of HTMLCollection: anytime you access an HTMLCollection, whether it be a property or a method, you are performing a query on the document, an that querying is quite expensive
- Be scope-aware
- Deployment
- Build process
- You should not pass your untouhed code to a browser for test purpose
- Intellectual property issues: post source code online let others to figure what you are doing
- File size: source with large amount of comments is good for maintainability but bad for performance
- Code organization: the way you organize code for maintainability is not necessarily the best wasy to deliver it to the browser
- File structure: spearate JavaScript files in different files
- Task runners: a task runner with automate tasks is a good idea
- Tree shaking
- Tree shaking is an effective strategy for reducing payload size
- Tree shaking is capable of determining which parts of the codebase are not needed at all, and remove them from the codebase to reduce bundle size
- Module bundlers: used to identify the landscape of JavaScript dependencies in an application, combine them into a monolithic application, make decition about how the modules should be organized and concatenated, and generate the output files that will be provided to the browser
- You should not pass your untouhed code to a browser for test purpose
- Validation
- Checking code in the browser suffers from several issues
- The validation canot be easily automated or ported from system to system
- Aside from syntax errors, problems are encountered only when code is executed, leaving it possible for errors to occur
- Several tools like JSLint and ESLint are popular JavaScript debugging tools
- Checking code in the browser suffers from several issues
- Compression
- File comprression involves two aspects
- Code size: the number of bytes that need to be parsed by the browser
- Wire weight: the number of bytes that are actually transmitted from the server to the browser
- Code minification: remove extra white space, remove all comments, shorten variable names, function names, and other identifiers
- JavaScript compilation: remove unused code, transform parts of code to use more concise syntax, global inlining of function calls, constants and variables
- JavaScript transpilation: transpilation will allow you to wield all the newest syntactical specification features without having to worry about backwards browser compatibility
- HTTP compression
- All major browsers support client-side decompression or resources that they receive
- The srever can compress JavaScript using sever-dependent capabilities, and include a header indicating the compression format
- File comprression involves two aspects
- Build process