Lesson 01 2021/08/30
- Install Node.js
- Install GitHub Desktop
- Run react-native app
- Run on browser: use React Native website, or use snack.expo.dev
- Run locally using Expo CLI
- Install Expo CLI:
npm install -g expo-cli - Create a new React Native project and run
1
2
3
4
5
expo init ProjectName
cd ./ProjectName
npm start # expo start is also okay
- Install Expo CLI:
- Run one your phone: download Expo Go and scan the QR code
Lesson 02 2021/09/01
- Scope

- Introduction
- Intro
- React Native is an open source framework for building Android and iOS applications using React and the app platform’s native capabilities
- With React Native, you use JavaScript to access your platform’s APIs as well as to describe the appearance and behavior of your UI using React components
- View
- In mobile development, a view is a basic building block of UI: a rectangular element on the screen which can be used to display text, images, or respond to user input
- Views can be nested
- Native Components
- You can invoke Andriod and iOS components with JS using React components, React Native creates the corresponding Andriod and iOS components at runtime. We call these platform-backed components Native Components
- React Native comes with a set of essential, ready-to-use Native Components you can use to start building your app today. These are React Native's Core Components
- React Native lets you build your own Native Components for Android and iOS to suit your app’s unique needs
- React Native has a thriving ecosystem of community-contributed components
- Intro
- Core Components
View
- View is the most fundamental component for building a UI. It is a container that supports layout with flexbox, style, some touch handling, and accessibility controls
- View is designed to be nested inside other views and can have 0 to many children of any type
- Basic example
1
2
3
4
5
6
7
8
9
10
11
12
13
14
15
16
17
18
19
20
21
22
23
24
25
26
import React from 'react';
import {View, Text, StyleSheet} from 'react-native';
const ViewApp = () => {
return (
// It is recommended to use StyleSheet for clarity and performance
<View style ={styles.container}>
// Inline styles are also supported
<Text style ={{fontSize: 40, fontWeight:'bold'}}>
Try editing me!
</Text>
</View>
);
};
styles = StyleSheet.create({
container: {
backgroundColor: 'red',
flex: 1,
justifyContent: 'center',
alignItems: 'center'
}
});
export default ViewApp;
Text
- Text is a React component for displaying text
- Text supports nesting, styling, and touch handling
- Limited Style Inheritance: in order to inherit styles from parent components, you must wrap all the text nodes inside of a Text component, you cannot have a text node directly under a View.
- Basic Example
1
2
3
4
5
6
7
8
9
10
11
12
13
14
15
16
17
18
19
20
21
22
23
24
25
26
27
28
29
30
31
32
33
import React from 'react';
import {View, Text, StyleSheet} from 'react-native';
const TextApp = () => {
return (
<View style={styles.container}>
<Text style={styles.baseText}>
This is a
<Text style={styles.innerText}>
paragraph!
</Text>
</Text>
</View>
);
};
export default TextApp;
const styles = StyleSheet.create({
container: {
backgroundColor: 'lightblue',
flex: 1,
justifyContent: 'center',
alignItems: 'center',
},
baseText: {
fontWeight: 'bold',
},
innerText: {
fontSize: 20,
color: 'red',
},
});
TextInput
- TextInput is a foundational component for inputting text into the app via a keyboard
- Basic Example
1
2
3
4
5
6
7
8
9
10
11
12
13
14
15
16
17
18
19
20
21
22
23
24
25
26
27
28
29
import React from "react";
import { View, StyleSheet, TextInput, Text } from "react-native";
const TextInputApp = () => {
return (
<View style ={styles.container}>
<label >
Enter Your Name.
</label>
<TextInput style={styles.input} placeholder="Jesse Li" />
</View>
);
};
export default TextInputApp;
const styles = StyleSheet.create({
container: {
backgroundColor:'lightblue',
flex: 1,
justifyContent: 'center',
alignItems: 'center',
},
input: {
backgroundColor:'yellow',
borderColor: 'black',
borderRadius: 5,
}
});
Image
- Image is a React component for displaying different types of images, including network images, static resources, temporary local images, and images from local disk, such as the camera roll
- Static image
1
2
3
4
5
6
// project structure
// ├── app.js
// └── img
// ├── my-icon.png
// in app.js
<Image source={require('./img/my-icon.png')} /> - Network image
1
2
3
// You should mannually give the image its size
<Image source={{uri: 'https://reactjs.org/logo-og.png'}}
style={{width: 400, height: 400}} />
ScrollView
- ScrollViews must have a bounded height in order to work, it is recommended that all parent containers have a bound height
- Basic Example
1
2
3
4
5
6
7
8
9
10
11
12
13
14
15
16
17
18
19
20
21
22
23
24
25
26
27
28
29
30
31
32
33
34
import React from 'react';
import {StyleSheet, View, ScrollView,Text} from 'react-native';
const ScrollViewApp = () => {
return (
<View style={styles.container}>
<ScrollView style={styles.scroolview}>
<Text style={styles.text}>
Lorem ipsum dolor sit amet, consectetur adipiscing elit, sed do
eiusmod tempor incididunt ut labore et dolore magna aliqua. Ut enim ad
minim veniam, quis nostrud exercitation ullamco laboris nisi ut
aliquip ex ea commodo consequat. Duis aute irure dolor nin
reprehenderit nin voluptate velit esse cillum dolore eu fugiat nulla
pariatur. Excepteur sint occaecat cupidatat non proident, sunt nin
culpa qui officia deserunt mollit anim id est laborum.
</Text>
</ScrollView>
</View>
);
};
const styles = StyleSheet.create({
container: {
flex: 1,
},
scroolview: {
backgroundColor: 'lightblue',
},
text: {
fontSize: 42,
},
});
export default ScrollViewApp;
Button
- A basic button component that should render nicely on any platform
- Basic Example
1
2
3
4
5
6
7
8
9
10
11
12
13
14
15
16
17
18
19
20
21
22
23
24
25
26
27
28
29
30
31
32
33
34
35
36
37
38
39
40
41
import React from 'react';
import { StyleSheet, Button, View, Text, Alert } from 'react-native';
const App = () => (
<View style={styles.container}>
<View>
<Text style={styles.title}>
The title and onPress handler are required. It is recommended to set accessibilityLabel to help make your app usable by everyone.
</Text>
<Button
title="Press me"
onPress={() => Alert.alert('Simple Button pressed')}
/>
</View>
<View>
<Text style={styles.title}>
All interaction for the component are disabled.
</Text>
<Button
title="Press me"
// Then this button cannot be pressed
disabled
onPress={() => Alert.alert('Cannot press this one')}
/>
</View>
</View>
);
const styles = StyleSheet.create({
container: {
flex: 1,
justifyContent: 'center',
marginHorizontal: 16,
},
title: {
textAlign: 'center',
marginVertical: 8,
},
});
export default App;
StyleSheet
- A StyleSheet is an abstraction similar to CSS StyleSheets
- Flexbox
flexflex: N, occupies
flexDirectionflexDirection: column, default, main axis is column, from top to bottomflexDirection: row, main axis is row, from left to rightflexDirection: column-reverse: main axis is column, from bottom to topflexDirection: row-reverse: main axis is row, from right to left
justifuContentjustifyContent: flex-start, default, children starts from start of main axisjustifyContent: flex-end, children starts from end of main axisjustifyContent: center, aligns children in the center of main axisjustifyContent: space-between, no space before the first children and after the last childrenjustifyContent: space-around, half space before the first children and after the last childrenjustifyContent: space-evenly, all space is evenly divided
alignItemsalignItems: stretch, default, stretch children to match the height of the container's cross axisalignItems: flex-start, children starts from the start of the cross axisalignItems: flex-end, children starts from the end of the cross axisalignItems: center, align children in the center of the container's cross axisalignItems: flex-start, align children along a common baseline
alignContent: distribution on the cross axis, only has effect whenflexWrap: wrapflexWrap,flexWrap: wraporflexWrap: nowrapflexBasis,flexGrow,flexShrinkwidth,height, defaultauto, can also set to integer pixels(egwidth: 300) or string percentage(egwidth: "80%")position: defines how an element is positioned within its parentposition: relative, defaultposition: absolute
Lesson 03 2021/09/13
- Steps to design a page
- Decide on the top level components and if they will be laid out horizontally or vertically.
- Decide on the justifyContent values (for the main axis) and the alignItem values for the cross-axis
- Create the toplevel components (possibly view) and use the grid property to state the relative size of that component.
- Repeat the process for each of the toplevel components, which can themselves consist of embedded components.
- Select colors, borders, fonts, and other style elements for the core components (Text, Button, TextInput, etc.)
Lesson 04 2021/09/15
- Introduction to Navigator
- Managing the presentation of, and transition between, multiple screens of a mobile app is typically handled by what is known as a navigator
- React Navigation provides a straightforward navigation solution, with the ability to present common stack navigation and tabbed navigation patterns on both Android and iOS
- React Navigation
- Installation:
npm install @react-navigation/native - Installation of dependent libraries
- Install into an Expo managed project:
expo install react-native-screens react-native-safe-area-context - Install into a bare React Native project:
npm install react-native-screens react-native-safe-area-context
- Install into an Expo managed project:
- Basic Example
1
2
3
4
5
6
7
8
9
10
11
12
import * as React from 'react';
import { NavigationContainer } from '@react-navigation/native';
const App = () => {
return (
<NavigationContainer>
{/* Rest of your app code */}
</NavigationContainer>
);
};
export default App; - The Navigation logic
- Web browser nagivator
- When a link is clicked, the browser jumps to a new page, the URL is pushed to the browser history stack
- When the back button is clicked, the browser pops the item from the top of the history stack
- React Navigation's native stack navigator does the same things, it also provides gestures and animations when navigating between routes in the stack
- Web browser nagivator
- The native stack navigator
- Installation:
npm install @react-navigation/native-stack - Basic Example
1
2
3
4
5
6
7
8
9
10
11
12
13
14
15
16
17
18
19
20
21
22
23
24
25
26
27
28
29
30
31
32
33
34
35
36
37
38
39
40
41
42
43
44
45
46
47
48
49
import * as React from 'react';
import { View, Text, Button } from 'react-native';
import { NavigationContainer } from '@react-navigation/native';
import { createNativeStackNavigator } from '@react-navigation/native-stack';
// In the native stack navigator, each Screen has a navigation property
const HomeScreen = ({navigation}) => {
return (
<View>
<Text> Home Screen </Text>
<Button
title = "Go to details"
// Call the navigate function to move between pages, if the destination is the current page, navigate method does nothing
onPress={() => navigation.navigate('Details')}
/>
</View>
);
};
const DetailsScreen = () => {
return (
<View style={{ flex: 1, alignItems: 'center', justifyContent: 'center' }}>
<Text>Details Screen</Text>
<Button
title = "Go to details"
// Call the push function to move between pages, this method can go to the same page multiple times
onPress={() => navigation.push('Details')}
/>
</View>
);
}
// This function returns an object with two properties: Screen and Navigator
const Stack = createNativeStackNavigator();
const App = () => {
return (
// NavigationContainer manages the navigation tree and contains the navigation state
<NavigationContainer>
// Navigator should contain Screen to define the configuration for routes
<Stack.Navigator initialRouteName="Home">
<Stack.Screen name="Home" component={HomeScreen} />
<Stack.Screen name="Details" component={DetailsScreen} />
</Stack.Navigator>
</NavigationContainer>
);
}
export default App; - Go to a page:
navigation.navigate("pageName") - Go to a page including the current one:
navigation.push("pageName") - Go back to the previous page:
navigation.goBack() - Go back to the first screen in the stack:
navigation.popToTop()
- Installation:
- Installation:
Lesson 05 2021/09/20
- Example
1
2
3
4
5
6
7
8
9
10
11
12
13
14
15
16
17
18
19
20
21
22
23
24
25
26
27
28
29
30
31
32
33
34
35
36
37
38
39
40
41
42
43
44
45
46
47
48
49
50
51
52
53
54
55
56
57
58
59
60
61
62
63
64
65
66
67
68
69
70
71
import React, { useState } from 'react';
import { View, Text, Button, StyleSheet, TextInput } from 'react-native';
import { NavigationContainer } from '@react-navigation/native';
import { createNativeStackNavigator } from '@react-navigation/native-stack';
const HomeScreen = ({ navigation }) => {
return (
<View style={styles.container}>
<Text> Welcome to the home screen!</Text>
<Button
title="Go to Details"
onPress={() => navigation.navigate('Details')}
/>
</View>
);
};
const DetailsScreen = (props) => {
const [count, setCount] = useState(0);
const [count1, setCount1] = useState(0);
return (
<View style={styles.container}>
<Text>Count = {count}</Text>
<Button
color="red"
title="Increment"
onPress={() => setCount(count + 1)}
/>
<Text>Count = {count1}</Text>
<Button
color="red"
title="Increment"
onPress={() => setCount1(count1 - 1)}
/>
<Button
color="red"
title="Reset"
onPress={() => {
setCount(0);
setCount1(0);
}}
/>
</View>
);
};
const Stack = createNativeStackNavigator();
const App = () => {
return (
<NavigationContainer>
<Stack.Navigator initialRouteName="Home">
<Stack.Screen name="Home" component={HomeScreen} />
<Stack.Screen name="Details" component={DetailsScreen} />
</Stack.Navigator>
</NavigationContainer>
);
};
const styles = StyleSheet.create({
container: {
flex: 1,
backgroundColor: 'yellow',
justifyContent: 'space-evenly',
alignItems: 'center',
},
});
export default App;
Lesson 06 2021/09/22
Lesson 07 2021/09/29
- Asynchronous Storage
- Installation
npm install @react-native-async-storage/async-storage
- Installation
Lesson 08 2021/10/04
- Context and Data Sharing
- In a typical React application, data is passed top-down (parent to child) via props, but such usage can be cumbersome for certain types of props (e.g. locale preference, UI theme) that are required by many components within an application.
- Context provides a way to share values like these between components without having to explicitly pass a prop through every level of the tree
- When to use context: Context is designed to share data that can be considered “global” for a tree of React components, such as the current authenticated user, theme, or preferred language
- Before you use context: If you only want to avoid passing some props
through many levels, component composition is often a simpler solution
than context
1
2
3
4
5
6
7
8
9
10
11
12
13
14
15
16
17
18
19
20
21
22
23
24
25
26
27
28
29
30
// This one is tedious
<Page user={user} avatarSize={avatarSize} />
// ... which renders ...
<PageLayout user={user} avatarSize={avatarSize} />
// ... which renders ...
<NavigationBar user={user} avatarSize={avatarSize} />
// ... which renders ...
<Link href={user.permalink}>
<Avatar user={user} size={avatarSize} />
</Link>
// This one is better
function Page(props) {
const user = props.user;
const userLink = (
<Link href={user.permalink}>
<Avatar user={user} size={props.avatarSize} />
</Link>
);
return <PageLayout userLink={userLink} />;
}
// Now, we have:
<Page user={user} avatarSize={avatarSize} />
// ... which renders ...
<PageLayout userLink={...} />
// ... which renders ...
<NavigationBar userLink={...} />
// ... which renders ...
{props.userLink} - API:
React.createContext: Creates a Context object. When React renders a component that subscribes to this Context object it will read the current context value from the closest matching Provider above it in the tree.1
const MyContext = React.createContext(defaultValue);
Context.Provider: Every Context object comes with a Provider React component that allows consuming components to subscribe to context changes. The Provider component accepts a value prop to be passed to consuming components that are descendants of this Provider. One Provider can be connected to many consumers. Providers can be nested to override values deeper within the tree.1
<MyContext.Provider value={/* some value */}>
Context.Consumer: A React component that subscribes to context changes. Using this component lets you subscribe to a context within a function component.1
2
3<MyContext.Consumer>
{value => /* render something based on the context value */}
</MyContext.Consumer>
useContexthook: Accepts a context object (the value returned from React.createContext) and returns the current context value for that context. The current context value is determined by the value prop of the nearest<MyContext.Provider>above the calling component in the tree.useContext(MyContext)is equivalent to<MyContext.Consumer>.1
const value = useContext(MyContext);
Lesson 09 2021/10/06
- Device specific options
- https://docs.expo.dev/versions/latest/
Lesson 10 2021/10/11
- JavaScript module
- As programs become more complicated, it's useful to provide
mechanisms for splitting JavaScript programs up into separate modules
that can be imported when needed
- Node.js, CommonJS, RequireJS all supports modules
- Modern browsers have started to support module functionality natively
- Use of native JavaScript modules is dependent on the import and export statements
- Exporting module features
- The first thing you do to get access to module features is export them. This is done using the export statement
- The easiest way to use it is to place it in front of any items you
want exported out of the module
1
2
3
4
5
6
7
8
9
10
11
12
13
14// suppose the relative path is "./modules/square.js"
export const name = 'square';
export function draw(ctx, length, x, y, color) {
ctx.fillStyle = color;
ctx.fillRect(x, y, length, length);
return {
length: length,
x: x,
y: y,
color: color
};
} - You can export functions, var, let, const, and classes
- A more convenient way of exporting all the items you want to export
is to use a single export statement at the end of your module file,
followed by a comma-separated list of the features you want to export
wrapped in curly braces
1
export {name, draw};
- Importing features into your script
- Once you've exported some features out of your module, you need to import them into your script to be able to use them
- You use the import statement, followed by a comma-separated list of
the features you want to import wrapped in curly braces, followed by the
keyword from, followed by the path to the module file — a path relative
to the site root
1
import { name, draw } from "./modules/square.js";
- In some module systems, you can omit
./,../,.js, but this does not work in native JavaScript - Although imported features are available in the file, they are read only views of the feature that was exported
- Applying the module to your HTML
- You need to include
type="module"in the<script>element - Method 1: reference a script
1
<script type="module" src="./script.js"></script>
- Method 2: directly embed a module in the HTML file
1
2
3<script type="module">
// JavaScript code here
</script>
- You need to include
- Default exports v.s. named exports
- Default export: designed to make it easy to have a default function
provided by a module, and also helps JavaScript modules to interoperate
with existing CommonJS and AMD module systems
- There is only one default export allowed per module
1
2
3
4
5
6
7
8
9
10// Method 1
export default const name = "Square";
// Method 2
const name = "Square";
export default name;
// Shorthand import for default feature
import name from "./modules/square.js";
// Full import statement for default feature
import { default as name } from "./modules/square.js";
- There is only one default export allowed per module
- Named export: each item is referred to by its name upon export
- Default export: designed to make it easy to have a default function
provided by a module, and also helps JavaScript modules to interoperate
with existing CommonJS and AMD module systems
- Avoiding naming conflicts
- If you try to import different functions of the same name into the same top-level module file, you would end up with conflicts and errors
- Rename exports and imports
1
2
3
4
5
6
7
8
9
10
11
12
13// Method 1
export { function1 as newFunction1, function2 as newFunction2 };
import { newFunction1, newFunction2 } from "./modules/function.js";
// Method 2
export { function1, function2};
import { function1 as newFunction1, function2 as newFunction2} from "./modules/function.js";
````
* Create a module object
```javascript
export { function1, function2 };
import * as Function from "./modules/function.js";
Function.function1();
Function.function2();
- Modules and Classes
1
2
3
4
5
6
7
8
9
10
11
12
13
14class Square {
constructor(ctx, listId, length, x, y, color) {
...
}
draw() {
...
}
...
}
export { Square };
import { Square } from "./modules/square.js";
- As programs become more complicated, it's useful to provide
mechanisms for splitting JavaScript programs up into separate modules
that can be imported when needed
- class
- Classes are a template for creating objects
- Functions can be called in code that appears before they are defined, classes must be defined before they can be constructed
- Class declarations
1
2
3
4
5
6class Rectangle {
constructor(height, width) {
this.height = height;
this.width = width;
}
} - Class expressions
1
2
3
4
5
6let Rectangle = class {
constructor(height, width) {
this.height = height;
this.width = width;
}
}; - Class body
- Constructor
- Fields and methods
- Use
#for private field - Use
extendsfor inheritance - Use
thisandsuperkeywords when necessary
Lesson 11 2021/10/13
- function
- Defining functions
- Function declarations
1
2
3function square(number) {
return number * number;
} - Function expressions
1
2
3const square = function(number) {
return number * number;
} - Arrow functions
1
2
3const square = (number) => {
return number * number;
}
- Function declarations
- Function parameters
- Default parameters
- Rest parameters
...theArgs
- Defining functions
- closure
- A closure is the combination of a function bundled together
(enclosed) with references to its surrounding state (the lexical
environment). In other words, a closure gives you access to an outer
function’s scope from an inner function
1
2
3
4
5
6
7function makeAdder(x) {
return function(y) {
return x + y;
};
}
var add5 = makeAdder(5);
add5(2); // 7 - Closure scope chain
- Local Scope (Own scope)
- Outer Functions Scope
- Global Scope
- A closure is the combination of a function bundled together
(enclosed) with references to its surrounding state (the lexical
environment). In other words, a closure gives you access to an outer
function’s scope from an inner function
- User-defined components
- Function components
1
2
3
4
5
6
7
8
9
10import React from 'react';
import { Text } from 'react-native';
const Cat = () => {
return (
<Text>Hello, I am your cat!</Text>
);
}
export default Cat; - Class component
1
2
3
4
5
6
7
8
9
10
11
12import React, { Component } from 'react';
import { Text } from 'react-native';
class Cat extends Component {
render() {
return (
<Text>Hello, I am your cat!</Text>
);
}
}
export default Cat; - Use state with class components
- Declare the state:
state = { key: value }; - Use the state:
this.state.key - Set the state:
this.setState({ key: value });
- Declare the state:
- Function components
- You can have conditional rendering with useState hook
Lesson 12 2021/10/18
- Ideas
- Each app will have its own appKey,so data can be shared between users of the app
- Each device will have its own userKey, so users can access their own data on the cloud
- Users can store and retrieve data with a valueKey and a String value, just as with AsyncStorage but the data will be stored in the cloud and they can share data with each other
- Server: Heroku, database: MongoDB
- Axios
- Use axios is more easier than the built-in fetch function
- Usage
1
2const z = await Axios.get(URL) # to get data from the server using only the URL
const z = await Axios.post(URL,JSONdata) # to send data to server and get something back - For a browser, you can only have
getandpost, for mobile phones, you can have more HTTP verbs
- Get and retrieve data from server
- Store and export appKey and appUrl locally on the device
- Use the following code
1
2
3
4
5
6
7
8
9
10
11
12
13
14
15
16
17
18
19
20
21
22
23
24
25
26
27
28
29
30
31
32
33
34
35
36
37
38
39
40
41
42
43
44
45
46
47
48
49
50
51
52
53
54
55
56
57
58
59
60
61
62
63
64
65
66
67import React, { useState, useEffect } from "react";
import { Button, StyleSheet, Text, TextInput, View } from "react-native";
import AsyncStorage from '@react-native-async-storage/async-storage';
import Axios from 'axios'
import { appKey, appURL } from '../lib/appKey.js'
const CloudRegistration = () => {
const [userKey, setUserKey] = useState(null)
useEffect(() => {
clearAll();
getData();}
,[])
const storeData = async (key,value) => {
try {
await AsyncStorage.setItem(key, jsonValue)
} catch (e) {
console.dir(e)
}
}
const getData = async () => {
try {
let data = await AsyncStorage.getItem('@userKey')
if (Object.keys(data).length === 0) {
setUserKey(data.userKey)
} else {
let result =
await Axios.post(appURL + '/getNewUserKey', { appKey : appKey })
setUserKey(result.data.userKey)
await AsyncStorage.setItem(key, result.data)
}
} catch(e) {
console.dir(e)
}
}
const clearAll = async () => {
try {
await AsyncStorage.clear()
} catch(e) {
console.dir(e)
}
}
let registrationComponent = <Text>initializing userKey:{userKey}</Text>
if (userKey) {
registrationComponent =
<View>
<View style={{flexDirection : 'row', flex : 1, justifyContent : 'space-around'}}>
<Text>UserKey = {userKey} </Text>
<Button title="clear user key (Dangerous only for debugging)"
color='red'
onPress = {() => {clearAll()}} />
</View>
</View>
}
return (
{ registrationComponent }
)
}
export default CloudRegistration;
Lesson 13 2021/10/20
- Idea
- Check asynchronous storage, if there is not data, fetch from cloud storage
Lesson 14 2021/11/01
- Container components
- Example
1
2
3
4
5
6
7
8
9
10
11
12
13
14
15
16
17
18
19
20
21
22import React from "react";
import { SafeAreaView, View} from 'react-native'
const ScreenTemplate = ({header,footer,children}) => {
return (
<SafeAreaView style={{flex:1,padding:0,margin:0}}>
{header}
<View style={{flex:1, backgroundColor:"#eee"}}>
{children}
</View>
{footer}
</SafeAreaView>
)
}
export default ScreenTemplate;
// Then you can use like this:
import ScreenTemplate from "./containers/screenTemplate.js";
<ScreenTemplate
header={}
footer={}
children ={}
/>
- Example
- Javascript concepts from the book <<Modern JavaScript for the
Impatient>>
- Chapter 1 Values and Variables
- Types: number, boolean, undefined/null, string, symbol, object
- Comments
- Single line:
// - Multiple line:
/* */
- Single line:
- Variable declaration
- Declared but not assigned variables have value of undefined
- Use let or constant, do not use var
- Numbers are all double-precision floating-point numbers
1
2
3
4
5
6// convert string to numbers
let x = 3.14
const y = parseFloat(x);
const z = parseInt(x);
// convert number to string
const c = y.toString(); - null and undefined
- Use null to denote the intentional absence of value
- Use undefined to indicate a declared but not assigned variable
- Template literal
1
2let x = "world";
let greeting = `Hello, ${x.toUpperCase()}`; - Objects
- Objects in JavaScript are simply key/value pairs or properties
- The key should be a string
- JSON
- JavaScript Object Notation is a lightweight text format of exchanging object data between applications
- All strings are inside double quotes
- Convert JavaScript object into JSON:
JSON.stringify(object) - Convert JSON string to JavaScript object:
JSON.parse(json)
- Destructing
- Swap the value of two variables:
[x, y] = [y, x] - Rest declarations
1
2
3
4const nums1 = [1,2,3,4];
let [x, y, ...others] = nums1; // others is [3,4]
const nums2 = [1,2]
let [x, y, ...others] = nums2; // others is []
- Swap the value of two variables:
- Chapter 2 Control Structures
- Any comparison involving NaN yields false
- If one operand is a number, the other operand is converted to a
number
1
2
3
4"" < 5; // true, "" is converted to 0
"Hello" < 5, // false, "Hello" is converted to NaN
[] < 5 // true, [] is converted to 0
[1, 2] < 5 // false, [1, 2] is converted to NaN - If neither operand is a number, both are converted to strings
1
[1, 2, 3] < {} // true, [1, 2, 3] is converted to '1,2,3', {} to '[object Object]'
- Statements
if elseswitchforfor of: used on iterable object, most commonly an array or stringfor in: used on properties of object
whiledo whilebreak,continuetry catch
- Chapter 3 Functions and Functional Programming
- Functional array processing
1
2
3const arr = [1, 2, 3];
const arr1 = arr.map(x => x * x); // arr1 is [1, 4, 9]
arr.forEach(ele => {console.log(ele);}) - Put
"use strict"in your file to enable strict mode - Test types
1
2
3
4
5
6
7
8let x = "abc";
// method 1
typeof x === 'string'; // true
// method 2
x instanceof String; // false
typeof [] === "string"; // true
[] instanceof String; // true - Rest parameters and spread operator
1
2
3
4
5
6
7
8
9const avg = (first = 0, ...others) => {
let sum = first;
for (let value of others) {
sum += value;
}
return sum / (1 + others.length);
}
avg([1,2,3]); // return 21
2
3
4let result = Math.max(1, 2, 3); // 3
const nums = [1, 2, 3];
result = Math.max(nums); // NaN, max cannot calculate maximum of one array
result = Math.max(...nums); // 3, use ... operator to destruct the array - Exceptions
- Throw:
throw Error(reasonString) - Catch
- Finally
- Throw:
- Functional array processing
- Chapter 9 Asynchronous Programming
- Concurrent tasks
- A program is concurrent when it manages multiple activities with overlapping timelines
- A JavaScript program runs in a single thread, so time-consuming operations in JavaScript are asynchronous
- Promise
- A promise is an action that will produce a result at some point in the future, unless it dies with an exception
- A promise has a resolve handler and a reject handler
1
2
3
4
5
6
7
8// template
const myPromise = new Promise((resolve, reject) => {
const callback = (args) => {
. . .
if (success) resolve(result) else reject(reason)
}
invokeTask(callback)
}) - You can use promise chain with
.then
- Async functions
- Use
await/asyncsyntax with promise and asynchronous functions - Usage
1
2
3
4
5
6
7
8
9
10
11
12// Arrow functions
async (url) => {...}
// Methods
class Test {
async load(url) {...}
}
// Named functions
async function load(url) {...}
// Object literal methods
const obj = {
async load(url) {...}
}
- Use
- Async return values
- An async function returns a promise
- In the fetch API, you should use
await result.json(), because JSON is processing asynchronously
- Concurrent await
- Successive calls to await are done one after another, you can let
them execute concurrently when necessary
1
2
3
4
5// Sequential execution
const img1 = await loadImage(url1);
const img2 = await loadImage(url2);
// Concurrent execution
const [img1, img2] = await Promise.all(loadImage(url1), loadImage(url2));
- Successive calls to await are done one after another, you can let
them execute concurrently when necessary
- Concurrent tasks
- Chapter 10 Modules
- The module concept
- A module provides features for programmers, called the exported features. Any features that are not exported are private to the module
- A module also specified on which other modules it depends
- Modules manage name conflicts
- ECMAScript modules
- Node.js implements a module system (called Common.js) that manages module dependencies. When a module is needed, it and its dependencies are loaded synchronously
- The AMD (Asynchronous Module Definition) standard defines a system for loading modules asynchronously, which is better suited for browser-based applications
- ECMAScript modules improve on both of these systems
- The module concept
- Chapter 1 Values and Variables
Lesson 15 2021/11/03
- Express
- MERN stack
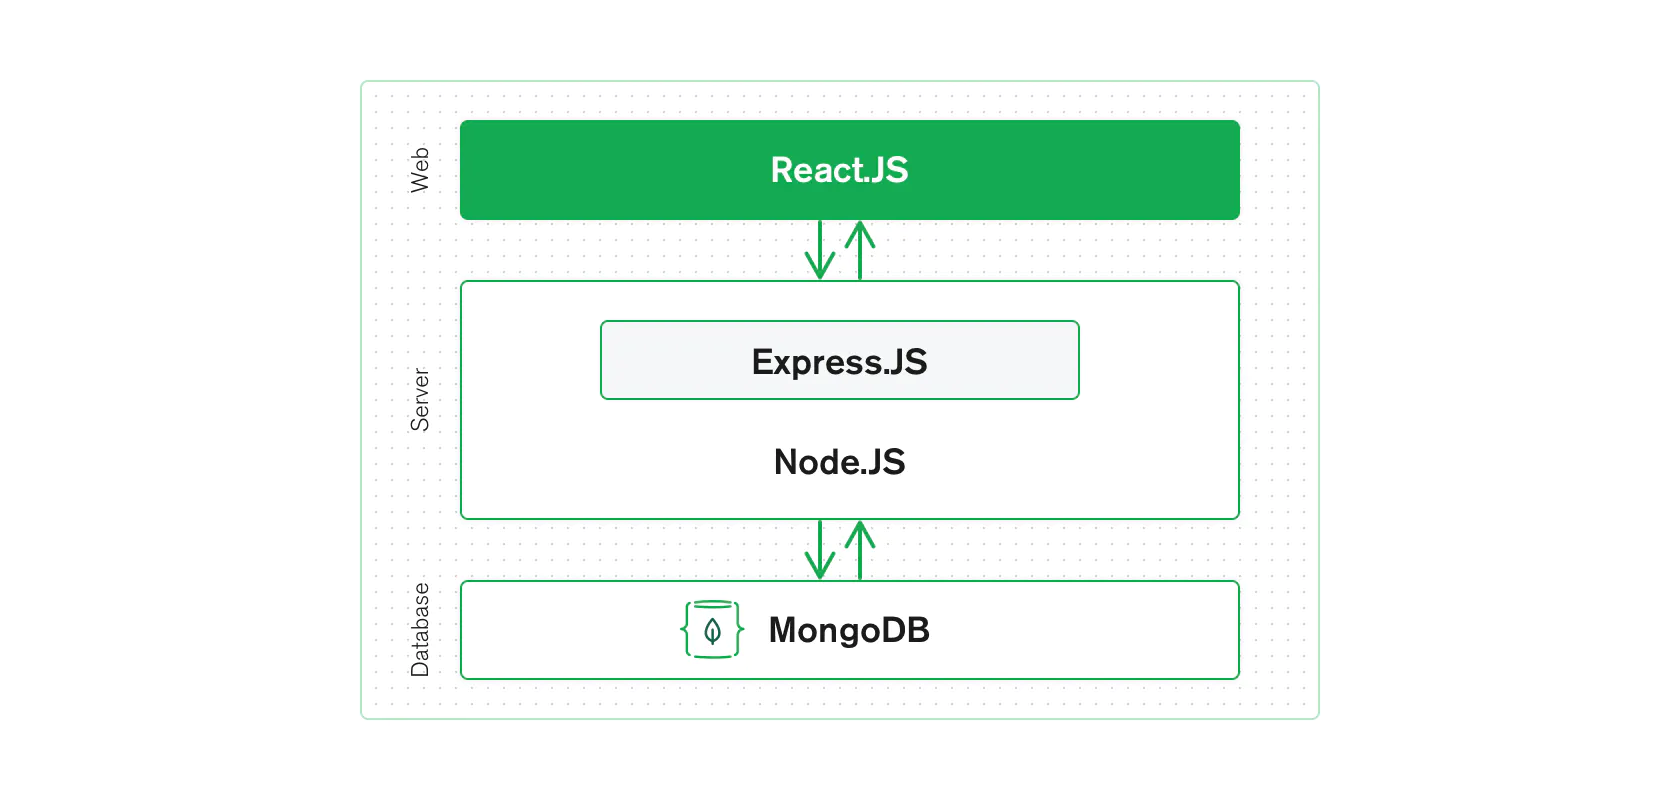
- Express is a fast, unopinionated, minimalist web framework for Node.js
- Installation
npm install express --savefor expressnpm install -g express-generatorfor the express-generator- You can run your file with express using
node xxx.js, express-generator creates the scaffolding for a full app with numerous JavaScript files, Jade templates, and sub-directories for various purposes - Create express project using express-generator
express projectNamecd projectName, thennpm install- Start
- On MacOS or Linux:
DEBUG=projectName:* npm start - Windows Command Prompt:
set DEBUG=projectName:* & npm start - Windows PowerShell:
$env:DEBUG='projectName:*'; npm start - Or simply:
npm start
- On MacOS or Linux:
- Example
app.js1
2
3
4
5
6
7
8
9
10
11const express = require('express')
const app = express()
const port = 3000
app.get('/', (req, res) => {
res.send('Hello World!')
})
app.listen(port, () => {
console.log(`Example app listening at http://localhost:${port}`)
}) - Some settings
1
2
3
4
5
6var path = require('path');
// view engine setup
app.set('views', path.join(__dirname, 'views'));
app.set('view engine', 'ejs');
module.exports = app; - Import and require
- Express is based on Node.js, the module system syntax in Node.js is
require - Plain JavaScript is based on ES6, the module system syntax is
importandexport importmust be at the beginning of a file, butrequirecan be anywhere in a file
- Express is based on Node.js, the module system syntax in Node.js is
- API
app.get(): Routes HTTP GET requests to the specified path with the specified callback functions1
2
3
4
5let counter = 0;
app.get('path', async (req, req) => {
counter += 1;
res.send(`Counter = ${counter} `);
})app.post(): Routes HTTP POST requests to the specified path with the specified callback functions1
2
3
4
5
6
7
8let messages = [];
app.use("/messages",
async (req, res) => {
let msg = req.body;
messages.push(msg);
res.json(messages);
}
);
- MERN stack
- SQL vs NoSQL database
- Difference
- SQL db is relational, NoSQL db is not relational
- SQL db is based on table, NoSQL db can be based on document, key/value pair
- There is automatic sql optimization in sql db
- MondoDB
- Local Server Installation
- Download and install MongoDB
- To use in shell, install MongoDB shell(mongosh)
- MongoDB Atlas(Cloud version)
- Create new database
- Configure database access and network access
- Connection:
- Download MongoDb compass and use that to connect MongoDB Atlas
- Connect using mongosh
- Shell CRUD commands
- Query databases:
show dbs; - Switch to one database:
use dbName; - Query collections:
show collections; - Read: query document:
- Query all:
db.cName.find({});, ordb.cName.find();this is justselect * from cName; - Query with equal condition:
db.cName.find({key: value});, this is justselect * from cName where key = value; - Query with and:
db.cName.find({k1: v1, k2: {$lt: v2}});, this is justselect * from cName where k1 = v1 and k2 < v2; - Query with or:
db.cName.find({$or: [{k1: v1}, {k2: {$gt: v2}}]});, this is justselect * from cName where k1 = v1 or k2 > v2;
- Query all:
- Create: insert document:
- Insert one document:
db.cName.insertOne({k1 : v1, ..., kn: vn});, this is justinsert into cName (k1, ..., kn) values (v1, ..., vn); - Insert multiple documents:
db.cName.insertMany({k11: v11, ..., k1n: v1n}, ..., {km1: vm1, ..., kmn: vmn});, this is justinsert into cName(k1, ..., kn) values (v11, ..., v1n), ... ,(vm1, ..., vmn);
- Insert one document:
- Update: update document
- Update one document:
db.cName.updateOne({k1 : v1}, {$set: {k1: k2}, $inc: {k2: 1}}), this is justupdate cName set k1 = v2, k2 = k2 + 1 where k1 = v1; - Update multiple documents:
db.cName.updateMany({k1: v1}, {$set: {k1: v2}}), this is justupdate cName set k1 = v2 where k1 = v1;
- Update one document:
- Delete: delete document
- Delete one document:
db.cName.deleteOne({k1: v1});, this is justdelete from cName where k1 = v1; - Delete multiple documents:
db.cName.deleteMany({k1: v1});, this is justdelete from cName where k1 = v1;
- Delete one document:
- Query databases:
- Local Server Installation
- Connect MongoDB in Express
npm install mongodbin project directory- Add the following code in app.js
1
2
3
4
5
6
7
8
9
10
11
12
13const { MongoClient } = require('mongodb');
const uri = "urlString";
const client = new MongoClient(uri, { useNewUrlParser: true, useUnifiedTopology: true });
client.connect(err => {
const collection = client.db("testing").collection("collection1");
collection.find().toArray((err, result) => {
if(err) {
throw err;
}
console.log(result);
})
});
client.close();
- Some concepts
- Collection: a collection in MongoDb is equivalent to a table in RDBMS, mongoDB has flexible Schema, so documents in one collection do not need to have the same set of fields and the data type for a field can differ
- Document: MongoDB stores data records as BSON documents. BSON is a binary representation of JSON documents, though it contains more data types than JSON
- Schema: a document schema is a JSON object that allows you to define the shape and content of documents and embedded documents in a collection
- Difference
Lesson 16 2021/11/08
- mongoose
- mongoose is an elegant mongodb object modeling for node.js
- Define a Schema
- Permitted types in a schema:
String,Number,Date,Buffer,Boolean,Mixed,ObjectId,Array,Decimal128,Map - By default, mongoose adds an
_idproperty to the schema1
2
3
4
5
6
7
8
9
10
11import mongoose from "mongoose";
const Schema = mongoose.Schema;
const userSchema = new Schema({
name: String,
email: String,
});
const User = mongoose.model("User", userSchema);
module.exports = User;
- Permitted types in a schema:
- Create a model
- You need to convert a schema into a model. Models are constructors compiled from schema definitions. An instance of a model is a document
- Create a model:
const User = mongoose.model("User", userSchema)
- Queries
Model.find()Model.findOne()Model.updateOne()Model.updateMany()Model.deleteOne()Model.deleteMany()query.then()
- Connections:
mongoose.connect(uriString)
Lesson 17 2021/11/10
- Heroku
- Installation
- Download installer
- Or run
npm install -g heroku - Check heroku version:
heroku --version
- Installation
Lesson 18 2021/11/15
Lesson 19 2021/11/17
- Introduction to React
- Test
Lesson 20 2021/11/22