Section 1 Course Orientation
- Contents:
- HTML, CSS, Javascript, AJAX
- NodeJS, Databases
- Security, Authentication, Authorization
- ...
Section 2 An Introduction to Web Development
- The internet
- The internet uses routing to connect multiple devices via TCP/IT networks
- The internet is the infrastructure that carries things like email, the web, file sharing, online gaming, streaming services
- The web
- The world wide web is an information system where documents and other resources are available over the Internet
- Documents are transferred via HTTP
- HTTP requests
- HTTP is the foundation of communication on the world wide web
- Hyper Text Transfer Protocol
- Http request/Http response
- A web server is a computer that can satisfy requests on the web
- A client is a computer that accesses a server requesting information
- The Request/Response Cycle
- Client sends a request, the server sends back a response to the client
- If you request a webpage, the response is not the webpage itself,
but the instructions on building the webpage. You client then builds the
webpage locally. You can use
View page sourceto view the instructions - The client uses html, css, javascript to build the page
- Front-End and Back-End
- Back-End: at the server, the back-end code construct the response
- Front-End: at the client, the front-end code uses html, css and javascript to construct the webpage
- What do HTML/CSS/JS do?
- HTML(noun): describe what the webpages is, the contents of the webpage
- CSS(adjective): help to describe HTML elements, the presentation, the formatting and the layout
- Javascript(verb): describe the behavior of HTML elements
- Development Environment
- Chrome
- VSCode Text Editor
Section 3 HTML: The Essentials
- Introduction to HTML
- HTML is a markup language, abbreviated for Hyper Text Markup Language
- HTML markup text content with some specific structure
- HTML Elements
- Create elements by writing tags
- Most elements consist of an opening tag and a closing tag
<i> italic </i>,<b> bold </b>
- First HTML Page
- If no closing tag is provided, then the whole elements after the opening tag are affected
- Mozilla Developer Network(MDN)
- Resources about HTML, CSS and JS, MDN is like a wikipedia
- MDN provides HTML elements
- Paragraph Elements
- Tags:
<p> any contents </p> - Space is added between different paragraphs
- use
<p> lorem </p>to be placeholder
- Tags:
- Heading Elements
- Tags:
<h1> heading 1</h1>,<h2> heading 2</h2>,<h3> heading 3</h3>,<h4> heading 4</h4>,<h5> heading 5</h5>,<h6> heading 6</h6> - At most one heading 1 in a page
- Space is added after the headings
- Tags:
- Introduction to the Chrome Inspector
- Right click mouse and click
Inspect - Inspect an element shortcut:
Ctrl + Shift + C
- Right click mouse and click
- HTML Boilerplate
- HTML standard skeleton
1
2
3
4
5
6
7
8
9
<html>
<head>
<title> Title </title>
</head>
<body>
<!-- Content goes here -->
</body>
</html> <html>element: represents the root of an HTML document, so it's also called as the root element<head>element: contains machine-readable information (metadata) about the document<body>element: represents the content of an HTML document. There can be only one<body>element in a document.
- HTML standard skeleton
- VSCode: Auto-Format
- Shortcut:
Shift + Alt + F
- Shortcut:
- List Elements
- Unordered List
1
2
3
4
5<ul>
<li>element</li>
<li>element</li>
<li>element</li>
</ul> - Ordered List:
1
2
3
4
5<ol>
<li>element</li>
<li>element</li>
<li>element</li>
</ol> - List can be nested
1
2
3
4
5
6
7
8
9
10<ul>
<li>element</li>
<li>element
<ul>
<li>element</li>
<li>element</li>
</ul>
</li>
<li>element</li>
</ul>
- Unordered List
- The Anchor Tags
<a>element (or anchor element), with its href attribute, creates a hyperlink to web pages, files, email addresses, locations in the same page, or anything else a URL can address.- Usage:
1
<a href = "URL/Destination">Hyper Link</a>
- The href can points to an external absolute location or an internal relative location(relative to the current directory).
- Images
- Just opening tag, but no closing tag
- Usage
1
<img src="Location" alt="Notes">
- The src can points to an external absolute location or an internal relative location(relative to the current directory)
- The alt provides a text note for the viewer when the image cannot be loaded properly
- Comments
- Usage:
<!-- Comment-->
- Usage:
Section 4 HTML: Next Steps & Semantics
- What Exactly is HTML5?
- The term HTML5 is essentially a buzzword that refers to a set of modern web technologies. This includes the HTML Living Standard(a document that describes how HTML should work, https://html.spec.whatwg.org/multipage/), along with JavaScript APIs to enhance storage, multimedia, and hardware access.
- Blocks v.s. Inline Elements - Divs and Spans
- Inline element
- Does not start on a new line, only takes as much width as necessary
- An inline element cannot contain a block-level element
- Example:
<a>,<abbr>,<acronym>,<b>,<br>,<button>,<code>, ...
- Block-level element
- A block-level element always starts on a new line, and it always takes up the full width available
- A block-level element has a top and bottom margin, whereas an inline element does not
- Example:
<div>,<article>,<table>,<p>,<ol>,<ul>,<li>, ...
<div>element: the generic container for flow content, it has no effect on the content or layout until styled using CSS- Usage:
1
2
3<div>
<!-- Content -->
</div>
- Usage:
<span>element: a generic inline container for phrasing content, which does not inherently represent anything. It can be used to group elements for styling purposes or because they share attribute values- Usage:
1
2
3<span>
<!-- Content -->
</span>
- Usage:
- Inline element
- An Odd Assortment of Elements: HR, BR, Sup, & Sub
<hr>element: represents a thematic break between paragraph-level elements(one long separating line, the style of the line can be modified using CSS)- Usage:
1
2
3
<!-- Content -->
<hr>
<!-- Content -->
- Usage:
<br>element: produces a line break in text(carriage-return)- Usage:
1
<!-- Content --> <br>
- Usage:
<sup>element: specifies inline text which is to be displayed as superscript for solely typographical reasons- Usage:
1
<sup>1</sup> / <sub>2</sub>
- Usage:
<sub>element: specifies inline text which should be displayed as subscript for solely typographical reasons- Usage:
1
<sup>1</sup> / <sub>2</sub>
- Usage:
- Entity Codes
- Entity codes: special codes in html that are used to display reserved characters(ones that normally would be invalid), or used in place of difficult to type characters
- Entity codes start with an ampersand(&) and end with a semicolon(;)
- Some examples:
<for>for
- Introduction to Semantic Markup
- Some tags have similar function as that of
<div>, but it's better to use them instead of<div>. Using these tags instead of<div>can better indicate the purpose of the codes - Examples:
<nav>,<main>,<header>,<footer>
- Some tags have similar function as that of
- Playing With Semantic Elements
- Use more specific elements like:
<section>,<article>,<nag>,<main>,<header>,<footer>,<aside>,<summary>,<details> <main>elements: represents the dominant content of the body of a document, should exclude items that are repeated on different pages- A document shouldn't have more than one
<main>element that doesn't have the hidden attribute specified
- A document shouldn't have more than one
<nav>element: represents a section of a page whose purpose is to provide navigation links, either within the current document or to other documents- Common examples of navigation sections are menus, tables of contents, and indexes
- Usage:
1
2
3
4
5
6<nav>
<ul>
<li> <a href = "URL">Content</a> </li>
<li> <a href = "URL">Content</a> </li>
</ul>
</nav>
<section>element: represents a generic standalone section of a document, which doesn't have a more specific semantic element to represent it<article>element: represents a self-contained composition in a document, page, application, or site, which is intended to be independently distributable or reusable (e.g., in syndication)<aside>element: represents a portion of a document whose content is only indirectly related to the document's main content- Asides are frequently presented as sidebars or call-out boxes
<footer>element: represents a footer for its nearest sectioning content or sectioning root element.- A
<footer>typically contains information about the author of the section, copyright data or links to related documents
- A
<time>element: represents a specific period in time- It may include the datetime attribute to translate dates into machine-readable format, allowing for better search engine results or custom features such as reminders
<time>is an inline element
- Use more specific elements like:
<figure>element: represents self-contained content, potentially with an optional caption, which is specified using the figcaption element- Usage:
1
2
3
4<figure>
<img src="/media/cc0-images/elephant-660-480.jpg" alt="Elephant at sunset">
<figcaption>An elephant at sunset</figcaption>
</figure>
- Usage:
- VSCode Tip: Emmet
- Emmet is a plugin for many popular text editors which greatly improves HTML & CSS workflow
- Child >:
div>pmeans a paragraph inside a div tag - Sibling +:
div+pmeans a div tag then a paragraph tag - Climb-up ^:
div>p^divmeans two div tags, and a paragraph inside the first div tag - Multiplication *:
ul>li*5means an unordered list with 5 entries - Item numbering $:
ul>li*5>a[href=$]means an unordered list with 5 entries, each entry contains a hyper link with URL indexing of i1
2
3
4
5
6
7<ul>
<li><a href="1"></a></li>
<li><a href="2"></a></li>
<li><a href="3"></a></li>
<li><a href="4"></a></li>
<li><a href="5"></a></li>
</ul> - Text {}:
ul>li*5>a[href=$]{Item$}similar to the former one, but with indexed texts1
2
3
4
5
6
7<ul>
<li><a href="1">Item1</a></li>
<li><a href="2">Item2</a></li>
<li><a href="3">Item3</a></li>
<li><a href="4">Item4</a></li>
<li><a href="5">Item5</a></li>
</ul>
Section 5 HTML: Forms and Tables
- Introduction to HTML Tables
- Tables are structured sets of data, made up of rows and columns. They can be a great way of displaying data clearly
- Tables: TR, TD and TH Elements
<td>element: defines a cell of a table that contains data<tr>element: defines a row of cells in a table- The row's cells can then be established using a mix of
<td>(data cell) and<th>(header cell) elements
- The row's cells can then be established using a mix of
<th>element: defines a cell as header of a group of table cells- Usage: a table with 2 rows and three columns
1
2
3
4
5
6
7
8
9
10
11
12
13
14
15
16
17<table>
<tr>
<th></th>
<th></th>
<th></th>
</tr>
<tr>
<td></td>
<td></td>
<td></td>
</tr>
<tr>
<td></td>
<td></td>
<td></td>
</tr>
</table>
- Tables: Thead, Tbody, and Tfoot elements
<thead>element: defines a set of rows defining the head of the columns of the table<tbody>element: encapsulates a set of table rows, indicating that they comprise the body of the table<tfoot>element: defines a set of rows summarizing the columns of the table
- Tables: Colspan & Rowspan
- N-row headers:
<th rowspan="N"> - M-col headers:
<th colspan="M">
- N-row headers:
- The Form Element
<form>element: represents a document section containing interactive controls for submitting information- The form itself is a shell or container that doesn't have any visual imipact
- We then fill the form with a collection of input, checkboxes, buttons, etc.
- The
actionattribute specifies where the form data should be sent:<form action="URL"> - The
methodattribute specifies which HTTP method should be used(when a form is submitted, a HTTP request is sent):<form method="get">, method can be get, head, post, put, delete, ...
- Common Input Types
<input>element: is used to create interactive controls for web-based forms in order to accept data from the user; a wide variety of types of input data and control widgets are available, depending on the device and user agent- The
typeattribute affects the behavior and appearance of the input - Usage:
<input type="TYPE" placeholder="PLACEHOLDER"> - Types: text, password, color, file, number, ...
- The All-Important Label
<label>element: represents a caption for an item in a user interface- The label text is not only visually associated with its corresponding text input; it is also programmatically associated with it
- To associate the
<label>with an<input>element, you need to give the<input>an id attribute. The<label>then needs a for attribute whose value is the same as the input's id. Theidattribute should be unique - Alternatively, you can nest the
<input>directly inside the<label>, in which case the for and id attributes are not needed because the association is implicit. This approach is valid but less common - Usage:
1
2
3
4
5
6<label for="label1"> Content </label>
<input type="text" placeholder="Input" id="label1">
<label>
<input type="text" placeholder="Input">
</label>
- HTML Buttons
<button>element: represents a clickable button, used to submit forms or anywhere in a document for accessible, standard button functionality- The default behavior of a button inside a form is to submit the form, the result page is the page that the action attribute in the form points to. If a button is outside the form, it does nothing by default. If you want a button that is inside the form do not submit the form, let its attribution type be button
- You can use inputs with type equals to button or submit to emulate non-submitting buttons or submitting buttons
- Usage:
1
2
3
4
5
6
7
8
9
10
11
12<!-- This button is outside the form, it does nothing by default -->
<button>Button</button>
<form action="URL" method="get">
<!-- This button is inside the form, we add a type attribute to prevent it from submitting -->
<button type="button">Not-submit button</button>
<!-- Use input with type equals to button and value equals to the text on the button to emulate a non-submitting button -->
<input type="button" value="No-submit button(input)">
<!-- This button is inside the form, its default behavior is to submit -->
<button>Submit</button>
<!-- Use input with type equals to submit and value equals to the text on the button to emulate a submitting button -->
<input type="submit" value="Submit-button(input)">
</form>
- The Name Attribute
- Usage:
1
<input type="TYPE" method="METHOD" name="NAME" id="ID">
- Consider the name a required attribute (even though it's not). If an input has no name specified, or name is empty, the input's value is not submitted with the form! (Disabled controls, unchecked radio buttons, unchecked checkboxes, and reset buttons are also not sent)
- Server uses names to find input values
- Usage:
- Radio Buttons, Checkboxes, and Selects
checkboxattribute: A check box allowing single values to be selected/unselected.- Usage:
1
2<input type="checkbox" id ="checkbox" name="checkbox" checked>
<label for="checkbox">Checkbox</label> - If you want the checkbox to be checked at the beginning, add a
checkedattribute to the input - If the checkbox is checked when the form is submitted, it adds
?name=onon the destination URL, if not, it adds nothing to the destination URL
- Usage:
radioattribute: A radio button, allowing a single value to be selected out of multiple choices with the same name value- Usage:
1
2
3
4
5
6
7
8
9
10
11
12<div>
<input type="radio" id="radio1" name="radio" value="radio1" checked>
<label for="radio1"> Choice 1</label>
</div>
<div>
<input type="radio" id="radio2" name="radio" value="radio2">
<label for="radio2"> Choice 2</label>
</div>
<div>
<input type="radio" id="radio3" name="radio" value="radio3">
<label for="radio3"> Choice 3</label>
</div> - Radio inputs should have the same
nameattribute, so that only one choice can be selected. In order for the server to know which input is selected, we add avalueattribute into the input. When the form is submitted, it adds?name=valueto the destination URL - You can add a
checkedattribute to the choice you want to select at the beginning
- Usage:
<select>element: represents a control that provides a menu of options- Usage:
1
2
3
4
5
6
7<label for="pet-select">Choose a pet:</label>
<select name="pets" id="pet-select">
<option value="">--Please choose an option--</option>
<option value="dog">Dog</option>
<option value="cat">Cat</option>
<option value="hamster">Hamster</option>
</select> - For the placeholder option, the value should be empty
- Once submitted, if you made a choice, it adds
?name=valueto the destination URL, if not, it adds?name=to the destination URL
- Usage:
- Range & Text Area
rangeattribute: A control for entering a number whose exact value is not important- Usage:
1
2
3
4
5
6
7
8
9
10<p>Audio settings:</p>
<div>
<label for="volume">Volume</label>
<input type="range" id="volume" name="volume" min="0" max="11">
</div>
<div>
<label for="cowbell">Cowbell</label>
<input type="range" id="cowbell" name="cowbell" min="0" max="100" value="90" step="10">
</div> - Displays as a range widget defaulting to the middle value
- Use
min,maxandstepattribute to control the range, at the beginning, the default value is halfway between the specified minimum and maximum - Once submitted, id adds
?name=valueto the destination URL
- Usage:
<textarea>element: represents a multi-line plain-text editing control, useful when you want to allow users to enter a sizeable amount of free-form text- Usage:
1
2
3
4<label for="area"> Enter some texts</label>
<textarea id="area" name="textarea" rows="n" cols="m">
Some text here...
</textarea> - Once submitted, it adds
name=textto the destination URL, where text is the text you enter in the area
- Usage:
- HTML5 Form Validations
- Validations: add constraints or validate user input of data
- The client side validation can be done using Javascript in the browser. There is also sever side validation that is sent back from the sever
requiredattribute: Boolean. A value is required and must be filled with when the form is to be submitted- Usage:
1
2
3
4<label for="username"> Username </label>
<input type="text" placeholder="username "id="username" name="user" required>
<label for="password"> Password </label>
<input type="password" placeholder="password" id="password" name="pwd" minlength="5" maxlength="20" required> - If an input field is required, then it cannot be empty and should satisfy the constraints before submitting the form
- Usage:
patternattribute: Pattern the value must match to be valid- Use your own regular expression to set constraints
- Use built-in input types to set constraints,
type="email",type="URL", ...
Section 6 CSS: The Very Basics
- What is CSS
- CSS(cascading style sheet), is a style sheet language used for describing the presentation of a document written in a markup language such as HTML
- CSS Rules: almost everything you do in CSS follows this basic
pattern
1
2
3
4
5
6
7
8
9
10
11
12
13
14
15/* general pattern */
selector {
property: value;
}
/* examples */
h1 {
color: purple;
}
img {
width: 100px;
height: 200px;
}
input[type="text"]:nth-of-type(2n) {
border: 2px solid red;
} - You should always add a semicolon after each property-value pair
- There are huge plenty of CSS properties, you could Google the one you want to use instead of memorizing them all
- Including Styles Correctly
- Inline styles: you can write the styles directly inline on each
element, but this is not a good idea most of the time
- Usage:
1
<h1 style="color:yellow;"> This is a h1 </h1>
- Usage:
- The
<style>element: you can write you styles inside of a<style>element. This is easy, but it makes it impossible to share styles between document, so it's not recommended either- Usage:
1
2
3
4
5
6
7
8
9
10<head>
<style>
h1 {
color: red;
}
</style>
</head>
<body>
<h1> This is a h1 </h1>
</body>
- Usage:
- External stylesheet: write you styles in a
.cssfile, an then include the using a<link>in the head of you html document, this approach is recommended- The
.cssfile should be in the same directory with the html file - Usage:
1
2
3<head>
<link rel="stylesheet" href="style.css">
</head>
- The
- Inline styles: you can write the styles directly inline on each
element, but this is not a good idea most of the time
- Color & Background-Color Properties
- Color
- Named color :
color: red; - Hex color:
color: #090; - RGB color:
color: rgb(34, 12, 64, 0.6); - HSL color:
hsl(30, 100%, 50%, 0.6); - Global color:
color: inherit;
- Named color :
- Background-color
- The background color of the element selected by the selector
- Usage:
background-color: red;, you could also use thebackgroundproperty to set the color, but it can do a lot more
- Color
- Color Systems: RGB & Names Colors
- Names color: modern browsers support 140 named colors, a typical computer can display about 16,000,000 different colors
- RGB color
- Red, Green, Blue channels
- Each channel ranges from 0 to 255
- Color Systems: Hexadecimal
- The system:
- RGB channels, each channel ranges from 0 to 255 but stored in two hexadecimal digits
- The system:
- Common Text Properties
text-alignproperty: sets the horizontal alignment of the content inside a block element or table-cell box- Values: left, right, center, justify(justify means both align-left and align-right)
font-weightproperty: sets the weight (or boldness) of the font. The weights available depend on the font-family that is currently set- Values: normal, bold, lighter, bolder, a number between 1 and 1000(400 is normal, 700 is bold)
text-decorationproperty: sets the appearance of decorative lines on text- Values:
text-decoration-line: none, underline, overline, line-through, underline overline, underline line-throughtext-decoration-style: solid, double, dotted, dashed, wavytext-decoration-thickness: auto, from-font, 0.1em, 3px, 10%, ...text-decoration-color: ...
- Values:
line-heightproperty: sets the height of a line box- Values: normal, 2.5, 3em, 150%, 32px, ...
letter-spacingproperty: sets the horizontal spacing behavior between text characters- Values: normal, .2rem, 1px, -1px, ...
text-transform: specifies how to capitalize an element's text- Values: uppercase, lowercase, capitalize(first character uppercase for each word), none, full-width, full-size-kana
- Font Size Basics With Pixels
font-sizeproperty: sets the size of the font- Values: 1.2em, x-small, smaller, 12px, 80%
- Relative size: em, rem, vh, vw, %, ...
- Absolute size: px(the most commonly used absolute unit), pt, cm, in, mm
- The Font Family Property
font-familyproperty: specifies a prioritized list of one or more font family names and/or generic family names for the selected element- It specifies a list of fonts, from highest priority to lowest, use comma to separate different fonts
Section 7 The World of CSS Selectors
- Universal & Element Selectors
- Universal selector: matches elements of any type
- Usage:
1
2
3* {
color: red;
}
- Usage:
- Type selector: matches elements by node name. In other words, it
selects all elements of the given type within a document
- Usage:
1
2
3h1 {
color: red;
}
- Usage:
- Select multiple elements, use comma to separate them
- Usage:
1
2
3h1, h2 {
color: red;
}
- Usage:
- Universal selector: matches elements of any type
- The ID Selector
- ID Selector: matches an element based on the value of the element’s id attribute. In order for the element to be selected, its id attribute must match exactly the value given in the selector
- Usage:
1
2
3#id {
color: red;
}
- The Class Selector
- Class Selector: matches elements based on the contents of their class attribute
- Usage:
1
2
3.class {
color: red;
}
- The Descendent Selector
- Usage:
1
2
3
4/* select all <a>'s that are nested inside an <li>*/
li a {
color: red;
} - The inheritance list can be nested, e.g.,
section li a
- Usage:
- The Adjacent & Direct-Descendent Selectors:
- Adjacent sibling selectors: separates two selectors and matches the
second element only if it immediately follows the first element, and
both are children of the same parent element
- Usage:
1
2
3
4/* Select the sibling paragraph that is located immediately after the h1*/
h1 + p {
color: red;
}
- Usage:
- General sibling selectors: separates two selectors and matches all
iterations of the second element, that are following the first element,
and are children of the same parent element
- Usage:
1
2
3
4/* Select all sibling paragraphs that are located after the h1*/
h1 ~ p {
color: red;
}
- Usage:
- Child selectors: it matches only those elements matched by the
second selector that are direct children of elements matched by the
first
- Usage:
1
2
3
4/* Select all direct child paragraphs of the h1*/
h1 > p {
color: red;
} - Child selectors are stricter than descendent selectors, the former only selects direct children, while the latter selects all descendants
- Usage:
- Descendant selectors: it matches only those elements matched by the
second selector that are descendants of elements matched by the first
- Usage:
1
2
3
4/* Select all paragraphs that are descendants of the h1*/
h1 p {
color: red;
}
- Usage:
- Adjacent sibling selectors: separates two selectors and matches the
second element only if it immediately follows the first element, and
both are children of the same parent element
- The Attribute Selector: matches elements based on the presence or
value of a given attribute
- Usage:
1
2
3input[type="password"] {
color: yellow;
}
- Usage:
- Pseudo Classes
- A CSS pseudo-class is a keyword added to a selector that specifies a special state of the selected element(s)
- Usage:
1
2
3
4/* Any button over which the user's pointer is hovering */
button:hover {
color: blue;
} - Examples:
- Linguistic pseudo-classes: idr, lang
- Location pseudo-classes: any-link, link, visited, local-link, target, target-within, scope
- User action pseudo-classes: hover, active, focus, focus-visible, focus-within
- Time-dimensional pseudo-classes: current, past, future
- Resource state pseudo-classes: playing, paused
- The input pseudo-classes: autofill, enabled, disabled, read-only, read-write, placeholder-shown, default, checked, indeterminate, blank, valid, invalid, in-range, out-of-range, required, optional, user-invalid
- Tree-structural pseudo-classes: root, empty, nth-child, nth-last-child, first-child, last-child, only-child, nth-of-type,nth-last-of-type, first-of-type, last-of-type, only-of-type
- Pseudo Elements: a keyword added to a selector that lets you style a
specific part of the selected element(s)
- Usage:
1
2
3
4
5/* The first line of every <p> element. */
p::first-line {
color: blue;
text-transform: uppercase;
} - Examples: after, backdrop, before, cue, cue-region, first-letter, first-line, file-selector-button, grammar-error, marker, part(), placeholder, selection, slotted(), spelling-error, target-text
- Usage:
- The CSS Cascade
- The order the styles are declared in and linked to matters
- Cascading order
- t first filters all the rules from the different sources to keep only the rules that apply to a given element
- Then it sorts these rules according to their importance, that is, whether or not they are followed by !important, and by their origin. The cascade is in ascending order, which means that !important values from a user-defined style sheet have precedence over normal values originated from a user-agent style sheet
- Specificity
- When there is a conflict, the more specific selector wins
- Priority: Selector with !important > Inline styles > ID > Class > Type
- If multiple selectors are equally specific, then the last one wins
- Inheritance
- Some elements will automatically inherit properties from superior elements
- For those don't automatically inherit, you can use inherit to force
inheritance
1
2
3button {
color: inherit;
}
Section 8 The CSS Box Model
- Box Model: Width & Height
- Everything in CSS has a box around it, and understanding these boxes is key to being able to create layouts with CSS, or to align items with other items
- The model
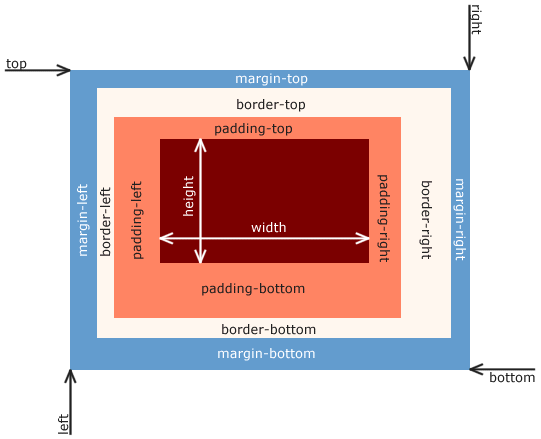
widthproperty: sets an element's width. By default, it sets the width of the content area, but if box-sizing is set to border-box, it sets the width of the border areaheightproperty: specifies the height of an element. By default, the property defines the height of the content area. If box-sizing is set to border-box, however, it instead determines the height of the border area
- Box Model: Border & Border-Radius
- Some properties:
- Simplest way:
1
2/* border: width style color;*/
border: 8px solid black; border-colorproperty: sets the color of an element's borderborder-styleproperty: sets the line style for all four sides of an element's border- Values: none, dotted, inset, dashed solid, dashed double none,
dashed groove none dotted
- You can also use
border-left-style,border-right-style,border-top-style,border-bottom-style
- Values: none, dotted, inset, dashed solid, dashed double none,
dashed groove none dotted
border-widthproperty: sets the width of an element's borderborder-radiusproperty: rounds the corners of an element's outer border edge.- Usage:
1
2
3
4
5
6
7
8
9
10
11
12
13
14
15
16/* One value, all 4 corners */
h1 {
border-radius: 12px;
}
/* Two values: 1st-value: top-left-and-bottom-right, 2nd-value: top-right-and-bottom-left */
h1 {
border-radius: 12px, 20%;
}
/* Three values: 1st-value: top-left-and-bottom-right, 2nd-value: top-right-and-bottom-left, 3rd-value: bottom-right */
h1 {
border-radius: 12px, 5px, 20%;
}
/* Four values: 1st-value: top-left, 2nd-value: top-right, 3rd-value: bottom-right, 4th-value: bottom-left */
h1 {
border-radius: 12px, 11px, 10px, 9px;
}
- Usage:
- Simplest way:
- Some properties:
- Box Model: Padding
paddingproperty: sets the padding area on all four sides of an element at once- You can also use
padding-bottom,padding-top,padding-left,padding-right - Usage:
1
2
3
4
5
6
7
8
9
10
11
12
13
14
15
16/* One Value: 4 sides */
h1 {
padding: 10px;
}
/* Two values: 1st-value: top-bottom, 2nd-value: right-left */
h1 {
padding: 10px, 9px;
}
/* Three values: 1st-value: top, 2nd-value: right-left, 3rd-value: bottom */
h1 {
padding: 10px, 9px, 8px;
}
/* Four values: 1st-value: top, 2nd-value: right, 3rd-value: bottom, 4th-value: left */
h1 {
padding: 10px, 9px, 8px, 7px;
}
- Box Model: Margin
marginproperty: sets the margin area on all four sides of an element- You can also use
margin-bottom,margin-top,margin-left,margin-right - Usage:
1
2
3
4
5
6
7
8
9
10
11
12
13
14
15
16/* One Value: 4 sides */
h1 {
margin: 10px;
}
/* Two values: 1st-value: top-bottom, 2nd-value: right-left */
h1 {
margin: 10px, 9px;
}
/* Three values: 1st-value: top, 2nd-value: right-left, 3rd-value: bottom */
h1 {
margin: 10px, 9px, 8px;
}
/* Four values: 1st-value: top, 2nd-value: right, 3rd-value: bottom, 4th-value: left */
h1 {
margin: 10px, 9px, 8px, 7px;
}
- The Display Property
displayproperty: sets whether an element is treated as a block or inline element and the layout used for its children, such as flow layout, grid or flex- Values:
inline: generates one or more inline element boxes that do not generate line breaks before or after themselves. In normal flow, the next element will be on the same line if there is space. Width, height, margin and padding are ignoredblock: generates a block element box, generating line breaks both before and after the element when in the normal flow. Width, height, margin and padding are respected.inline-block: similar to inline property, but Width, height, margin and padding are respectednone: the element is hided, it's not deleted
- CSS Unites Revisited
- Relative Units
- Percentages:
width: 50%- half the width of the parentline-height: 50%- half the font-size of the element itself
emvalue: relative font-size to parent or the element itself- With
font-size: 1em equals the font-size of the parent, 2em is twice the font-size of the parent - With other properties, 1em is equal to the computed font-size of the element itself
- With
remvalue: relative font-size to the root elementfont-size:Nrem: equals Nth times the font-size of the root element
- Percentages:
- Relative Units
Section 9 Other Assorted Useful CSS Properties
- Opacity &The Alpha Channel
- Alpha Channel:
- RGBA:
rgba(a, b, c, d), d
- RGBA:
- Opacity:
opacityproperty: sets the opacity of an element. Opacity is the degree to which content behind an element is hidden, and is the opposite of transparency- Opacity applies to an element as a whole, so its contents and its children have the same opacity level
- Alpha Channel:
- The Position property
positionproperty: sets how an element is positioned in a document- Usage:
1
2
3
4
5
6
7
8
9
10
11
12
13
14
15
16
17
18
19
20/* Default position */
h1 {
position: static;
}
/* Relative its default position */
h1 {
position: relative;
/* Leave 20px at the top, i.e., move to the bottom of 20px*/
top: 20px;
/* Leave 40px on the left, i.t., move to the right of 40px*/
left: 40px;
}
/* Current position removes, then relatively positioned to its positional ancestor,
if no positional ancestor exists, it's positioned to the initial containing block */
h1 {
position: absolute;
top: 20px;
left: 40px;
}
- CSS Transitions
transitionproperty: provides a way to control animation speed when changing CSS properties- Usage:
1
2
3div {
transition: <property> <duration> <timing-function> <delay>;
} - Example:
1
2
3
4
5
6
7
8
9
10
11div {
background-color: red;
height: 400px;
width: 400px;
transition: 3s; /* Take three seconds to transit */
}
div:hover {
background-color: yellow;
border-radius: 50; /* A circle */
} transition-duration: sets the length of time a transition animation should take to complete. By default, the value is 0s, meaning that no animation will occurtransition-delay: specifies the duration to wait before starting a property's transition effect when its value changestransition-timing-function: sets how intermediate values are calculated for CSS properties being affected by a transition effecttransition-property: sets the CSS properties to which a transition effect should be applied
- The Power of CSS Transforms
transformproperty: lets you rotate, scale, skew, or translate an element. It modifies the coordinate space of the CSS visual formatting model- transform-functions:
transform: rotate(Ndeg): rotate N degrees, if N > 0, clockwise, if not, counter-clockwisetransform: scale(sx): scaling uniformlytransform: scale(sx, sy): sx represents the width, sy represents the heighttransform: translate(sx, sy): parallel movetransform: skew(ax): distort along x-axistransform:skew(ax, ay): distort along both x-axis and y-axis- ...
- The transform-functions can be combined together
- The Truth About Background
background-imageproperty: sets one or more background images on an elements- Usage:
1
background-image: url('URL');
- Usage:
background-sizeproperty: sets the size of the element's background image. The image can be left to its natural size, stretched, or constrained to fit the available spacebackground-positionproperty: sets the initial position for each background image
- Google Fonts
- URL: fonts.google.com
- Steps:
- Add a link in the html head
- Use font-body in the CSS file
- Example:
1
<link rel="preconnect" href="https://fonts.gstatic.com">
1
2
3h1 {
font-family: 'Roboto', sans-serif;
}
- The Photo Site
- Position:
1
2
3
4img {
width: 30%;
margin: calc(10%/6);
} - Although elements like img or link are inline, there is still white space between them if you put them separately. In order for the above figures and margins to be placed correctly, you should leave no space between the img elements.
- Position:
Section 10 Responsive CSS & Flexbox
- What is Flexbox
- Flex is a one-dimensional layout model, and as a method that could offer space distribution between items in an interface and powerful alignment capabilities
- It's about distributing space within some container
- Flex-Direction
- A flexbox has two axes- the main axis and the cross axis. By
default, the main axis is horizontal, the cross axis is always
perpendicular to the main axis. You can use
flex-directionproperty to change the direction of main direction. - Change direction of axes:
1
2
3
4
5
6
7
8
9
10
11div {
display: flex;
/* Default setting, horizontal main axis indexing from left to right */
flex-direction: row;
/* Horizontal main axis indexing from right to left */
flex-direction: row-reverse;
/* Vertical main axis indexing from top to bottom */
flex-direction: column;
/* Vertical main axis indexing from bottom to top */
flex-direction: column-reverse;
} - If you set
display: flex, the the specific property setting to inner element like width or height may not come into effect. For example, if container width is 500px and there are 5 inner div elements with width of 200px each, then the actual width would be 500 / 5 = 100px. If the container width is larger than 1000px(200 * 5 = 1000px), then there would be extra row space leaving unused
- A flexbox has two axes- the main axis and the cross axis. By
default, the main axis is horizontal, the cross axis is always
perpendicular to the main axis. You can use
- Justify-Content
justify-contentproperty: defines how the browser distributes space between and around content items along the main-axis of a flex container, and the inline axis of a grid- Usage:
1
2
3
4
5
6
7
8
9
10
11
12
13
14
15#container {
display: flex;
/* The content is displayed on the start of the main axis */
justify-content: flex-start;
/* The content is displayed on the end of the main axis */
justify-content: flex-end;
/* The content is displayed at the center of the main axis */
justify-content: center;
/* The contents are displayed so that there is space between them but no space between the content and the container */
justify-content: space-between;
/* The content are displayed so that there is space between them, space between the content and the container is half-size */
justify-content: space-around;
/* The content is displayed so that there is equally distributed space between contents and between the content and the container */
justify-content: space-evenly;
}
- Flex-Wrap
flex-wrapproperty: sets whether flex items are forced onto one line or can wrap onto multiple lines. If wrapping is allowed, it sets the direction that lines are stackedflex-wrap: wrap: if not enough space, the it makes multiple lines parallel to the main axis to locate the elementsflex-wrap: nowarp: do not use wrapflex-wrap: wrap-reverse: use wrap, but starts from the end side of the main axis- The direction: main axis, then the cross axis
- Align-Items
align-itemsproperty: sets the align-self value on all direct children as a group. In Flexbox, it controls the alignment of items on the Cross Axis. In Grid Layout, it controls the alignment of items on the Block Axis within their grid areaalign-items: center: cross axis centeralign-items: start: cross axis startalign-items: end: cross axis end 6.Align-Content & Align-Selfalign-contentproperty: sets the distribution of space between and around content items along a flexbox's cross-axis or a grid's block axis- If the main axis is horizontal, it controls the space between rows, if the main axis is vertical, it controls the space between columns
- This property has no effect on single line flex containers (i.e. ones with flex-wrap: nowrap)
- Usage:
align-content: center,align-content:start,align-content: space-between,align-content: space-around
align-selfproperty: overrides a grid or flex item's align-items value. In Grid, it aligns the item inside the grid area. In Flexbox, it aligns the item on the cross axis- It picks one element in the container and behaves the same as align-items
- Flex-Basics, Grow, & Shrink
- The
flex-basics,flex-grow,flex-shrinkproperty deals with a flex item in the flexbox flex-basicsproperty: sets the initial main size(the main size is the length in the direction of the main axis) of a flex item. It sets the size of the content box unless otherwise set with box-sizingflex-growproperty: sets the flex grow factor of a flex item's main sizeflex-shrinkproperty: sets the flex shrink factor of a flex item. If the size of all flex items is larger than the flex container, items shrink to fit according to flex-shrink- The relationship:
If
If
- The relationship:
- The
- Flex property:
flexproperty: sets how a flex item will grow or shrink to fit the space available in its flex container- Usage
1
2
3
4
5
6
7
8
9
10
11
12
13
14
15
16
17
18
19
20
21
22
23
24
25
26/* One value without unit: flex-grow */
div {
display: flex;
flex: 2;
}
/* One value with uint: flex-basics */
div {
display: flex;
flex: 10em;
}
/* Two values: one with unit: flex-grow and flex-basics */
div {
display: flex;
flex: 1 9em;
}
/* Two values: both without unit: flex-grow and flex-shrink */
div {
display: flex;
flex: 2 2;
}
/* Three values: flex-grow, flex-shrink and flex-basics */
div {
display: flex;
flex: 2 2 8em;
}
- Responsive Design & Media Queries Intro
- Responsive design: is an approach to web design that makes web pages
render well on a variety of devices and window or screen sizes from
minimum to maximum display size
- Early on, it's common to create separate CSS for different divices, or even completely different websites for each size
- These days, we typically create one website and CSS that is able to respond to different devices sizes and features
- Media queries allow us to modify our styles depending on particular parameters like screen width or device type
- Responsive design: is an approach to web design that makes web pages
render well on a variety of devices and window or screen sizes from
minimum to maximum display size
- The Power of Media Queries
@mediaCSS at-rule can be used to apply part of a style sheet based on the result of one or more media queries. With it, you specify a media query and a block of CSS to apply to the document if and only if the media query matches the device on which the content is being used- Syntax
1
2
3
4
5@media (media query) {
element {
property: value
}
} - Example
1
2
3
4
5
6
7
8
9
10/*
* viewport: A viewport represents a polygonal (normally rectangular) area in computer graphics that is currently being viewed. In web browser terms, it refers to the part of the document you're viewing which is currently visible in its window (or the screen, if the document is being viewed in full screen mode). Content outside the viewport is not visible onscreen until scrolled into view
* min-width: when the viewport is wider than 600px
* max-width: when the viewport is narrower thant 800px
*/
@media (min-width: 600px) and (max-width: 800px) {
h1 {
color: red;
}
} - Example:
1
2
3
4
5
6/*The orientation of the screen, when the width is larger than the height, the orientation value should be landscape, when the width is smaller than the height, the orientation value should be protrait*/
@media (orientation: landscape) {
body {
background-color: magenta;
}
} - As the viewport becomes smaller, the font-size may be too large, so
you need to adjust
font-sizeusing a media query with something likemax-width Npx
Section 11 Pricing Panel Project
- CSS reset
- The goal of a reset stylesheet is to reduce browser inconsistencies in things like default line heights, margins and font sizes of headings, and so on
- Code:
1
2
3
4
5
6
7
8
9
10
11
12
13
14
15
16
17
18
19
20
21
22
23
24
25
26
27
28
29
30
31
32
33
34
35
36
37
38
39
40
41
42
43html, body, div, span, applet, object, iframe,
h1, h2, h3, h4, h5, h6, p, blockquote, pre,
a, abbr, acronym, address, big, cite, code,
del, dfn, em, img, ins, kbd, q, s, samp,
small, strike, strong, sub, sup, tt, var,
b, u, i, center,
dl, dt, dd, ol, ul, li,
fieldset, form, label, legend,
table, caption, tbody, tfoot, thead, tr, th, td,
article, aside, canvas, details, embed,
figure, figcaption, footer, header, hgroup,
menu, nav, output, ruby, section, summary,
time, mark, audio, video {
margin: 0;
padding: 0;
border: 0;
font-size: 100%;
font: inherit;
vertical-align: baseline;
}
/* HTML5 display-role reset for older browsers */
article, aside, details, figcaption, figure,
footer, header, hgroup, menu, nav, section {
display: block;
}
body {
line-height: 1;
}
ol, ul {
list-style: none;
}
blockquote, q {
quotes: none;
}
blockquote:before, blockquote:after,
q:before, q:after {
content: '';
content: none;
}
table {
border-collapse: collapse;
border-spacing: 0;
}
- Mobile first design:
- It's a design strategy that says when you create a website or app, you should start sketching and prototyping the smallest screen first and work your way up to larger screens
- The reason that this makes sense is because with such limited real estate on small screens, UX designers must prioritize the most important aspects of their website and apps, namely content
- Some tips:
- Remove the last border(pick the last one using
selector:last-child) - Change margin sides when changing the flex-direction
- Remove the last border(pick the last one using
Section 12 CSS Framework: Bootstrap
- What is Bootstrap
- Bootstrap helps to create nice-looking, responsive modern website
- Bootstrap contains two main things:
- Components: a bunch of pre-built components to incorporate in you websites
- Grid system: helps to construct you wen custom, responsive layouts
- Including Bootstrap & Containers
- Include Bootstrap
- Download bootstrap and use a link in the html head to include it
- Add the following link into your CSS:
1
<link rel="stylesheet" href="https://cdn.jsdelivr.net/npm/bootstrap@4.5.3/dist/css/bootstrap.min.css" integrity="sha384-TX8t27EcRE3e/ihU7zmQxVncDAy5uIKz4rEkgIXeMed4M0jlfIDPvg6uqKI2xXr2" crossorigin="anonymous">
- Some elements in bootstrap require JS
- Container
- Containers are the most basic layout element in Bootstrap and are required when using bootstrap default grid system. Choose from a responsive, fixed-width container (meaning its max-width changes at each breakpoint) or fluid-width (meaning it’s 100% wide all the time).
- Usage:
1
2
3
4
5
6
7
8
9
10
11
12
13
14
15
16
17
18
19
20
21
22
23
24
25
26
27/* Ordinary container */
<div class="container">
<!-- Content here -->
</div>
/* Fluid-width container */
<div class="container-fluid">
...
</div>
```
3. Bootstrap Buttons
* Bootstrap includes several predefined button styles, each serving its own semantic purpose, with a few extras thrown in for more control
* The .btn classes are designed to be used with the `<button>` element. However, you can also use these classes on `<a>` or `<input>` elements
* For `<a>` elements, add `role="button"` property to the elements
* Use `btn-outline-name` to remove button background-color
* Use `btn-lg` or `btn-sm` to adjust button sizes
* Use `active` and `aria-pressed="true"` to make buttons being pressed
* Use `btn-block` to use block-level buttons
* Use `disabled` to use disabled buttons
* ...
4. Bootstrap Typography & Utilities
* Typography
* Bootstrap sets basic global display, typography, and link styles
* Display headings: headings that stand out(larger)
* Usage:
```html
<h1 class="display-1">Display 1</h1> - Lead: paragraphs that stand out
- Usage:
1
2
3<p class="lead">
<!-- Content -->
</p>
- Usage:
- Blockquotes: quote blocks of content from another source within the
document with a source
- Usage:
1
2
3
4<blockquote class="blockquote">
<p> Paragraph content</p>
<footer class="blockquote-footer">Source</footer>
</blockquote>
- Usage:
- Utilities
- Color: text color, background color
- Include Bootstrap
- Badges, Alerts, and Button Groups
- Badges can be used in terms of notifications
1
<h1>Example heading <span class="badge bg-secondary">New</span></h1>
- Button group: group a series of buttons together on a single line or
stack them in a vertical column
1
2
3
4
5<div class="btn-group" role="group" aria-label="Basic example">
<button type="button" class="btn btn-primary">Left</button>
<button type="button" class="btn btn-primary">Middle</button>
<button type="button" class="btn btn-primary">Right</button>
</div> - Alert: provide contextual feedback messages for typical user actions with the handful of available and flexible alert messages
- Badges can be used in terms of notifications
- Intro to Bootstrap Grid
- Bootstrap’s grid system uses a series of containers, rows, and columns to layout and align content. It’s built with flexbox and is fully responsive
- Each row in bootstrap has 12 units to divide
1
2
3
4
5<div class='row'>
<div class='col-3 bg-info'>Part 1</div>
<div class='col-3 bg-warning'>Part 2</div>
<div class='col-3 bg-info'>Part 3</div>
</div> - Responsive layout columns:
.col-n.col-sm-n.col-md-n.col-lg-n.col-xl-n - Responsive layout images:
class="img-fluid"
- Useful Grid Utilities
- The flexbox properties have responsive versions in bootstrap, e.g.
.justify-content-md-end
- The flexbox properties have responsive versions in bootstrap, e.g.
- Forms
- Form control
1
2
3
4
5<div class="test`">
<label for="exampleFormControlInput1" class="form-label">Email address</label>
<input type="email" class="form-control" id="exampleFormControlInput1" placeholder="name@example.com">
</div> - There are a lot of other features
- Form control
- Navbars
- Navbars require a wrapping .navbar with .navbar-expand{-sm|-md|-lg|-xl} for responsive collapsing and color scheme classes
- Navbars and their contents are fluid by default
- Navbars are responsive by default
- Navbars are hidden by default when printing
- Bootstrap Icons
- A lot of icons
Section 14 JavaScript Basics
- Why JavaScript
- A client-side scripting language
- Primitives and The Console
- There are seven primitive data types:
string,number,bigint(integers in arbitrary precision format),boolean(true, false),undefined(declared but not assigned variable),symbol(unique value), andnull - Use right click mouse and choose
inspector pressF12to open the console in Chrome - In JavaScript, semicolon at the end of statement is not required but highly recommended
- Use single quotes unless you are writing JSON
- There are seven primitive data types:
- Numbers
- Integers and floating point numbers are all included
- Demo
1
2
3
4console.log(typeof 42) // number
console.log(2 ** 4) // 16
console.log(5/2) // 2.5
console.log(~~(5/2)) // 2, this is integer divison
- NaN
NaNis a numeric value that represents something that is not a number- Demo
1
2
3console.log(1 / 0) // Infinity
typeof 1/0 // NaN
typeof NaN // number - Whenever you do mathematical operations that involve the
NaN, the result isNaN
- Variables and Let
- Demo: difference between var and let
1
2
3
4
5
6
7console.log(x) // Undefined
var x = 5
console.log(x) // 5
console.log(y) // ReferenceError: y is not defined
let y = 5
console.log(y) // 5
- Demo: difference between var and let
- Const and Var
- Demo
1
2
3
4var x = 15
const y = 15
x++ // 16
y++ // TypeError: Assignment to constant variable - You can use const to define variables like PI, you can also use them in Object types
- Demo
- Booleans
- true or false
- Variables can change type in JavaScript, e.g., you can convert numeric variables into boolean ones
- Variable Naming and Conversions
- An identifier is a sequence of characters in the code that identifies a variable, function, or property
- Identifiers are case-sensitive and can contain Unicode letters, $, _, and digits (0-9), but may not start with a digit
- Conversions:
- Use lowerCamelCase for variables, properties and function names
- Use UpperCamelCase for class names
- Use UPPERCASE for Constants
Section 15 JavaScript Strings and More
- Introduction
- String must be inside quotes
- Indices and Length
- Index starts from 0, character access:
string[index] - Length is the property of a string:
string.length
- Index starts from 0, character access:
- String Methods
string.toUpperCase(),string.toLowerCase()string.charAt(index), same effect ofstring[index]string.trim(),string.trimStart(),string.trimEnd()string.indexOf(str)returns the first index or -1string.slice(beginIndex[, endIndex]), endIndex is not includedstring.replace(str1, str2),string.replaceAll(str1, str2)- ...
- String Template Literals
- Template literals are strings that allow embedded expressions, which will be evaluated and then turned into a resulting string
- Demo
1
2
3var x = 'Jesse';
var result = `My name is ${x}`; // This sign is called back-tick
console.log(result); // My name is Jesse
- Undefined and Null
- Null:
- Intentional absence of any value
- Must be assigned
- Undefined
- Variables that do not have an assigned value are undefined
- Null:
- Random Numbers and The Math Object
Math.PIMath.round(value)Math.abs(value)Math.pow(a, b)Math.floor(value),Math.ceil(value)Math.random(), includes 0 but not 11
2// A random number between a and b, a and b are both included
var x = Math.floor(Math.random() * (b - a + 1)) + a
Section 16 JavaScript Decision Making
- Comparison Operators
- Operators:
>,<,>=,<=,==,!=,===(strict equality),!==(strict non-equality) - You can compare strings
- Operators:
- Equality: Triple v.s. Double Equals
==and!=- Checks for equality of value, but not equality of type, it coerces both values to the same type and then compares them
- Demo:
1
2
3
4
51 == 1 // true
1 == '1' // true
0 == '' // true
0 == false // true
null == undefined // true
===and!==- Checks both type and value
- Demo
1
21 === '1' // false
0 !== false // true
- Console, Alert and Prompt
console.log(): prints arguemnts to the consoleconsole.warn(): outputs a warning messageconsole.error(): outpus an error messagealert('Content'): instructs the browser to display a dialog with an optional message, and to wait until the user dismisses the dialogprompt('Content'): instructs the browser to display a dialog with an optional message prompting the user to input some text, and to wait until the user either submits the text or cancels the dialog- Demo
1
2
3
4
5var input = prompt('Please enter a number');
console.log(input);
typeof input // string
input = parseInt(input)
typeof input // number
- Demo
- Running JavaScript From A Script
- Add script element in the HTML file
1
<script src='app.js'></script>
- The bset place to put the JavaScript file is at the very end of the body element in your HTML file, so that all HTML elements have already been loaded
- Add script element in the HTML file
- Conditional Statements
- Demo
1
2
3
4
5
6
7
8var rd = Math.random();
if (rd < 0.5) {
console.log(`The number ${rd} is stupid!`);
} else if (rd >= 0.5 && rd < 0.6) {
concole.log(`The number ${rd} is still stupid!`);
} else {
console.log(`The number ${rd} is not stupid!`);
}
- Demo
- True and False Values
- False values: false, 0, ""(empty string), null, undefined, NaN
- Everything else has a true value
- Logical Operators
- And:
&& - Or:
|| - Not:
!
- And:
- The switch statement
- Demo
1
2
3
4
5
6
7
8
9
10
11
12
13
14
15
16
17
18
19
20
21
22
23
24
25
26
27var input = window.prompt('Enter a number between 1 and 7');
input = parseInt(input);
switch(input) {
case 1:
console.log('Monday');
break;
case 2:
console.log('Tuesday');
break;
case 3:
console.log('Wednesday');
break;
case 4:
console.log('Thursday');
break;
case 5:
console.log('Friday');
break;
case 6:
console.log('Saturday');
break;
case 7:
console.log('Sunday');
break;
default:
console.log('Invalid input');
}
- Demo
Section 17 JavaScript Arrays
- Introduction
- Arrays are ordered collections of values
- Create an array:
let names = ['Jimmy', 'Karen', 'Tom'] - Types of itmes in the array do not need to be the same
- Array Random Access
- Each item in an array has an associated index
- Length:
array.length - String is immutable, but array is mutable
- For
indexsuch thatindex >= array.length,array[index] = itemdoes not result in an error, the missing items from indexarray.length - 1toindex - 1are all undefined
- Push, Pop, Shift and Unshift
- Push: add to end,
array.push(value1, value2, ..., valueN) - Pop: remove from end,
var value = array.pop() - Shift: remove from start,
var value = array.shift() - Unshift: add to start,
array.unshift(value1, value2, ..., valueN)
- Push: add to end,
- Concat, IndexOf, Includes and Reverse
- Concat: concat two arrays and result in a new array
1
2
3
4
5
6var x = [1, 2];
var y = [3, 4];
var z = x.concat(y);
console.log(z); // [1, 2, 3, 4]
console.log(y); // [3, 4]
console.log(x); // [1, 2] - Includes: return whether an array contains an item
1
2var x = [1,2];
console.log(x.contains(3)); // false - IndexOf: return the index of an item or -1
1
2
3var x = [1, 2];
x.indexOf(2); // 1
x.indexOf(3); // -1 - Reverse: reverse the array, return the reverse
1
2
3
4var x = [1, 2];
var y = x.reverse();
console.log(x); // [2, 1]
console.log(y); // [2, 1]
- Concat: concat two arrays and result in a new array
- Other methods
- Slice: return subarray,
array.slice(index1, index2), index2 is optional - Splice: delete/add items to the array
splice(start, deleteCount, item1, item2, ..., itemN), ifstart < array.lengthanddeleteCount > 0, then deletedeleteCountitems starting from indexstart. Ifstart >= array.lengthordeleteCount <= 0, then additem1toitemNto the array
- Sort: sort the array according a sorting method, we can use default sorting method or pass a sorting method into the sort function
- Slice: return subarray,
- Arrays and Constants
- Demo
1
2
3const colors = ['red', 'blue'];
colors.push('black'); // Changing array contents is okay as long as the array itself is not changed
console.log(colors); // ['red', 'blue', 'black']
- Demo
- Multi-Dimensional Arrays
- Represented using nested arrays
Section 18 JavaScript Object Literals
- Introduction:
- Objects are collections of properties
- Properties are a key-value pair
- Rather than accessing data using an index, we use custom keys
- Demo
1
2
3
4
5
6const information = {
username: 'root',
password: '123456',
port: 3306,
database: 'info'
} - There is no limitation on values, you can put whatever you want, including arrays and other objects
- Accessing Dat Out of Objects
- Use square brackets to access value, but need to add a quotation mark to key, you can also use a variable as a key here(variables does not quotation marks)
- Use dot notations, no quotation is needed in this way
1
2
3
4
5
6
7
8const information = {
username: 'root',
password: '123456',
port: 3306,
database: 'info'
}
result = information['username'] // 'root'
db = information.database // 'info' - Loop to get keys and values of an object
1
2
3
4
5
6
7for (const key in info) {
console.log(`key = ${key}, value = ${info[key]}`);
}
for (const [key, value] of Object.entries(info)) {
console.log(`key = ${key}, value = ${value}`);
}
- Modifying Objects
- Demo:
1
2
3const midterm = {Karen: 79, Thomas:80};
midterm['Karen'] = 'A'; // update a value
midterm['Jesse'] = 'A+'; // insert into a value
- Demo:
- Nesting Arrays and Objects
- Arrays and Objects can be nested with each other
Section 19 Repeating Stuff With Loops
- For Loops
- Syntax
1
2
3for([initialExpression]; [condition]; [incrementExpression]) {
[statements];
}
- Syntax
- Nested Loops
- You need nested loops for multi-dimensional arrays
- While Loop
- Syntax
1
2
3
4let variable = value;
while ([condition]) {
[statements];
} - When you do not know the amount of loops, you should use while loop rather than for loop
- Syntax
- The Break Keyword
- Use
break;to break out the loop
- Use
- The For Of Loop
- Syntax
1
2
3for ([variableName] of [Iterable]) {
[statements];
} - We can use for of loops on arrays, strings, ...
- Syntax
- Iterate Over Objects
- The obejct itself is not iterable
- Iterable over objects
Object.keys(obj)Object.values(obj)Object.entries(obj)
Section 20 Introduction to Functions
- Introduction
- Functions allow us to write reusable, modular code
- Functions should be declared and executed
- Syntax:
1
2
3
4
5
6// Function declaration
function funcName() {
[statements];
}
// Function execution
funcName();
- Functions with Arguments
- Syntax:
1
2
3function funcName(para1, para2, ..., paraN) {
[statements, paras];
}
- Syntax:
- The Return Keyword
- Return something from a function
Section 21 Leveling Up Functions
- Scopes
- The location where a variable is defined dictates where we have access to the variable
- Function scope: variables defined inside a function is local to the function
- Block scope: variables defined inside a block is local to the block
- Lexical scope: inner functions can access variables defined in the outer functions
- Function Expressions
- Syntax
1
2
3
4
5
6// Declare the function
const variableName = function ([parameters]) {
[statements];
}
// Execute the function
variableName(parameters); - In JavaScript, functions are first-class
- Syntax
- Higher Order Function
- Functions can accept other functions as arguemnts, functions can return other functions
- Function as an argument example:
1
2
3
4
5
6
7
8
9
10
11function callTwice(func) {
func();
func();
}
function rollDie() {
const result = Math.floor(Math.random() * 6) + 1;
console.log(result);
}
callTwice(rollDie); - Return a function example:
1
2
3
4
5
6
7
8
9
10
11
12
13
14
15function returnFunc() {
const = Math.random();
if (const > 0.5) {
return function() {
console.log('Ohhhh!');
}
} else {
return function() {
alert('Stupid!');
}
}
};
const result = returnFunc();
result();
- Defining Methods
- We can add functions as properties on objects, we call them objects
- Example:
1
2
3
4
5
6
7
8
9
10
11
12
13
14
15
16
17
18const math = {
multiply: function(x, y) {
return x * y;
},
// We can use a shorthand
//divide: function(x, y) {
// return x / y;
//},
divide(x, y) {
return x/ y;
},
square: function(x) {
return x * x;
}
};
- The Keyword
thisthisis used to access other properties on the same object- Example:
1
2
3
4
5
6
7
8
9
10const cat = {
name: 'Blue Steel',
color: 'grey',
breed: 'scottish fold',
meow() {
console.log(`${this.name} says Meow!`);
}
}
cat.meow();
- Try/Catch
- Use these statements to catch errors in code
- Syntax:
1
2
3
4
5try {
[statements];
} catch (e) { // e is the error
[statements];
}
Section 22 Callbacks and Array Methods
forEachMethod- Accepts a callback function, calls the function once per element in the array
- Example
1
2
3
4
5
6
7for (ele of arr) {
console.log(ele);
}
arr.forEach(function (ele) {
console.log(ele);
})
mapMethod- Creates a new array with the results of calling a callback on every element in the array
- Example
1
2
3const newArr = arr.map(function (ele) {
return ele * 2;
})
- Arrow Functions
- Simpler than function expression
1
2
3
4
5
6
7
8
9
10
11
12
13// function declaration
function myFun(x, y) {
return x + y;
}
// function expression
const myFun = function(x, y) {
return x + y;
}
// arrow function
const myFun = (x, y) => {
return x + y;
}
- Simpler than function expression
- Arrow Function Implicit Return
- When there is only one return statement in the function, we can remove return keyword and the curly bracket
- Example
1
const myFun = (x, y) => x + y;
setTimeoutandsetIntervalmethod- Syntax
1
2
3
4
5
6
7// after num milliseconds, the callback function will run
setTimeout(callback, num);
// the callback function will be executed every num milliseconds
setInterval(callback, num);
// stop the interval function
const id = setInterval(callback, num);
stopInterval(id);
- Syntax
filtermethod- Creates a new array with all elements that pass the test impleemnted by the provided function
- Example
1
2
3const nums = [1,2,3,4];
const odds = nums.filter(n => n % 2 === 1);
console.log(odds); // [1,3]
someandeverymethod- If at least one elements in the array pass the provided function,
then
somereturns true - If all elements in the array pass the provided function, then
allreturns true
- If at least one elements in the array pass the provided function,
then
reducemethod- Executes a reducer function on each element of the array
- Syntax
1
2// the return value of function is the next round value of accumulator
arry.reduce((accumulator, curValue) => {statements;})
Section 23 Newer JavaScript Features
- Default Parameters
- Old way:
1
2
3
4
5
6const rollDice(numSize) {
if (numSize === undefined) {
numSize = 6;
}
return Math.floor(Math.random() * nuimSize) + 1;
} - New way:
1
2
3const rollDice(numSize = 6) {
return Math.floor(Math.random() * numSize) + 1;
} - The default parameter should always be the last parameter
- Old way:
- Spread in Function Calls
- Spread operator:
...allows an iterable such as an array expression or string to be expanded in places where zero or more arguments (for function calls) or elements (for array literals) are expected, or an object expression to be expanded in places where zero or more key-value pairs (for object literals) are expected - Example
1
2
3
4
5const arr= [1,2,3];
console.log(arr); // [1, 2, 3]
console.log(...arr) // 1 2 3
Math.min(arr); // NaN
Math.min(...arr); // 1
- Spread operator:
- Spread with Array Literals
- Example
1
2
3
4
5
6
7const x = [1, 3];
const y = [2, 4];
const z = [...x, ...y];
console.log(...z); // [1, 3, 2, 4]
const arr = [...'hello'];
console.log(arr); ['h', 'e', 'l', 'l', 'o'];
- Example
- Spread with Objects
- Example
1
2
3
4
5
6
7
8
9
10
11
12const cat = {
name: 'cat',
category: 'cat',
weight: 1
};
const dog = {
name: 'dog',
category: 'dog',
weight: 2
};
// when there is a confict, the object in the following position will win, so the category of animal is dog
const animal = {...cat, ...dog};
- Example
- Rest Params
- The
argumentsobject is available inside every function, it's an array-like object and has a length property, it contains all the arguments passed to the function, it's not available inside of arrow functions - Example
1
2
3
4
5
6
7
8
9
10
11
12
13
14
15
16
17
18// use the arguments object
const sumVal = function() {
let total = 0;
for (let i = 0; i < arguments.length; i ++) {
total += arguments[i];
}
return total;
}
sumVal(8, 4, 4); // 16
sumVal(1, 2); // 3
// use the rest parameters
const sumVal2 = function(...nums) {
return nums.reduce((total, curVal) => total + curVal);
}
sumVal2(1, 2, 3); // 6
- The
- Destructing Arrays
- Example
1
2
3
4const [a, b, c] = [1, 2, 3];
console.log(a); // 1
console.log(b); // 2
console.log(c); // 3
- Example
- Destructing Objects
- Example
1
2
3
4
5
6
7
8
9
10
11
12
13
14const obj = {
name:'Li',
mail: '123@gmail.com',
address:'NY',
};
const {name, mail, address} = obj;
console.log(name); // Li
console.log(mail); // 123@gmail.com
console.log(address); // NY
// We can give default value to a property
// `let zip = obj.zipcode, and if obj.zipcode is undefined, then zip = 'NA'
const {name, mail, address, zipcode: zip = 'NA'} = obj;
- Example
- Destructing Params
- Example
1
2
3
4
5
6
7
8
9
10
11const obj = {
name:'Li',
mail: '123@gmail.com',
address:'NY',
};
const fullName = ({name, mail}) => {
return `${name}, ${mail}.`;
};
fullName(obj);
- Example
Section 24 Introduction to DOM
- Introduction
- DOM(Document Object Model): is an API that represents and interacts with HTML or XML document
- DOM is a document model loaded in the browser and representing the document as a node tree, where each node represents part of the document
- The objects:
window: a global variable representing the main JS object root- Use
document.defaultViewto get the window object associated with a document object, if none is available, returns null
- Use
window.screen: an object about physical screen dimensionswindow.document: main object of the DOM, contained in the window object
getElementByIdmethod- Syntax:
1
2let result = document.getElementById('stringId');
console.log(typeof result); // object - Returns the obejct or null
- Syntax:
getElementsByTagNamemethod andgetElementsByClassNamemethod- These two methods return collection of objects, you need to use indices to select a specific item
getElementsByTagNamemethod- Syntax:
1
2let results = document.getElementsByTagName('tagName');
console.log(typeof results); // object in general, HTMLCollection more concretely - Returns HTMLCollection of all results, or an empty collection
- Syntax:
getElementsByClassName- Syntax:
1
2let results = document.getElementsByTagName('tagName');
console.log(typeof results); // object in general, HTMLCollection more concretely - Returns HTMLCollection of all results, or an empty collection
- Syntax:
querySelectormethod andquerySelectorAllmethodquerySelectormethod- Example
1
const result = document.querySelector('q');
- Returns the first matched object
- Example
querySelectorAllmethod- Example
1
const results = document.querySelectorAll('q');
- Returns all matched objects
- Example
- innerHTML, textContent, innerText
- These are all properties
- Example
1
2
3
4
5
6// get innerText value
let result = document.querySelector('h1');
console.log(result.innerText);
// change value
result.textContent = 'Text';
- Attributes
- Changing attributes example
1
2
3
4
5
6
7
8
9// mannual approach
document.querySelector('#banner').id = 'banner1';
// getAttribute
let result = document.querySelector('#banner');
let attribute = result.getAttribute('id');
// setAttribute
result.setAttribute('id', 'banner1');
- Changing attributes example
- Styles
- Find all styles
1
2
3const result = document.querySelector('p');
result.style.color = 'red';
result.fontSize = '12px';
- Find all styles
- ClassList
- Set multiple class
1
2
3const result = document.getElementById('idString');
const curClass = docuemnt.getAttribute('class');
result.setAttribute('class', '${curClass} class2'); - Modify class using
classList1
2
3
4
5
6const result = document.getElementById('idString');
result.classList.add('class2');
result.classList.remove('class1');
result.classList.contains('class1'); // false
// if result.classList.contains('class3') === true, remove class3, otherwise add class3
result.classList.toggle('class3');
- Set multiple class
- Traversing Parent/Child/Sibling
- Example
1
2
3
4
5
6
7
8
9
10
11
12
13
14const result = document.querySelector('#idString');
console.log(result.parentElement);
console.log(result.childElementCount); // amount of children
for (let child of result.children) {
console.log(child);
}
// the next sibling node
console.log(result.nextSibling);
// the next sibling element
console.log(result.nextElementSibling);
// the previous sibling node
console.log(result.previousSibling);
// the previous sibling element
console.log(result.previousElementSibling);
- Example
- Append and AppendChild
- Add a new element by appending to the HTML body
1
2
3const newImg = document.createElement('img');
result.src = 'urlString';
document.body.appendChild(newImg); - Use the append method
1
2
3
4
5const p = document.createElement('p');
// append at the ending
p.append('someText');
// prepand at the begining
p.prepand('someText');
Section 25 DOM Events
- Introduction to Events
- Use events to user inputs and actions
- Event examples: click, drag, drop, hover, scroll, form submission, key press, focus/blur, mouse wheel, double click, copy, paste ,audio start, screen resize, print
- Inline Events
- Using inline event handler in html is not recommended
- Example
1
<button onclick = "alert('You clicked me!');"> Click me! </button>
- The Onclick Property
- You can use javascript property to handle events
- Example
1
2const btn = document.querySelector('#button1');
btn.onclick = function () => alert('You clicked me!');
addEventListenermethod- Sets up a function that will be called whenever the specified event is delivered to the target
- Basic Syntax:
target.addEventListener(type, listener); - Example
1
2const btn = document.querySelector('#button1');
btn.addEventListener('click', () => alert('You clicked me!')); - Advanced option:
target.addEventListener(type, listener, options)1
2
3const btn = document.querySelector('#button1');
// listener is removed once it is invoked, so the event only occurs once
btn.addEventListener('click', () => alert('You clicked me!'), {once: true});
- Keyword This
- Use keyword this in function that can be applied to multiple different elements
- Keyboard Events and Event Objects
- We can use keyboard event to track which key is pressed
keydownevent: fired when a key is pressed- Example: track which key is pressed
1
2
3
4
5const input = document.querySelector('#input');
input.addEventListener('keydown', (key) => {
console.log(key.key); // if 'e' is pressed, this will be 'e'
console.log(key.code); // if 'e' is pressed, this will be 'keyE'
});
- Example: track which key is pressed
keyupevent: fired when a key is released- If you want to track keydown/keyup anywhere in the page, you can addEventListener to the window element
- Form Events and PreventDefault
- Prevent Submission
1
2
3
4
5
6
7
8const form = document.querySelector('#form');
form.addEventListener('submit', (form) => {
const input = document.querySelector('#input');
// get the input content
console.log(input.value);
// prevent the default behavior of the form, which is submission
form.preventDefault();
}) - Access form elements using
elementsproperty1
2
3
4
5
6
7
8
9
10
11
12
13
14
15
16
17<h2> Inputs </h2>
<form action="" method="get" class="form-example">
<div class="form-example">
<label for="name">Enter your name: </label>
<input type="text" name="name" id="name" required>
</div>
<div class="form-example">
<label for="email">Enter your email: </label>
<input type="email" name="email" id="email" required>
</div>
<div class="form-example">
<input type="submit" value="Subscribe!">
</div>
</form>
<h2> Info </h2>
<ul id = 'info'> </ul>1
2
3
4
5
6
7
8
9
10
11
12
13
14
15
16
17const form = document.querySelector("form");
const infomation = document.querySelector('#info')
form.addEventListener('submit', (e) => {
e.preventDefault();
const username = form.elements.name;
const email = form.elements.email;
addInfo(username.value, email.value);
username.value = '';
email.value = '';
});
const addInfo = (username, email) => {
const item = document.createElement('li');
item.append(username);
item.append(`- ${email}`);
infomation.append(list);
}
- Prevent Submission
- Input and Change Events
inputevent: whenever the input value is changed, the input event is firedchangeevent: only fired when on blur(not fired when on focus)
- Event Bubbling
- For nested elements, the inner element is also a part of the outer element, thus when an event is fired on the inner element, if the outer element has an event with the same name, it will also be fired
- If you want to stop firing events on the outer event, you should add
event.stopPropagation(), then inner element's behavior will not impact outer element's behavior
Section 27 Async JavaScript
- The Call Stack
- Defeinition: the mechanism the JS interpreter uses to keep track of its place in a script that calls multiple functions
- How it works
- When a script calls a function, the interpreter adds it to the call stack and then starts carrying out the function
- Any functions that are called by that function are added to the call stack further up, and run where their calls are reached
- When the current function is finished, the interpreter takes it off the stack and resumes execution where it left off in the last code listing
- WebAPI and Single Threaded
- Single JS thread is running at most one line of JS code
- Browsers have Web APIs that are able to handle certain tasks in the background(like setTimeout or making requests)
- The JS call stack recognizes there Web API functions and passes them of the browser to take care of
- Once the browser finishes those tasks, they return and are pushed onto the call stack as a callback
- Callback Hell
- The there are multiple layers of nested callbacks, things could be confusing, this situation is often referred as the callback hell
- fakeRequest Using Callbacks and Promises
- Promise: an object representing the eventual completion or failure of an asynchronous operation
- A promise has three status: pending, fulfilled, and rejected
- When a promise is resolved, the
thenfunction if fired, when a promise is rejected, thecatchfunction is fired - Callbacks approach
1
2
3
4
5
6
7
8
9
10
11
12
13
14
15
16
17
18
19
20
21const fakeRequestCallback = (url, success, failure) => {
const delay = Math.floor(Math.random() * 500) + 500;
setTimeout(() => {
if (delay > 888) {
failure('Connection Timeout.');
} else {
success(`Here is your fake data from ${url}.`);
}
}, delay);
}
fakeRequestCallback('www.google.com/page1', (message) => {
console.log(message);
fakeRequestCallback('www.google.com/page2', (message) => {
console.log(message);
}, (message) => {
console.log(message);
});
}, (message) => {
console.log(message);
}) - Promise approach
1
2
3
4
5
6
7
8
9
10
11
12
13
14
15
16
17
18
19
20
21
22
23
24
25
26
27const fakeRequestPromise = (url) => {
return new Promise((fulfill, reject) => {
const delay = Math.floor(Math.random() * 500) + 500;
setTimeout(() => {
if (delay > 888) {
reject('Connection Timeout.');
} else {
fulfill(`Here is your fake data from ${url}.`);
}
}, delay);
});
}
fakeRequestPromise('www.google.com/page1')
.then((message) => {
console.log(message);
fakeRequestPromise('www.google.com/page2')
.then((message) => {
console.log(message);
})
.catch((message) => {
console.log(message);
})
})
.catch((message) => {
console.log(message);
});
- The magic of Promise
- Using promise allows you to avoid nested then functions and to use one single catch function
- Refactoring the above code:
1
2
3
4
5
6
7
8
9
10
11
12
13
14
15
16
17
18
19
20
21
22
23
24
25
26
27
28
29
30
31
32
33// The original nested format
fakeRequestPromise('www.google.com/page1')
.then((message) => {
console.log(message);
fakeRequestPromise('www.google.com/page2')
.then((message) => {
console.log(message);
})
.catch((message) => {
console.log(message);
})
})
.catch((message) => {
console.log(message);
});
// A simpler format after refactoring
fakeRequestPromise('www.google.com/page1')
.then((message) => {
// If the firstURL fulfills, print the messaage
console.log(message);
// We need to return a callback here
return fakeRequestPromise('www.google.com/page2');
})
.then((message) => {
// If the secondURL fulfills, print the message
console.log(message);
// You can return more fakeRequestPromise if needed
})
. catch((message) => {
// This catch function handles all rejected situations
console.log(message);
})
- Create Our Own Promise
- Example
1
2
3
4
5
6
7
8
9
10
11
12
13
14
15
16const delayedColorChange = (color, delay) => {
return new Promise((fulfill, reject) => {
setTimeout(() => {
document.body.style.backgroundColor = color;
fulfill();
}, delay);
});
}
delayedColorChange('red', 1000)
.then(() => delayedColorChange('orange', 1000))
.then(() => delayedColorChange('yellow', 1000))
.then(() => delayedColorChange('green', 1000))
.then(() => delayedColorChange('blue', 1000))
.then(() => delayedColorChange('indigo', 1000))
.then(() => delayedColorChange('violet', 1000));
- Example
- The Async Keyword
- Using keyword
asyncandawaitprovides us a newer and cleaner syntax for working with async code - The async keyword
- Async functions always return a promise
- If the function returns a value, the promise will be resolved with that value
- If the function throws and exception, the promise will be rejected
- Example
1
2
3
4
5
6
7
8
9
10
11
12
13
14
15
16const sing = async () => {
const num = Math.floor(Math.random() * 500);
if (num > 250) {
return 'Hurry, succeeded.';
} else {
throw 'Oh no, an error occured.';
}
}
sing()
.then((message) => {
console.log(message);
})
.catch ((message) => {
console.log(message);
})
- Using keyword
- The Await Keyword
- We can only use the await keyword inside of functions declared with async
- Await will pause the execution of the function, waiting for a promise to be fulfilled
- Example
1
2
3
4
5
6
7
8
9
10
11const rainbow = async () => {
await delayedColorChange('red', 1000);
await delayedColorChange('orange', 1000);
await delayedColorChange('yellow', 1000);
await delayedColorChange('green', 1000);
await delayedColorChange('blue', 1000);
await delayedColorChange('violet', 1000);
await delayedColorChange('indigo', 1000);
}
rainbow();
- Handle Errors in Async Functions
- Use try catch clause to handle errors
Section 28 AJAX and APIs
- Introduction to AJAX(Asynchronous JavaScript and XML)
- You can make requests without refreshing the page with AJAX
- JSON is a common response type
- Introduction to API(Application Programming Interface)
- It is a type of software interface, offering a service to other pieces of software
- Web API
- Introduction to JSON(JavaScript Object Notation)
- JSON is built on two structures: a collection of name/value pairs, an ordered list of values
- Key: must be double-quoted string
- Value: object, array, string, numebr, "true", "false", "null"
- Conversion:
- The returned JSON is a JSON string, we need to convert it into a JS object
- Demo
1
2
3
4
5
6let data = '{"name":"John", "age":30, "city":"New York"}';
typeof data; // string
let result = JSON.parse(data);
typeof result; // object
let stirngObj = JSON.stringfy(result)
typeof stringObj // string
- Using Postman
- Postman is an API platform for building and using APIs. Postman simplifies each step of the API lifecycle and streamlines collaboration so you can create better APIs—faster
- Http status code:
- 2xx: successful responses
- 3xx: redirection messages
- 4xx: client error responses
- Response Header: Date, Server, Set-Cookie, Content-Type, ...
- Query Strings and Headers
- We can use base URL and query string in search
- We can add key-value pair to the header to modify response
- Making XHR(XMLHttpRequest)
- The original way of sending requests via JS
- Does not supprot promises, so lots of callbacks are involved
- Example
1
2
3
4
5
6
7
8
9
10
11
12const request = new XMLHttpRequest();
request.onload = () => {
console.log('All done.');
}
request.onerror = () => {
console.log('Error');
}
request.open('GET, 'https://www.google.com/search?q=cat');
request.send();
- The Fetch API
- The newer way of making request via JS
- Supports promises
- Example
1
2
3
4
5
6
7
8
9
10
11
12
13fetch('https://www.google.com/search?q=cat')
// then is fired as long as the header of the response is catched
.then(res => {
console.log('Response waiting', res);
// this return the promise
return res.json();
})
.then(data => {
console.log('Response data', data)
})
.catch(e => {
console.log('Error');
})
- Introduction to Axios
- Axios is a library for making http requests
- Include script:
<script src="https://cdn.jsdelivr.net/npm/axios/dist/axios.min.js"></script> - Example
1
2
3
4
5
6
7axios.get('https://wwww.google.com/search?q=cat')
.then(res => {
console.log('Success', res);
})
.catch(err => {
console.log('Error', err);
})
Section 29 Prototypes, Classes and OOP
- Prototypes
- Definition: objects can have a prototype object, which acts as a template object that it inherits methods and properties from
- Get prototype object of an item
1
2
3
4
5
6
7
8
9
10
11
12
13
14
15
16
17
18
19
20
21
22
23
24
25const arr = [1,2,3];
// This is deprecated
let prototype = arr.__proto__;
// You should use this
let prototype = Object.getPrototypeOf(arr);
```
* Equivalence: `Class.prototype === Object.getPrototypeOf(classInstance)`
* The prototype of a constructor is different from the prototype of an object, the former one can be found via `Object.getPrototypeOf(Class)`, the latter one can be found via `Object.getPrototypeOf(classInstance)`
2. Factory Function
* Definition: a factory function is a function that returns a new object
* Example
```javascript
const makeColor = (r, g, b) => {
const color = {};
color.r = r;
color.g = g;
color.b = b;
color.rgb = () => {
return `rgb(${color.r}, ${color.g}, ${color.b})`;
};
color.hex = () => {
return ('#' + ((1 << 24) + (color.r << 16) + (color.g<< 8) + color.b).toString(16).slice(1));
};
return color;
};
- Constructor Function
- The
newoperator lets developers create an instance of a user-defined object type or of one of the built-in object types that has a constructor function - Example
1
2
3
4
5
6
7function Car(make, model, year) {
this.make = make;
this.model = model;
this.year = year;
}
const car1 = new Car('Eagle', 'Talon TSi', 1993); - Constructor function is better than factory function in that objects then do not have individual copy of methods, the associated methods all go into the class prototype object
- The
- Extends and Super Keywords
- Example # Section 30 Mastering the Terminal
1
2
3
4
5
6
7
8
9
10
11
12
13
14
15
16
17
18
19
20
21class Pet {
constructor(name, age) {
console.log('IN PET CONSTRUCTOR!');
this.name = name;
this.age = age;
}
eat() {
return `${this.name} is eating!`;
}
}
class Cat extends Pet {
constructor(name, age, livesLeft = 9) {
console.log('IN CAT CONSTRUCTOR!');
super(name, age);
this.livesLeft = livesLeft;
}
meow() {
return 'MEOWWWW!!';
}
}
- Example
- Introduction
- Why terminal
- Speed: develop faster using a terminal than using GUI
- Access: can give us access to ares we normally don't interact with
- Tools: many tools are installed and used via the command line
- Terminal: a text-based interface to your computer, originally a physical object, but now we use software terminals
- Shell: the program running on the terminal
- Why terminal
- Commands
ls: list files and directories in the current directory,ls -l == ll,ls -a, list all files including the hidden onepwd: writes the full pathname of the current working directorycd:cd ~: go to home directory.: current directory..: parent directory/: root directory~: home directory
mkdir dirName: make a new directory at pwd called dirNametouch fileName: make a new file at pwd called fileNameman command: show information about commandrm name: remove a file at pwd called namermdir name: remove an empty directory at pwd called namerm -rf name: recursively force to remove a directory
Section 31 Our First Brush with Node
- Introduction to Node JS
- Node.js is a JavaScript runtime built on Chrome's V8 JavaScript engine
- As an asynchronous event-driven JavaScript runtime, Node.js is designed to build scalable network applications
- What is Node Used For
- Web Servers
- Command Line Tools
- Native Apps(VSCode)
- Video Games
- Drone Software
- ...
- The Node REPL
- Exit REPL:
.exit, orCtrl + Ctwice, orCtrl + D - Ask help:
.help - window in Javascript:
global
- Exit REPL:
- Running Node Files
- Syntax:
node path/file.js: use node REPL to run a JS file from a specific path
- Syntax:
- Process and Argv
- Process object
process.version: contains the Node.js version stringprocess.release: returns an Object containing metadata related to the current releaseprocess.cwd(): returns the current working directory of the Node.js processprocess.argv: returns an array containing the command-line arguments passed when the Node.js process was launched
- Process object
- File System Module Crash Course
- Add access to the module:
const fs = require('fs'); - All file system operations have synchronous, callback, and promise-based forms
- Asynchronously creates a directory
1
2
3
4const fs = require('fs');
fs.mkdir('./Test', { recursive: true }, (err) => {
if (err) throw err;
}); - Synchronously creates a directory
1
2const fs = require('fs');
fs.mkdir('./Test'); - Asynchronously writes data to a file
1
2
3
4
5
6const fs = require('fs');
const data = new Uint8Array(Buffer.from('Hello Node.js'));
fs.writeFile('message.txt', data, (err) => {
if (err) throw err;
console.log('The file has been saved!');
}); - Synchronously writes data to a file
1
2
3const fs = require('fs');
const data = new Uint8Array(Buffer.from('Hello Node.js'));
fs.writeFile('message.txt');
- Add access to the module:
Section 32 Exploring Modules and the NPM Universe
- Working with module.exports
- Use require to access other JS files, and use module.export in one JS file to decide what can be seen from other JS files
- Example
1
2
3
4
5
6
7// in math.js
const add = (x, y) => x + y;
const square = (x) => x * x;
const PI = 3.1415926;
module.exports.add = add;
module.exports.square = square;
module.exports.PI = PI;1
2
3
4// in app.js
const math = require('./math.js'); // don't need to write .js here
console.log(math.PI);
console.log(math.square(3));1
2
3
4
5
6
7
8
9
10// simpler code in math.js
const add = (x, y) => x + y;
const square = (x) => x * x;
const PI = 3.1415926;
const math = {
add: add,
square: square,
PI: PI
};
module.exports = math;1
2
3
4
5// simpler code in app.js
const {PI, square, add} = require('./math.js');
console.log(PI);
console.log(square(3));
console.log(add(PI, 1));
- Requiring a directory
- When requiring a directory, it will look for
index.jsfile in the folder, if there is one, it uses it, if there is not one, it fails - Syntax
1
2// app.js
const folder = require('./dirName');1
2
3// index.js
module.exports.file1 = require('./dirName/file1.js');
module.exports.fileN = require('./dirName/fileN.js');
- When requiring a directory, it will look for
- Introducing to NPM
- NPM(Node Package Manager)
- NPM is really two things:
- A library of packages published by other developers that we can use for free
- A command line tool to easily install and manage those packages in our Node projects
npm install packageName: install a package called packageName in the current directory- This command will install all indispensable packages in a direcetory
called
node_modulesand a file calledpackage-lock.json - Usage of package
1
2
3
4const jokes = require('give-me-a-joke'); // just the name of the pacakge rather than the path
giveMeAJoke.getRandomDadJoke (function(joke) {
console.log(joke);
});
- This command will install all indispensable packages in a direcetory
called
- Adding Global Packages
npm install packageNameinstalls local package, which cannot be used globally, this is out of version control considerationnpm install -g packageNameinstalls package globally, which can be accessed from everywhere on your computer
- The Package.json
- Contains metadata about a package
- Include: description, license, name, version, dependencies
- Manully create package.json:
npm init
- Installing All Dependencies for a Project
- With a
package.json, you canuse two ways to install all packages in the dependencies property:- Manually install each one
- Simply run
npm install, this will automatically install all the dependencies
- With a
Section 33 Creating Servers with Express1
- Introduction to Express
- Express is a fast, unopinionated, minimalist web framework for Node.js
- Express helps us
- Start up a server to listen for requests
- Parse incoming requests
- Match those requests to particular routes
- Craft our http response and associated content
- Library v.s. framework
- When you use a library, you are in charge of the flow of the application code and you decide when to use the library
- With frameworks, the control is inverted. The framework is in charge, you are merely a participant. The framework tells you where to plug in the code
- First Express App
- Example
1
2
3
4
5
6
7
8
9
10
11
12
13const express = require('express');
const app = express();
// Ecahtime the server receives a request, this method is invoked
app.use(() => {
console.log("We got a new request!");
})
// Let the server listen to a specific port until interrupted
app.listen(9999, () => {
// here the url is localhost:9999
console.log("We are currently listening to port 9999!");
})
- Example
- The Request and Response Objects
- The express framework prepares request and response obejct for you to use
- The
reqobject represents the HTTP request and has properties for the request query string, parameters, body, HTTP headers, and so on - The
resobject represents the HTTP response that an Express app sends when it gets an HTTP request - Example
1
2
3
4
5
6
7
8
9
10
11
12const express = require('express');
const app = express();
app.use((req, res) => {
console.log("We get a new request!");
// example usage
// This appears on the server's console
console.log(req.body);
// This appears on the sender's webpage
res.send("We received your request!");
})
- Express Routing Basics
- Routing refers to determining how an application responds to a client request to a particular endpoint, which is a URI (or path) and a specific HTTP request method (GET, POST, and so on)
- Syntax:
app.method(path, handler)- app is an instance of express
- method is an HTTP request method in lowercase
- path is a path on the server, it can be a string, a string pattern, a regular expression, or an array of combinations above
- handler is the callback function executed when the route is matched
- Example:
1
2
3
4
5
6
7
8
9
10
11
12
13
14// So this method is only invoked when the request is send to host:port/intro
app.get('/intro', function (req, res) {
// We can have only one send method
res.send('Hello World!')
});
// Pattern match: use :test to match app child webpages under /
app.use('/:test', (req, res) => {
res.send("We received your request!");
// this variable must have name test
const {test} = req.params;
// req.get('host') returns localhost:port, test returns the pattern in the request url
res.send(`This is ${req.get('host')}/${test}`);
});
- Working with query string
- There is query property in the request object, so you don't need to use pattern match for query string
- Example
1
2
3
4
5
6
7
8const express = require('express');
const app = express();
app.get('/search', (req, res) => {
// Name of the object must be the same as the key in the query string
const {name, id} = req.query;
res.send(`Searching for name: ${name} with id: ${id}`);
});
- Auto-Restart with Nodemon
- If you change the code with the server, you need to restart the server in order for the change to apply
- With Nodemon package, your server will automatically restart when there are changes in the code
- Syntax
- Installation:
npm install -g nodemon - Usage:
nodemon [node app name]instead ofnode [node app name]
- Installation:
Section 34 Creating Dynamic HTML with Templating
- What is Templating
- Templating allows us to define a preset pattern for a webpage, that we can dynamically modify
- EJS(Embedded JavaScript templating) is the templating we use
- Configuring Express for EJS
- Install ejs:
npm install ejs - Use ejs in JS:
app.set('view engine', 'ejs'); - Set Views Directory
- Express assume all templates are located inside
working_directory/Viewsdirectory - Set Views path:
app.set('')
- Express assume all templates are located inside
- Example
1
2
3
4
5
6
7
8
9
10
11
12
13
14
15const express = require('express');
const path = require('path');
const app = express();
app.set('view engine', 'ejs');
app.set('views', path.join(__dirname, '/views'));
app.get('/', (req, res) => {
// send the page back
res.render('home.ejs');
});
app.listen(9999, () => {
console.log("Listening on port 9999");
});
- Install ejs:
- EJS Syntax
- Tags
<%'Scriptlet' tag, for control-flow, no output<%_'Whitespace Slurping' Scriptlet tag, strips all whitespace before it<%=Outputs the value into the template (HTML escaped)<%-Outputs the unescaped value into the template<%#Comment tag, no execution, no output<%%Outputs a literal '<%'%>Plain ending tag-%>Trim-mode ('newline slurp') tag, trims following newline_%>'Whitespace Slurping' ending tag, removes all whitespace after it
- Tags
- Passing Data to EJS
- You should make your template as simple as possible, so you should pass data to templates instead of establishing logics inside the ejs file
- Example
1
2
3
4
5
6// In the index.js file
app.get('/random', (req, res) => {
let num = Math.floor(Math.random() * 10 + 1);
// The second object {rand: num} will let ejs receive a variable called rand whose value is num
res.render('random.ejs', {rand: num});
})1
2<!-- In the random.ejs -->
<h1> Your random number is <%= rand%>! </h1>
- Conditionals in EJS
- Use
<%=to calcualte variable value, use<%to execute JS code - Example
1
2
3
4app.get('/random', (req, res) => {
let num = Math.floor(Math.random() * 10) + 1;
res.render('random.ejs', { rand: num });
});1
2
3
4
5
6
7
8
9
10
11<h1>Your random number is
<%= rand %>
</h1>
<% if (rand % 2 === 0) { %>
<h2>This is an even number!</h2>
<% } else { %>
<h2>This is an odd number!</h2>
<% } %>
<h3>
<%= rand % 2 === 0 ? 'Even' : 'ODD' %>
</h3>
- Use
- Loops in EJS
- Example
1
2
3
4app.get('/loop', (req, res) => {
const arr = [1, 2, 3, 4, 5];
res.render('loop.ejs', {arr: arr});
})1
2
3
4
5<% for (let num of arr) { %>
<li>
<%= num%>
</li>
<% } %>
- Example
- Serving Static Assets in Express
- Static file v.s. dynamic file
- Static files are sent to the client without server's intervention, such as images, CSS files, and JS files
- Dynamic files are parsed by the server which renders a new set of data based on the dynamic file template
- Serve static files
- Syntax:
app.use(express.static('dirName')), then the static files are located in a directory called dirName
- Syntax:
- Static file v.s. dynamic file
- Bootstrap and Express
- Downlaod the associated bootstrap css files and js files and jquery dependencies, put them in the static directory, include them in your html files
Section 35 Defining RESTful Routes
- Get v.s. Post Requests
- Get request
- Used to retrieve information
- Data is sent via query string
- Information is plainly visible in the URL
- Limited amount data can be sent
- Post request
- Used to post data to the server
- Used to write/create/update
- Data is sent via request body, not a query string
- Can send any sort of data
- Get request
- Parsing the Request Body
- Example
1
2
3
4
5
6
7
8
9
10
11var express = require('express');
var app = express();
app.use(express.json()); // for parsing application/json
app.use(express.urlencoded({ extended: true })); // for parsing application/x-www-form-urlencoded
app.post('/profile', function (req, res, next) {
console.log(req.body);
res.json(req.body);
})
- Example
- Introduction to REST
- REST(representational state transfer), it is a software architectural style that was created to guide the design and development of the architecture for the World Wide Web
- REST defines a set of constraints for how the architecture of an Internet-scale distributed hypermedia system should behave
- A web API that obeys the REST constraints is informally described as RESTful
- To put it simpler, REST describes how servers interacts with clients, the RESTful API of server uses HTTP verbs(GET/POST/DELETE/PATCH, etc) and URL to describe operations
- RESTful Comments Overview
- Example
1
2
3
4
5GET /comments // show all comments
POST /comments // create a new comment
GET /comments/:id // get one comment using id
PATCH /comments/:id // update one comment
DELETE /comments/:id // delete one comment - Other Staff
res.redirect('urlString')- The UUID package
- UUID(Universally unique identifier) is a 128-bit label used for information in computer systems
- Installation:
npm install uuid - Usage
1
2import {v4 as uuidv4} from 'uuid'
uuidv4(); // this generates an UUID
- Example
Section 36 MongoDB
- Introduction to Databases
- Why database
- DB can handle large amounts of data efficiently and store it compactly
- They provide tools for easy insertions, querying, and updating of data
- They generally offer security features and control over access to data
- They generally scale well
- Why database
- SQL vs NOSQL Databases
- SQL database: MySQL, Postgres, SQLite, Oracle, MS SQL Server
- NoSQL database: MongoDB, Couch DB, Neo4j, Cassandra, Redis
- Why MongoDB
- Mongo is commonly used with Node and Express(MEAN: MongoDB, Express, Angular, Nodejs, MERN: MongoDB, Express, React, Nodejs, MEVN: MongoDB, Express, Vue, Nodejs)
- Easy to get started with, particularly well with JavaScript
- The Mongo Shell
- Operations
mongo: connect to mongo dbhelp: show methods- You can just use JavaScript in mongo db
show databasesorshow dbs: show all nonempty databases in MongoDB, the default database is called testuse databaseName: switch to a database, if it does not exist, create it first and then switch to itexit: close the shell
- Operations
- Introduction to BSON
- Problems of JSON
- JSON is a text-based format, and text parsing is very slow
- JSON's readable format is far from space-efficient
- JSON only supports a limited number of basic data types
- BSON
- Binary JSON
- Lightweight: encodes type and length information, which allows it to be parsed much more quickly
- Traversable: BSON is designed to be traversed easily
- More data types: BSON has been extended to add some optional non-JSON-native data types
- MongoDB stores data in BSON both internally and over the network
- Problems of JSON
- MongoDB CRUD
- A record in MongoDB is a document, which is a data structure composed of field and value pairs. MongoDB documents are similar to JSON objects. The values of fields may include other documents, arrays, and arrays of documents
- MongoDB stores documents in collections. Collections are analogous to tables in relational databases.
- Inserting with Mongo(Create)
- Syntax:
db.collection.insertOne(): insert one document into a collectiondb.collection.insertMany(): insert multiple documents into a collection, use an array to hold the documents
- Example
1
2
3use animalShelter; // Switch to db, if db not exists, create it first
db.dogs.insertOne({name: "Charlie", age: 3, aggressive: true}); // Insert an item into the collection called dogs
// MongoDB will automaticallly generate id with type ObjectId for each inserted item
- Syntax:
- Finding with Mongo(Read)
- Syntax:
db.collection.find() - Example
1
2db.dogs.insertMany([{name: "Wyatt", age: 4, aggressive: false}, {name: "Tonya", age: 6, aggressive: true}]);
db.dogs.find({age: {$lt: 5}}).limit(1); // You can add query filter and cursor modifier to select output documents
- Syntax:
- Updating with Mongo(Update)
- Syntax:
db.collection.updateOne(): update one documentdb.collection.updateMany(): update multiple documentsdb.collection.replaceOne(): completely replace one document
- Example
1
db.dogs.updateOne({name: "Wyatt"}, {$set: {age: 4}}); // syntax {$set: {field: value}}, you can set multiple field-value pairs, when a field does not exist, it simply adds such field to that item
- Syntax:
- Deleting with Mongo(Delete)
- Syntax:
db.collection.deleteOne(): delete one documentdb.collection.deleteMany(): delete multiple documents
- Example
1
db.dogs.deleteMany({}); // Delete all documents in the dog collection
- Syntax:
- There are also other useful operators
- Query Selectors: comparison, logical, element, evaluation, geospatial, array, bitwise,
- Projection Operators
- Miscellaneous Operators
Section 37 Connecting MongoDB with Mongoose
- What is Mongoose
- We can use Mongoose to connect to MongoDB, it's an elegant mongodb object modeling for node.js
- Mongoose is an ODM(Object Document Mapper, for relational databse, we use ORM, Object Relation Mapper), it maps documents coming from a database into usable JavaScript objects
- Connect Mongoose to Mongo
- Example
1
2
3const mongoose = require('mongoose');
mongoose.connect('mongodb://localhost:27017/test') // The db here is the default test, you can change to your db
.catch(err => console.log(err));
- Example
- First Mongoose Model
- Everything in Mongoose starts with a Schema. Each schema maps to a MongoDB collection and defines the shape of the documents within that collection
- Models constructors compiled from Schema definitions. An instance of a model is called a document. Models are responsible for creating and reading documents from the underlying MongoDB database
- Example
1
2
3
4
5
6
7
8
9
10
11
12
13const mongoose = require('mongoose');
mongoose.connect('mongodb://localhost:27017/movieDB');
const movieSchema = new mongoose.Schema({
titlle: String,
year: Number,
score: Number,
rating: String
});
const Movie = mongoose.model('Movie', movieSchema); // The collection name in db is movies(lowercase, plural form of model name)
const amadeus = new Movie({title: "Amadeus", year: 1986, score: 9.2, rating: "R"});
amadeus.save(); // The save method actually saves the instance to smongoDB
// use Movie.insertMany() to insert multiple documents
- Some API
Model.insertMany()Model.find()Model.findById(),Model.findByIdAndDelete(),Model.findByIdAndRemove(),Model.findByIdAndUpdate(), use the delete method rather the remove method unless you have a good reason not toModel.findOne(),Model.findOneAndDelete(),Model.findOneAndRemove(),Model.findOneAndReplace(),Model.findOneAndUpdate(), use the delete method rather the remove method unless you have a good reason not to
- Mongoose Scheme Validations
- You can add validations to a schema, there are a lot of validations you can add
- Add validations to schema
1
2
3
4
5
6
7
8
9
10
11
12
13
14
15
16
17
18
19
20
21
22
23
24
25
26
27const productSchema = new mongoose.Schema({
name: {
type: String,
maxlength: 20, // the max length of this field is 20 characters
required: true // if this field is not provided, there will be an error
},
year: {
type: Number,
required: true
},
price: {
type: Number,
required: true
},
onsale: {
type: Boolean,
default: false // if this field is not provided, it will use the default value
},
size: {
type: String,
enum: ['S', 'M', 'L'] // the size can only be these three values
}
});
const Product = mongoose.model('Product', productSchema);
const bike = new Product({name: 'Mountain Bike', price: 500, year: 2021});
- Mongoose Validation Errors
- You can add error message for validations
1
2
3
4
5
6
7const productSchema = new mongoolse.Schema({
price: {
type: Number,
// use an array, the first element is the value, the second element is the error message
min: [0, "The price must be positive"]
}
})
- You can add error message for validations
- Model Instance Methods
- Instances of Models are documents. Documents have many of their own built-in instance methods
- Example
1
2
3
4
5
6
7
8
9
10
11// Define a schema
const productSchema = new Schema({
name: String,
type: String
});
// Assign a function to the "methods" object of our animalSchema
// Notice, you should use traditional function syntax here rather
// than the arrow function syntax, because the method is bounded with an instance
productSchema.methods.findSimilarTypes = function(cb) {
return mongoose.model('Product').find({ type: this.type }, cb);
};
- Model Static Methods
- Example
1
2
3
4
5
6
7
8
9
10// Assign a function to the "statics" object of our animalSchema
productSchema.statics.findByName = function(name) {
return this.find({ name: new RegExp(name, 'i') });
};
// Or, equivalently, you can call `animalSchema.static()`.
productSchema.static('findByBreed', function(breed) { return this.find({ breed }); });
const Product = mongoose.model('Product', productSchema);
let products = await Product.findByName('fido');
products = animals.concat(await Product.findByBreed('Poodle'));
- Example
- Mongoose Virtuals
- Virtuals are document properties that you can get and set but that do not get persisted to MongoDB
- Example
1
2
3productSchema.virtual('fullName').get(function() {
return this.name.first + ' ' + this.name.last;
});
- Defining Mongoose Middleware
- Middleware (also called pre and post hooks) are functions which are passed control during execution of asynchronous functions
- Middleware is specified on the schema level and is useful for writing plugins
- Pre Middleware
1
2
3
4
5const schema = new Schema(..);
schema.pre('save', function(next) {
// do stuff
next();
}); - Post Middleware # Section 38 MongoDB with Express
1
2
3schema.post('init', function(doc) {
console.log('%s has been initialized from the db', doc._id);
});
- Express with MongoDB Basic Setup
- Example
1
2
3
4
5
6
7
8
9
10
11
12
13
14
15
16
17
18
19
20const express = require("express");
const app = express();
const path = require("path");
const mongoose = require("mongoose");
app.set("views", path.join(__dirname, "views"));
app.set("view engine", "ejs");
mongoose.connect('mongodb://localhost:27017/test')
.then(() => {
console.log("Connection Open!!")
})
.catch(err => {
console.log("Oh no error!!");
console.log(err);
});
app.listen(3000, () => {
console.log("App is listening on port 3000!");
});
- Example
- FarmStand
- Put your model in separate files inside the model directory, don't put them simply inside the index.js file
res.render("./products/index.ejs");render a pageres.render("./products/index.ejs", {products});render a page which has access to products, you should useasync (req, res)andawait(e.g.const product = await Product.findById(id))- Use post request with forms to insert new products, in the post
request route, you should add redirection statement(e.g.
res.redirect(/products/${newProduct.id});) - You cannot set post request when updating documents, you should use
put request instead.
1
2
3
4
5// In index.js
const methodOverride = require('method-override');
app.use(methodOverride("_method"));1
2
3<!-- In edit.ejs -->
<!-- Add ?_method=PUT to form action property-->
<form action="/products/<%= product._id %>?_method=PUT" method="POST">
Section 39 YelpCamp: Campgrounds CRUD
- Put and Post
- Put requests are idempotent, post requests are not
- Use put to create or update a resource, use post to modify and update a resource
- Use method-override
- Installation:
npm install method-override - Usage
1
2const methodOverride = require('method-override');
app.use(methodOverride('_method'));1
2
3
4<!--This form will send put request instead of post request-->
<form action="/url?_method=PUT" method="POST">
<button>Submit</button>
</form>
- Installation:
- Response
res.render(view): Renders a view and sends the rendered HTML string to the clientres.redirect(URL): Redirects to the URL derived from the specified path, with specified status, a positive integer that corresponds to an HTTP status code . If not specified, status defaults to “302 “Found”
Section 40 Middleware: The Key to Express
- Intro to Express Middleware
- Express middlewares are functions that run during the request/responsee lifecycle
- Middleware has access to the request and response objects
- Middleware can end the HTTP request by sending back a response with
methods like
res.send(), or middlewares can be chained together by callingnext()
- Using Morgan - Logger Middleware
- Morgan allows you to create a new morgan logger middleware function using the given format and options, whenever there is a request to the app, morgan will login a formatted string in the console
- Installation:
npm install morgan - Example
1
2// Using a predefined format string
morgan('tiny')
- Define a Middleware
app.use((req, res, next) => {})- You should include the
next()method in your middleware if you want to execute the next middleware that follows the current one
- Set Up a 404 Route
- A 404 Route example
1
2
3
4app.use(function (err, req, res, next) {
console.error(err.stack)
res.status(404).send("Not Found!");
})
- A 404 Route example
- Set Up a Password Middleware
- You can use your middleware to interact with database to validate if the input password is valid
- It's more appropriate to use post or get instead of use when you want only requests to some specific path can invoke some middleware
Section 41 YelpCamp: Adding Basic Styles
- A New EJS Tool for Layouts
- Installation:
npm install ejs-mate - Usage
1
2
3
4
5
6
7
8
9
10
11
12<!-- Suppose this is the template.ejs -->
<html>
<head>
<title>It's <%= who %></title>
</head>
<body>
<section>
<%- body -%>
</section>
</body>
</html>1
2
3
4<!-- Suppose this is in the index.ejs -->
<!-- Notice the path in the layout function should be relative path from template.ejs to index.ejs -->
<% layout('template') -%>
<h1>I am the <%= what %> template</h1>1
2
3
4
5
6
7
8
9app.get("/",
async (req, res, next) => {
try {
res.render("index", {who: me}); // Then the result will insert the index.ejs into the template.ejs template at <%- body -%>, and return that result ejs file as index.ejs
} catch (error) {
next(error);
}
}
)
- Installation:
- Partials
- Example
1
2
3
4
5
6
7
8
9
10
11
12
13
14
15
16
17<!-- Suppose this is inside the nav.ejs -->
<nav class="navbar sticky-top navbar-expand-lg navbar-dark bg-dark">
<div class="container-fluid">
<a class="navbar-brand" href="#">Navbar</a>
<button class="navbar-toggler" type="button" data-bs-toggle="collapse" data-bs-target="#navbarNavAltMarkup"
aria-controls="navbarNavAltMarkup" aria-expanded="false" aria-label="Toggle navigation">
<span class="navbar-toggler-icon"></span>
</button>
<div class="collapse navbar-collapse" id="navbarNavAltMarkup">
<div class="navbar-nav">
<a class="nav-link active" aria-current="page" href="/">Home</a>
<a class="nav-link" href="/campgrounds">Campgrounds</a>
<a class="nav-link" href="/campgrounds/new">Add a campground</a>
</div>
</div>
</div>
</nav>1
2
3<!-- Suppose this is inside the template.ejs -->
<!-- The relative path is the path from template.ejs to nav.ejs -->
<%- include("./nav.ejs") %> - Make the footer at the bottom of the page in Bootstrap
# Section 42 Handle Errrors in Express App
1
2
3
4
5
6
7<body class="d-flex flex-column vh-100">
<footer class="mt-auto">
</footer>
</body>
- Example
- Express's built-int Error Handler
- Express comes with a built-in error handler that takes care of any errors that might be encountered in the app. This default error-handling middleware function is added at the end of the middleware function stack
- The res.statusCode is set from err.status (or err.statusCode). If this value is outside the 4xx or 5xx range, it will be set to 500
- The res.statusMessage is set according to the status code
- The body will be the HTML of the status code message when in production environment, otherwise will be err.stack
- Any headers specified in an err.headers object
- A basic error handler
1
2
3
4
5
6
7
8
9
10
11
12
13
14
15
16
17
18
19app.use( (err, req, res, next) => {
console.log("**************************");
console.log(err);
console.log("**************************");
res.status(err.status || 500);
next(err);
});
````
2. Custom Error Class
* Example
```javascript
class MyError extends Error {
constructor (message, status) {
super();
this.message = message;
this.status = status;
}
}
module.exports = MyError;
- Handle Async Errors
- Test